DocuPen™ Operating Manual 04/02/10 DOCUPORT THE PORTABLE IMAGING COMPANY
Legal and Other Notices All contents of this publication are subject to change without notice. No part of this publication may be reproduced or transmitted in any form Or by any means, electronic or mechanical, for any purpose, without the Express prior written permission of Docuport Incorporated. Docuport makes no representations or warranties regarding any damages, or benefit expected by using this unit lawfully, or any request from a third person, which are caused by the inappropriate use of this unit.
Contents INTRODUCTION................................................................................... 5 Check the Content………………………………………….......... 5 DocuPen™ Overview…………………………………………..... 6 Pen Scanner Power Button…………………………………....... 6 LED Indicator Panel…………………………………………....... 7 GETTING STARTED ............................................................................ 8 Inserting the Batteries……………………………………………. 8 Changing the Batteries…………………………………………… 9 About the Battery Life……………………………………………..
FREQUENTLY ASKED QUESTIONS................................................ 31 What is the Capacity of the Pen’s Memory Bank?.............. LED Lights Do Not Turn on?................................................ Images are Not Readable?.................................................. All LED Lights Are Flashing?............................................... Do I need a Computer to Scan?.......................................... How are the Scanned Images handled?.............................
Introduction Thank you for purchasing the DocuPen™ Portable Scanner. This portable scanner functions as a quick and simple tool that can be taken anywhere to swipe over a smooth flat clean surface to capture black and white images. This manual provides instructions for scanning documents with the DocuPen™ and downloading the scanned images to your PC. Please read these instructions carefully to obtain optimum performance and longer service life from the unit. Retain this manual for future reference.
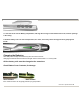
DocuPen™ Overview LED Indicators Power Button Battery Cover Rollers Connector Pen Scanner Power Button • Press one time to turn the DocuPen™ on in Standard scan mode (200x100 dpi). • Press two times to turn the DocuPen™ on and put the pen in Hi Resolution scan mode (200x200 dpi). • Press to respond to prompts when downloading or erasing the pen’s memory bank.
LED Indicators The 4 LED indicators at the top of the DocuPen™ from left to right indicate the following: LED LIGHTS LED #1 Condition Processor On/Off and Scan Speed Too Fast When you press the DocuPen™ power button, this red light turns on, & also the #2, & #3 LED indicating that the DocuPen™ is ready for use. This light also flashes if your scan speed is too fast.
Getting Started Inserting the Batteries The factory has left the cover in position but not locked in place, to allow easier battery loading. Therefore simply push forward & lift up at the narrow end. The DocuPen™ uses 4 (four) 1.55v silver oxide high drain coin cell batteries included in the package. The recommended battery is Energizer 389VP (SR1130W). 1.
3. Lower the Cover over the Battery compartment, and align the four legs on the bottom of the cover, with the openings in the casing. 4. Slide the battery cover into the closed position, till it clicks, and is fully closed. Firmly push while grasping with thumb. Changing the Batteries Note that you can change the batteries any time the unit is turned off. Changing the batteries does not affect the images stored in the DocuPen™ ’s memory bank. All four battery cells must be changed at the same time.
About the Battery Life Typical battery life depends on several factors including scan duration, scan resolution, and type of service. The battery life under normal service is typically 200 document pages at 100 dpi or 100 document pages at 200 dpi (both scanning 8.5”x11” pages. (Based on intermittent use over several weeks). The battery life under continuous use service involves two full drain cycles of 60 pages at 100 dpi or 30 pages at 200 dpi per cycle.
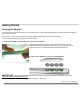
Points to Remember Before You Scan To obtain the best scan results, note the following: The document you scan must be well supported on a smooth flat, clean, & stable surface. It is recommended that you hold the top of the document with one hand while you scan with the other. Hold document Hold the Scanner flat, Do Not tilt Typically scanning from top of document down 1. Place your document on a smooth, flat, clean surface. 2.
Scanning 4. Slowly roll the DocuPen™ down across the area you want to scan. The LEDs activate, and the unit begins scanning as soon as you start moving the pen. When you stop moving the pen, the LEDs shut off and scanning stops. Apply even pressure, in the center of the scanner to allow the rollers to rotate smoothly down the document. When you stop scanning the image is saved to the pen’s internal flash memory and the DocuPen™ power turns off.
Additional Scanning Tips What you scan is what you get. The DocuPen™ is sensitive to changes in direction and scan speed and records every movement you make. The more uniform your scan swipe, the better your scanned image results. This may take a little practice at first. Your entire scan swipe motion must be sooth and uniform. Scanning too quickly or abruptly changing acceleration causes the RED LED to flash, reminding you to reduce your scanning speed.
Additional Scanning Tips Continued For better control over the DocuPen™ ’s movement, it is recommended that you detach the cable before you scan. During Scanning better control without cable… When scanning books or bound pages, it may be easier to scan in landscape mode across the page. This will follow the natural curve better. Images can be turned with the Imaging Software, within Windows, or Paperport. Beware of and avoid staples, and paper clips.
Installing the DocuPen™ Software The DocuPen™ includes a proprietary TWAIN scan driver on the included CD. TWAIN is an industry standard for software that controls optical input devices such as scanners and video capture interface cards. TWAIN support allows the DocuPen™ to be controlled from your PC scanner or imaging software. After installation, the DocuPen™ driver is made available to your Windows TWAIN-compatible applications. Such as Windows Imaging, or PaperPort ® .
8. After reading and agreeing to the terms of the DocuPen™ Software License Agreement, click the YES button to continue. 9. You will be prompted to enter registration information. 10. Then click the FINISH button to complete the Pen Twain installation. 11. The Prolific USB Driver will load next. 12. Simply follow on screen instructions. 13. Remember to remove USB Cable if plugged in. 14.
Installing the Paperport® SE 8.0 Software 1. The final software to load is the Paperport® SE 8.0, simply follow on screen instructions to proceed. This is required under Windows XP 2. Opening pop-up window. 3.Welcome ready to install window. 4. License Agreement. 5. User information required. 6. Installation Set-up. 7. Set-up Ready to Install.
8. Registration window. 9. Installation complete. 10. Restart required. Once your computer is restarted, if you have a USB port you can safely plug in the USB cable. The Serial cable can be plugged in at any time. You should have a brief pop-up message from the Hardware Wizard. WINDOWS SHOULD SELF INSTALL THE DRIVERS, IF NOT REFER TO THE TROUBLESHOOTING SECTION PAGE 37 You can now start the Imaging program by Kodak®, or the PaperPort ® SE 8.
Downloading All images of the documents you scan are maintained in the DocuPen™ ’s flash memory bank. After downloading the memory bank to your computer, you can view and manage the individual images using any TWAIN-compatible imaging application. When you download the DocuPen™ ’s memory bank to your computer, you overwrite the existing image file created from the previous download.
To download using Windows 98/2000/ME/ with Kodak Imaging: 1. 2. Open the Imaging for Windows application, which is included with all versions of Windows 95 and later. For Windows XP, please use the PaperPort ® SE 8.0 OCR software. Generally, the Imaging command can be found under the Windows. Desktop Start, Programs Accessories menu. Choose the Imaging command to open the Imaging application Window that applies to your operating system.
3. From the list of TWAIN-compliant scanners, select PenTwain, and click the OK button. Depending on how many other Twain compliant devices you may have only one, or more. You must select PenTwain source when you are using the DocuPen™ scanner .If you have used another device prior, then that device will remain default till you reselect PenTwain device. This is only the case if you have multiple scanners. If you only have DocuPen™ as a scanner then it will remain default, until another device is added.
4. From the Imaging File menu, choose the Acquire Image (Win 2000) Scan New (Win 98) command. Windows 2000 says Acquire Image 5. Windows 98 says Scan New Clicking either will open the Pen Scanner Control window, giving you the opportunity to view and manage your scanned images. Download Images 6. To download the scanner's memory bank, choose the File Download Bank command or click the download icon.
A message displays prompting you to press the DocuPen™ scanner power button. 7. In response to the prompt, press the DocuPen™ power button, FIRST and Immediately AFTER click the OK button in the prompt window. If you miss the timing you only have 3-4 seconds you may encounter an error message such as; No problem, simply press the DocuPen™ power button and Immediately AFTER click the Retry button in the prompt window. Otherwise the DocuPen™ memory bank transfers, & downloads to your computer.
After the download is complete, thumbnail images of all scanned pages display in the Pen Scanner Control window. Note that the number of scanned image pages displays in the status bar of the Pen Scanner Control window. Viewing Images To view an image, simply click on the image thumbnail in the Pen Scanner Control window and click the OK button. The image displays in the Imaging application window.
To download the Scanned Images Using Win XP & PaperPort® SE 8.0 1. You must have already loaded the software during installation. 2. Open PaperPort ® SE 8.0 & Select source by clicking on Scan. 3. The Pen Twain is the source for this application. You may have more than one source, so Pen Twain must be selected when using the DocuPen™.
4. To open the Twain Penscanner Control window click on scan. 5. Click on the download icon. 6. Follow the onscreen instructions same as those on page 23. 7. Once the image(s) download, Click OK or select all (multiple images.) 1. The image(s) are loaded to your desktop area. Select the image(s) and each can be run under all the applications that the software has detected such as Word, or Excel, etc. 2. At this point you can run the OCR, as you require for a single or multiple page document. 3.
Saving Images in PaperPort® SE 8.0 You can save scanned images to a separate file on your PC in either of the following ways: From the PaperPort Desktop Window: Click on one or more thumbnail images in the Desktop window, and choose the window’s File, Save As, command. In the standard Windows Save As dialog box, define the image file name and destination folder. Then click the Save button.
Saving Images in Windows's Imaging You can save scanned images to a separate file on your PC in either of the following ways: From the Imaging Control Window: Click on one or more thumbnail images in the Pen Scanner Control window, and choose the window’s File, Save As, command. In the standard Windows Save As dialog box, define the image file name and destination folder. Then click the Save button.
Erasing the DocuPen™ Memory Bank After you have save the desired scanned image files on your hard disk, it is recommended that you empty the DocuPen™ ’s memory bank. By doing so, you ensure maximum storage capacity and optimum scanning speed. To erase the DocuPen™ memory bank: 1. Choose the Acquire Image (Win 2000 ) Scan New (Win 98) command. If you are running under Windows XP or using PaperPort ® SE 8.0. then simply click scan. Windows 2000 Acquire Image Windows 98 Scan New 2. PaperPort ® SE 8.0.
5. A prompt warns you that erasing the memory bank will clear all scanned images from the DocuPen™ ’s memory. 6. Click on Yes a second pop-up prompts you to erase. Press the DocuPen™ power button FIRST, and then click the OK button in the window within 3-4 7. seconds. 8. The DocuPen™ memory bank will be erased. NOTE: The Erase Bank command erases only the DocuPen™ memory bank. The temporary image file from the previous download still exists on your computer’s hard drive.
Frequently Asked Questions What is the Capacity of the Pen’s Memory Bank? The number of pages that can be stored in the memory bank depends greatly on the image text, graphics, and scanning resolution. Note that documents with heavy graphics and text consume more memory than documents with no graphics and light text. The table below estimates the number of pages that can be maintained in the memory bank before you must download the images.
Frequently Asked Questions How Are the Scanned Images Handled? Every time you scan a document, the scanned image is added to the DocuPen™ ’s internal flash memory bank. The number of scanned images that can be maintained in the memory bank depends on the complexity of the scanned documents. (Refer to the section Capacity of Pen’s Memory Bank page 31) The image file is downloaded as one whole file. The images, or pages can after downloading be separated or edited individually.
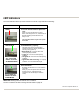
Frequently Asked Questions What is a Good Scanned Image? Good scan sample DocuPen™ Operation Manual 33
Frequently Asked Questions Why is part of image missing? You have stopped moving scanning or the roller was not in contact with the document. If you stop even momentarily, the scanner stops scanning, and image is incomplete. You will have to re-scan.
Frequently Asked Questions Why is image compressed? Your scan was too fast. Text & image are compressed.
Frequently Asked Questions Why is image skewed? The scan was twisted to one side, try practice scanning more straightly.
Troubleshooting Cannot Connect to the Penscanner PenTwain message when trying to Download, or Erase: 1. Ensure cables fully inserted. The black plastic plug should touch the silver casing. It is also possible that you missed the timing sequence, ie; first 3 LED’s are on for 4 seconds during power on. 2. Ensure that ports are working. Both the Serial (com ports) & the USB ports should be checked in the Windows Device Manager. You can also try switching ports from auto to manual.
Troubleshooting Blinking LED Lights Indicate Error Conditions LED lights do not turn on at all. Make sure you have installed the batteries correctly. Check battery contacts page 43. Led Lights on, but no scanner light. Batteries are weak, replace with 4 new batteries.
Troubleshooting Software Installation Error Messages The USB driver failed to install properly. OK, Cancel USB either not present, or configured properly. Verify in Device Manager the USB configuration, if present. If you see a yellow exclamation mark, review properties, & update driver. Try reinstalling the USB Prolific 2303 Driver with the included CD. For more detailed help contact TOLL FREE 1-877-DOCUPEN HELPLINE or email via support@docuport.
Troubleshooting Software Installation Error Messages Win 2000/XP This message may appear during an installation with Windows 2000 or Windows XP if you are not logged on as Administrator but as a Guest or other name. 1. You must be log on as Administrator. 2. Cancel installation & Verify that no programs have been installed. Remove CD 3. If programs have been installed they must be un-installed with the Windows Control Panel, Add/Remove Program. 4. Restart computer, & Log on as Administrator. 5.
Troubleshooting Software Installation Messages ScanSoft® This may appear if a previous installation has been detected. 1. You can choose to continue, but it is best if you remove older versions. 2. To remove programs, open Control Panel, Add/Remove Programs, & remove. 3. You may be required to restart your computer. 4. Once restarted, open & close CD tray to start-up.
Troubleshooting Download Failed Error Messages You may also see the following error messages during a failed download. These can occur if the batteries are weak. 1. 2. Verify battery polarity. 3. Check battery contacts. 4. Download as normal. 5. Delete Memory Bank. 6. Scan as Normal Install 4 new batteries.
Troubleshooting Lost Calibration Message This message may appear during an erase operation when the power is low, or interrupted. This can happen due to inferior batteries, or damaged battery cover contacts. 1. 2. 3. Good contact Install 4 new batteries. Verify battery polarity. Check battery contacts. Bent contact If the contact is bent it can be gently pushed up to good position. 4. Click OK Proceed to erase memory as detailed on pages 29 & 30. 5. You can also restore buy attempting to download.
Troubleshooting Download Failed Messages You may also see the following messages during a failed download. This can occur when the batteries are weak, or another application is running. Avoid multiple applications running. 1. 2. Verify battery polarity. 3. Check battery contacts. 2. Download as normal. Install 4 new batteries. This is normal, it means there is nothing to download, Memory Bank, has no scans stored, they have already been erased, and no scans have been done since. 1. 2. 3.
Appendix A. DocuPen™ Specifications SCANNING Resolution - Standard mode 200x100 dpi; or Fine mode 200x200 dpi Scan speed - 4-8 seconds per 8.5”x11” page (varies depending on text, graphics, and scanning resolution) Scan width - 8.
B. Proper Handling and Safe Use Avoid bending or dropping the DocuPen™ unit. Do not scan over sharp objects such as staples, or paper clips Do not store the unit in high, or very low temperatures, or humid or dusty places. Do not place or drag the scanner lens down on a hard abrasive surface. Do not tap the unit to unload the batteries. If you drop the unit in water or get water inside it, unload the batteries immediately and contact your Docuport representative.
Warranty Docuport Inc. warrants that this product (but not the included batteries) is free from defects in materials and function at the time of original purchase and for a period of 90 days from that date. If, during the warranty period, any defect in the product arises due to a deficiency in materials or function, Docuport Inc. pledges to, at Docuport Inc.’s option, either to repair or replace the defective product with the same or an equivalent model.
Warranty Card 90 day Limited Warranty Certificate Docuport Incorporated The Portable Imaging Company 555 Rene Levesque Montreal Quebec H2Z 1B1 1-877-DOCUPEN (362-8736) www.docuport.com www.DocuPen.