
User's Manual

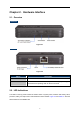

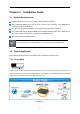
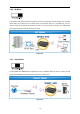
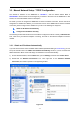

Table Of Contents
- Chapter 1. Product Introduction
- Chapter 2. Hardware Interface
- Chapter 3. Installation Guide
- Chapter 4. Configuration in Web UI
- Chapter 5. Quick Connection to a Wireless Network
- Appendix
- EC Declaration of Conformity

User’s Manual of WNRT-300
-14-
3.4. Hardware Installation
Please follow the instruction below to build the wireless network connection between WNRT-300 and
your computers.
Before you start using the WNRT-300, please follow the procedures below to
install and charge the battery.
Step 1: Remove the battery cover, and insert the attached battery into the slot. Then replace the
cover back.
Step 2: Charge the battery by the attached power adapter and USB cable. The red LED will be lit
up.
Step 3: The battery needs to be charged for 8 hours in the first time. When the battery is fully
charged, the red LED will be off.
Before installing the WNRT-300, make sure your PC is connected to the Internet through the
broadband service successfully at this moment. If there is any problem, please contact your local ISP.
After that, please install the WNRT-300 according to the following steps.
Step 1. Please shift the hardware switch on the WNRT-300 to the operation mode you want to use,
and follow the figure below to install it for the purpose of configuration.