802.
Table of Contents 1. Package Contents.................................................. 3 2. Physical Introduction.............................................. 4 3. Hardware Installation............................................. 5 4. Web UI Configuration........................................... 10 5. Further Information:............................................
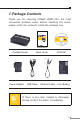
1. Package Contents Thank you for choosing PLANET WNRT-300, the most convenient portable router. Before installing the router, please verify the contents inside the package box. Portable Router Power Adapter Note Quick Guide USB Cable CD-ROM Ethernet Cable Li-ion Battery If there is any item missed or damaged, please contact the seller immediately.
2. Physical Introduction Top Panel Description Power Wireless Connection WPS Battery WAN/LAN Front Panel Description Power Switch WPS Button The Switch of Router, AP and Client Modes.
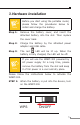
3. Hardware Installation Note Before you start using the portable router, please follow the procedures below to install and charge the battery. Step 1: Remove the battery cover, and insert the attached battery into the slot. Then replace the cover back. Step 2: Charge the battery by the attached power adapter and USB cable. Step 3: The red LED will be lit up. When the battery is fully charged, the LED will be off.
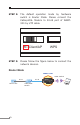
STEP 2: The default operation mode by hardware switch is Router Mode. Please connect the Cable/xDSL Modem to RJ-45 port of WNRT300 by UTP cable. RT/Client/AP STEP 3: WPS ON/OFF Please follow the figure below to connect the network devices.
STEP 4: Please use your PC to site survey the wireless signal of WNRT-300, and connect your PC with it wirelessly. *Default SSID: default *Default Wireless Security: No Security Note 1. When the WNRT-300 is at Router Mode, the only RJ-45 port will become a WAN port. Therefore, you have to configure it wirelessly. However, if you need to configure the WNRT-300 by the UTP cable, please switch it to AP Mode first. And the RJ-45 port will become a LAN port to be able to connect with your computer.
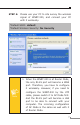
2. If you cannot obtain an IP address automatically from WNRT-300, please refer to the next two figures and follow the procedures below to referconfigure the network connection. Step 1. Click “Start” button located at lower-left corner of the screen. Step 2. Click “Control Panel”. Step 3. Click “Network and Internet Connections”. Step 4. Click “Network Connections”. Note Step 5. Right-click “Wireless Network Connection” or “Local Area Connection”, and choose “Properties”. Step 6.
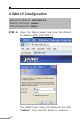
4. Web UI Configuration Default IP Address: 192.168.1.1 Default Username: admin Default Password: admin STEP 1: Open the Web browser and enter the default IP address http://192.168.1.1 The default User name and Password are both “admin”. Then click OK button to continue.
STEP 2: When you enter into the Web User Interface, the first screen appears is Setup Wizard. Click Next>> button to continue. STEP 3: Please select the corresponding WAN Access Type of the Internet connection. After the related configuration is done, click Finished button to reboot and make the settings take effect. You have already finished the configuration of the WNRT-300.
5. Further Information: The above introductions are simple installations and configurations for WNRT-300. For further configurations of WAN, LAN, Wireless Security, Firewall, Routing, Port Forwarding, DMZ, and DDNS etc, please refer to the user’s manual in the CD. If you have further questions, please contact the local dealer or distributor where you purchased this product.