54/108Mbps Super G Wireless LAN USB Adapter WL-U357 User’s Manual 1
Copyright Copyright © 2005 by PLANET Technology Corp. All rights reserved. No part of this publication may be reproduced, transmitted, transcribed, stored in a retrieval system, or translated into any language or computer language, in any form or by any means, electronic, mechanical, magnetic, optical, chemical, manual or otherwise, without the prior written permission of PLANET.
Federal Communication Commission (FCC) Radiation Exposure Statement This equipment complies with FCC radiation exposure set forth for an uncontrolled environment. In order to avoid the possibility of exceeding the FCC radio frequency exposure limits, human proximity to the antenna shall not be less than 20 cm (8 inches) during normal operation. Safety This equipment is designed with the utmost care for the safety of those who install and use it.
TABLE OF CONTENTS CHAPTER 1 INTRODUCTION ................................................................ 1 1.1 Features...............................................................................................1 1.2 Application............................................................................................1 1.3 Specification .........................................................................................3 1.4 Package Contents.........................................................
Chapter 1 Introduction Complying with the IEEE 802.11g standard, WL-U357 provides simple, reliable, high-speed wireless connectivity for both desktop and laptop users. By combining two, state-of-the-art technologies—USB 2.0 and Super G— WL-U357 provides up to 108Mbps data rate in 2.4GHz unlicensed ISM band.
channel. Before adopting an ESS with roaming capability, choosing an available radio channel with less interference is highly recommended. Proper Access Point positioning combined with a clear radio channel will greatly enhance performance. Ad-Hoc Still complaining about the high price of wireless access points? This mode is the easiest and cost-effective way to meet your requirements. It enables you to construct wireless networking in no time without any access point.
Historical or old buildings, public occasions, venues and open area where it is difficult to wire. 3. Frequently changing environments Factories, Retailers, and Offices that frequently change locations and rearrange the workplace 4. Temporary network access Events, exhibitions, construction sites or some important occasions that require temporary network access. 5.
9Mbps (BPSK): -86dBm 6Mbps (BPSK): -88dBm (Typically @PER < 10% packet size 1024 and @25ºC + 5ºC) Working Mode Power Consumption Compatibility Infrastructure, Ad-Hoc Continuous TX: 472mA, Continuous RX: 290mA Windows 98SE/ME/2000/XP/Server 2003 1.4 Package Contents Before installation, please check the items of your package.
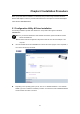
Chapter 2 Installation Procedure Before you proceed with the installation, it is necessary that you have enough information about the Wireless USB Adapter. Follow the procedure described below in this chapter to install the USB adapter under Windows 98SE/ME/2000/XP. 2.1 Configuration Utility & Driver Installation The following installation operates under Window XP. The procedure also applies to Windows 98SE/ME/2000.
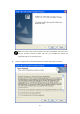
Note: If the screen in step A does not appear, click “Start” at the taskbar. Then, select “Run” and type “E:\Utility” to access the folder, where E is your CD-ROM drive. Execute the appropriate utility for your operating system. C. Select “I accept the terms of the license agreement” and click “Next” button to continue.
D. Select “Install Client Utilities and Driver (recommended)” and click “Next” button to continue. E. Click “Yes” button to continue. F. You can click “Browse” to specify the Destination Folder that you want to install the configuration utility. Or you can keep the default setting and click ”Next” to continue.
G. Select the program folder you want to install this utility to.
H. Click “Next” to continue I. It is recommended to select “PLANET WL-U357 Utility and Supplicant” option. If “Third Party Supplicant” is selected, some functions may not work normally.
J. Insert WL-U357 when the dialog box pops up. Click “OK” to continue. K. Click “Continue Anyway” to continue L.
Chapter 3 Configuration Utility The Configuration Utility is a powerful tool that helps you to configure WL-U357 easily and monitor the status of wireless communication. Right-click the icon in the system tray, there are some items for you to use the configuration utility: Help: Show Manual Webpage. Exit: Select this to close the configuration utility tool. Open PLANET WL-U357 Utility: It enables you to open the configuration utility tool. Preferences: Select what you want to appear on the popup menu.
point or wireless station with the strongest signal strength. This screen displays all the information about the current wireless connection. Profile Name The name of the current selected configuration profile. Link Status Shows whether the station is associated to the wireless network. Wireless Mode Displays the wireless mode. IP Address Displays the computer’s IP address. Network Type The type of network the station is connected to. The options include Infrastructure (access point) and Ad Hoc.
Authentication Displays the authentication mode. . Type Message Integrity Shows whether MIC is enabled. MIC prevents bit-flip attacks on Check encrypted packets. Associated AP Displays the name of the access point the wireless adapter is Name associated to. Associated AP IP Shows the IP address of the access point the wireless adapter is Address associated to. Associated AP Displays the MAC address of the access point the wireless adapter MAC Address is associated to.
Menu Bar Action: Disable Radio: Disable RF signals. Disable Tray Icon: Disable the utility icon in the system tray. Exit: Select this to close the configuration utility tool. Options: Select the display units of the Signal strength or Data. Help: PLANET WL-U357 Utility Help: display Manual Webpage. About PLANET WL-U357 Utility: display Utility Version.
3.2 Profile Management 3.2.1 Add a Profile To add a new configuration profile, click New on the Profile Management tab. The Profile Management dialog box displays the General tab. Please note that the WL-U357 utility only allows the creation of 16 configuration profiles. After the creation of 16 profiles, clicking the New button displays an error message 3.2.1.1 General Tab Profile Name Identifies the configuration profile. This name must be unique. Profile names are not case sensitive.
Network Names (SSIDs) The IEEE 802.11 wireless network name. This field has a maximum limit of 32 characters. WL-U357 can configure up to three SSIDs (SSID1, SSID2, and SSID3). 3.2.1.2 Security Tab This section describes the security settings of the PLANET WL-U357 Utility. WPA & 802.
onto it. Check with the IT manager. 1. On the Security tab, choose the WPA radio button. OR: On the Security tab, choose the 802.1x radio button. 2. Choose EAP-TLS from the drop-down menu. 3. Click the Configure button. 4. Select the appropriate certificate authority from the list. The server/domain name and the login name are filled in automatically from the certificate information. Click OK. 5. Activate the profile.
3. Click the Configure button. 4. Select the appropriate certificate from the drop-down list and click OK. 5. Enter a EAP user name in the User Name field and password and start the EAP authentication process. 6. Click Advanced and: o Leave the server name field blank for the client to accept a certificate from any server with a certificate signed by the authority listed in the Network Certificate Authority drop-down list.
3. Click the Configure button. 4. Select the appropriate network certificate authority from the drop-down list. 5. Enter a PEAP user name in the User Name field to use a separate user name and start the PEAP authentication process. 6. Choose Token or Static Password, depending on the user database. Note that Token uses a hardware token device or the Secure Computing SofToken program (version 1.3 or later) to obtain and enter a one-time password during authentication. 7.
3. Click the Configure button. 4. Select the appropriate certificate from the drop-down list. 5. Enter a PEAP user name in the User Name field to use a separate user name and start the PEAP authentication process. 6. Click Advanced and: o Leave the server name field blank for the client to accept a certificate from any server with a certificate signed by the authority listed in the Network Certificate Authority drop-down list.
2. Click the Configure button. 3. Select to Use Temporary User Name and Password by choosing the radio button. Check Manually Prompt for LEAP User Name and Password to manually login and start the LEAP authentication process. 4. Select to Use Saved User Name and Password by choosing the radio button and specify the LEAP user name, password, and domain to save and use. 5.
1. On the Security tab, choose the WPA Passphrase radio button 2. Click on the Configure button. 3. Fill in the WPA Passphrase 4. Click OK Pre-Shared Key setting 1. Click the Define Pre-Shared Keys radio button on the Security tab. 2. Click on Configure button. 3. Fill in the fields in the Define Pre-Shared Keys dialog box 4.
Key Button Description Key Entry Determines the entry method for an encryption key: hexadecimal (0-9, A-F), or ASCII text (all keyboard characters except spaces). Encryption Keys Selects the default encryption keys used. Only allows the selection for a shared First, Second, Third, or Fourth key whose corresponding field has been completed. WEP Keys (1-4) Defines a set of shared encryption keys for network configuration security.
3.2.1.3 Advanced Tab Transmit Power Selects the transmit power level for 80211b/g in mW. Actual transmit Level power may be limited by regulatory domain or hardware limitations. • Power Save Mode Maximum: causes the access point to buffer incoming messages for the wireless adapter. The adapter up periodically polls the access point to see if any messages are waiting. • Normal: uses maximum when retrieving a large number of packets, then switches back to power save mode after retrieving the packets.
access point network. The wireless adapter must match the wireless mode of the access point it associates to. Wireless Mode This mode allows selection of the channel the wireless adapter uses. The when Starting an channels available depend on the regulatory domain. If the adapter finds Ad Hoc Network no other ad hoc adapters, this selection specifies which channel with the adapter starts the ad hoc network with. The wireless adapter must match the wireless mode and channel of the clients it associates to.
3.2.4 Switch Profiles 1. To switch to a different profile, go to the Profile Management tab. 2. Click on the profile name in the Profile List. 3. Click the Activate button. 3.2.5 Import a Profile 1. From the Profile Management tab, click the Import button. The Import Profile window appears. 2. Browse to the directory where the profile is located. 3. Highlight the profile name. 4. Click Open. The imported profile appears in the profiles list. 3.2.6 Export a Profile 1.
3.2.8 Auto Profile Selection Management Including a profile in the auto selection feature allows the wireless adapter to automatically select that profile from the list of profiles and use it to connect to the network. Including a profile in auto profile selection: 1. On the Profile Management tab, click the Order Profiles button. 2. The Auto Profile Selection Management window appears, with a list of all created profiles in the Available Profiles box. 3.
3.3 Diagnostics The Diagnostics tab of the WL-U357 Utility provides buttons used to retrieve receive and transmit statistics. The Diagnostics tab does not require any configuration.
• ACK frames • Encryption errors • RTS Frames • Duplicate frames • Clear-to-send (CTS) • AP mismatches Frames • Data rate mismatches • No CTS frames • Authentication time-out • Retried RTS frames • Authentication rejects: the number of AP • Retried data frames authentication failures received by the wireless network adapter • Association time-out • Association rejects: the number of access point authentication rejects received by the wireless network adapter • Standard MIC OK
Chapter 4 Troubleshooting This section provides solutions to problems usually encountered during the installation and operation of the USB adapter. Read the description below to diffuse your doubts. What is the IEEE 802.11g standard? 802.11g is the latest IEEE standard for high-speed WLAN communications that provides up to 54Mbps data rate in the 2.4GHZ band. It has become the mainstream technology of current WLAN networks.
military for use in reliable, secure, mission-critical communication systems. It is designed to trade off bandwidth efficiency for reliability, integrity, and security. In other words, more bandwidth is consumed than in the case of narrowband transmission, but the trade off produces a signal that is, in effect, louder and thus easier to detect, provided that the receiver knows the parameters of the spread-spectrum signal being broadcast.