
Gigabit Ethernet Switch User's Manual
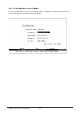
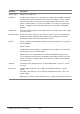
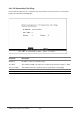
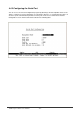
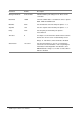

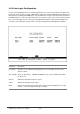
Table Of Contents
- Chapter 1. Introduction
- Chapter 2. Installing the Switch
- Chapter 3. Switch Management
- Chapter 4. Console Interface
- 4.1 Login Screen
- 4.2 Main Menu
- 4.3 System Information Menu
- 4.4 Management Setup Menu
- 4.5 Device Control Menu
- 4.5.1 Setting the System Operation Mode
- 4.5.2 Layer 2 Menu
- 4.5.3 Using the Bridge Menu
- 4.5.4 Configuring Virtual LANs
- 4.5.5 Configuring IGMP Snooping
- 4.5.6 Configuring IP Settings
- 4.5.7 Security Menu
- 4.5.8 Jumbo Packet Configuration
- 4.6 Monitoring the Switch
- 4.6.1 Displaying Port Statistics
- 4.6.2 Layer 2 Address Tables
- 4.6.3 Displaying Bridge Information
- 4.6.4 Displaying VLAN Information
- 4.6.5 IP Multicast Registration Table
- 4.6.6 IP Address Table
- 4.7 Resetting the System
- 4.8 Logging Off the System
- Chapter 5. Web Interface
- 5.1 Web-Based Configuration and Monitoring
- 5.2 Navigating the Web Browser Interface
- 5.3 Panel Display
- 5.4 Main Menu
- 5.5 System Information Menu
- 5.6 Management Setup Menu
- 5.7 Device Control Menu
- 5.7.1 Layer 2 Menu
- 5.7.2 Using the Bridge Menu
- 5.7.3 Configuring Virtual LANs
- 5.7.4 Configuring IGMP Snooping
- 5.7.5 Configuring IP Settings
- 5.7.6 Configuring Security Filters
- 5.7.7 Jumbo Packet Configuration
- 5.8 Monitoring the Switch
- 5.9 Resetting the System
- Chapter 6.Advanced Topics
- Appendix A Troubleshooting
- Appendix B Pin Assignments
- GLOSSARY

WGS3 Layer 3 Switch User’s Manual
- 29 -
4.4.3 Assigning SNMP Parameters
Use the SNMP Configuration screen to display and modify parameters for the Simple Network
Management Protocol (SNMP). The switch includes an on-board SNMP agent which monitors the status
of its hardware, as well as the traffic passing through its ports. A computer attached to the network,
called a Network Management Station (NMS), can be used to access this information. Access rights to
the on-board agent are controlled by community strings. To communicate with the switch, the NMS must
first submit a valid community string for authentication. The options for configuring community strings and
related trap functions are described in the following sections.
Parameter Description
Send
Authentication Fail
Traps
Issue a trap message to specified IP trap managers whenever authentication of an
SNMP request fails. (The default is enabled.)
SNMP
Communities
Assigns SNMP access based on specified strings.
IP Trap Managers Specifies management stations that will receive authentication failure messages or
other trap messages from the switch.