VoIP Analog Telephone Adapter VIP-156 VIP-156PE VIP-158 User’s manual 1
Copyright Copyright (C) 2005 PLANET Technology Corp. All rights reserved. The products and programs described in this User’s Manual are licensed products of PLANET Technology, This User’s Manual contains proprietary information protected by copyright, and this User’s Manual and all accompanying hardware, software, and documentation are copyrighted.
Revision User’s Manual for PLANET VoIP Analog Telephone Adapter: Model: VIP-156/VIP-156PE/VIP-158 Rev: 1.0 (2005, August) Part No.
TABLE OF CONTENTS Chapter 1 Introduction .......................................................................... 6 Overview............................................................................................................................6 Package Content ...............................................................................................................7 Physical Details .................................................................................................................
Appendix A Voice communications...............................................................................29 VIP-156 to VIP-156 connection via IP address........................................................29 Voice communication via SIP proxy server –SIP50.................................................29 Appendix B VIP-156 Specifications ..............................................................................
Chapter 1 Introduction 1 Overview Based on years of VoIP manufacturing experiences, PLANET Technology VoIP total solutions are known for advanced implementation of standards based telephony with mass deployment capability. Cost-effective, easy-to-install and simple-to-use, the VIP-156 converts standard telephones to IP-based networks.
• Voice processing: Voice Active Detection, DTMF detection/ generation, G.168 echo cancellation (16mSec.
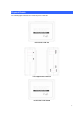
Physical Details The following figure illustrates the front/rear panel of VIP-156.
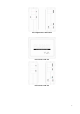
Left / Right Panel of VIP-156PE Front Panel of VIP-158 Front Panel of VIP-158 9
LED Display & Button 1 RJ-45 connector, to maintain the existing network structure, PC connected directly to the PC through straight CAT-5 cable RJ-45 connector, for Internet access, connected directly to Switch/Hub through straight CAT-5 cable. 2 LAN The LAN interface also can be connected with 802.
2 Chapter 2 Preparations & Installation Physical Installation Requirement This chapter illustrates basic installation of VIP-156/VIP-156PE/VIP-158 • Network cables. Use standard 10/100BaseT network (UTP) cables with RJ45 connectors. • TCP/IP protocol must be installed on all PCs.
ÍNote Please locate your PC in the same network segment (192.168.0.x) of VIP-156/VIP-156PE/VIP-158. If you’re not familiar with TCP/IP, please refer to related chapter on user’s manual CD or consult your network administrator for proper network configurations. LAN IP address configuration via web configuration interface Execute your web browser, and insert the IP address (default: 192.168.0.1) of VIP in the adddress bar.
telephone set and refer to the following table for machine network configurations. IVR Menu Choice Machine operation Parameter(s) Notes: VIP-156 will change to #111# Set DHCP client None DHCP Client #112xxx*xxx*xxx* Setup Static IP Address xxx# Use the * (star) key DHCP will be disabled and when entering a decimal system will change to the point. Static IP type. Use the * (star) key #113xxx*xxx*xxx* Set Network Mask xxx# when entering a decimal Must set Static IP first. point.
confirming the modification you’ve done, Please click on the Submit button to apply settings and browse to “Save & Reboot” menu to reboot the machine to make the settings effective. Connection Type Data required. In most circumstances, it is no need to configure the DHCP Fixed IP settings. DHCP clinet The ISP will assign IP Address, and related information.
Chapter 3 Network Service Configurations 3 Configuring and monitoring your Phone Adapter from web browser The VIP-156/VIP-156PE/VIP-158 integrates a web-based graphical user interface that can cover most configurations and machine status monitoring. Via standard, web browser, you can configure and check machine status from anywhere around the world.
When users login the web page, users can see the Phone Adapter system information like firmware version, company…etc in this main page.
Chapter 4 VoIP Telephone Adapter Configurations 4 Speed Dial settings In Speed Dial setting function you can add/delete Speed Dial number. You can input maximum 10 entries speed dial list. If you need to add a phone number into the Speed Dial list, you need to input the position, the name, and the phone number (by URL type). When you finished a new phone list, just click the “Add Phone” button.
Call forward This page defines the tones generated to the phone connected to the phone port. All lines use same tone parameters. After modify the tone parameters, you must save modify then Reboot to let the modified parameters work. Call Forward function: you can setup the phone number you want to forward in this page. There are three type of Forward mode. You can choose All Forward, Busy Forward, and No Answer Forward by click the icon. All Forward: All incoming call will forward to the number you choosed.
Volume Setting This page defines the Handset Volume, Ringer Volume, and the Handset Gain. When you finished the setting, please click the Submit button. Handset Volume is to set the volume for you can hear from the handset. Ringer Volume is to set the ringer volume for you can hear. Handset Gain is to set the volume send out to the other side’s handset. Block Setting This page defines the e Block Setting to keep the phone slience. You can choose Always Block or Block a period.
Caller ID settings This page defines the device to show Caller ID in your PSTN Phone or IP Phone. There are four selection of Caller ID. You need to base on your environment to set the Caller ID function for FSK or DTMF. Dial Interval Settings This function is when you input the phone number by the keypad but you don’t need to press “#”. After time out the system will dial directly.
Flash Time Setting When you use the PSTN Phone and you need to press the Hook to do the Flash (Switch to the other phone line or HOLD), this function is for you to set the time you press the Hook to represent the Flash function. Call waiting Settings When you are talking with other people, You can choose If you want to hear the notice when there is a new coming call. If the call waiting function is On, if there is a new incomeing call, you will hear the call waiting notice in your current call.
Service Domain Settings This router comes with the built-in firewall based on the advanced technology of Stateful Packet In Service Domain Function you need to input the account and the related informations in this page, please refer to your ISP provider. You can register three SIP account in the Phon. You can dial the VoIP phone to your friends via first enable SIP account and receive the phone from these three SIP accounts.
Port Settings This page defines the SIP and RTP port number in this page. Each ISP provider will have different SIP/RTPport setting, please refer to the ISP to setup the port number correctly. When you finished the setting, please click the Submit button. Codec Settings This page defines the Codec priority, RTP packet length, and VAD function in this page. You need to follow the ISP suggestion to setup these items. When you finished the setting, please click the Submit button.
RTP Setting This page defines the Out-Band DTMF and Send DTMF SIP Info Enable/Disable in this page. To change this setting, please following your ISP information. When you finished the setting, please click the Submit button.
RPort Settings This page defines the RPort Enable/Disable in this page. To change this setting, please following your ISP information. When you finished the setting, please click the Submit button. Other Settings This page defines the Hold by RFC, Voice/SIP QoS and SIP expire time in this page. To change these settings please following your ISP information. When you finished the setting, please click the Submit button. The QoS setting is to set the voice packets’ priority.
Auto Configuration In Auto Configuration Setting you need to check with your service provider if they have provided this function. Usually this function will be boundle with an IP PBX to use in the office. Country Settings In Country Settings is for you to set the Country, different country will have different settings in FXS inter face.
System Authority In System Authority you can change your login password. Save & Reboot In Save & Reboot you can save the changes you have done. If you want to use new setting in the Phone Adapter, You have to click the Save button. After you click the Save button, the Phone Adapter will automatically restart and the new setting will effect. Firmware Upgrade In Firmware Upgrade function you can update new firmware via HTTP in this page.
Reset to Default In Default Setting you can restore the Phone Adapter to factory default in this page. You can just click the Restore button, then the Phone Adapter will restore to default and automatically restart again. Reboot without saving Reboot function you can restart the Phone Adapter. If you want to restart the Phone Adapter, you can just click the Reboot button, then the Phone Adapter will automatically.
Appendix A Voice communications There are several ways to make calls to desired destination in VIP-156. In this section, we’ll lead you step by step to establish your first voice communication via keypad and web browsers operations. VIP-156 to VIP-156 connection via IP address Assume there are two VIP-156’s in the network the IP address are 192.168.0.1, 192.168.0.2 Analog telephone sets are connected to the phone (RJ-11) port of VIP-156s respectively 192.168.0.1 1 9 2 * 192.168.0.
Machine configurations on the VIP-156: STEP 1: Log in SIP-50 and create two testing accounts/password: 1001/123 (for VIP-156 A), and 1002/123(for VIP-156 B) for the voice calls. STEP 2: Please log in VIP-156 via web browser, browse to the SIP setting menu and select the Domain Service config menu.
Appendix B VIP-156 Specifications Product Model Hardware LAN PC PHONE LINE (VIP-158) Protocols and Standard Standard SIP Telephone Adapter VIP-156 VIP-156PE Voice codec Voice Standard G.723.1 (6.3k/5.3k), G.729A, G.729B, G.711 Voice activity detection (VAD) Comfort noise generation (CNG) Acoustic echo canceller (AEC) G.165: Line echo canceller (LEC) Jitter Buffer SIP 2.