SIP IP Phone VIP-155PT User’s manual
Copyright Copyright (C) 2006 PLANET Technology Corp. All rights reserved. The products and programs described in this User’s Manual are licensed products of PLANET Technology, This User’s Manual contains proprietary information protected by copyright, and this User’s Manual and all accompanying hardware, software, and documentation are copyrighted.
Revision User’s Manual for PLANET SIP IP Phone: Model: VIP-155PT Rev: 1.0 (October, 2006) Part No.
TABLE OF CONTENTS Chapter 1 ................................................................................................ 6 Introduction............................................................................................ 6 Overview............................................................................................................................6 Package Content ...............................................................................................................
Syslog Config ...........................................................................................................36 Time Set....................................................................................................................36 Reboot.......................................................................................................................37 Chapter 4 Keypad Configurations...................................................... 38 Keypad Function ...........................
1 Chapter 1 Introduction Overview Meeting the next-generation Internet telephony service demands, PLANET Technology provides feature-rich, toll-quality Internet telephony service solutions. The 802.3af Power over Ethernet (PoE) IP Phone -VIP-155PT brings cost-effective solution for voice communications and interoperates VoIP hardware and systems from major third party vendors with traditions of PLANET VoIP family. As a feature-rich IP Phone, the VIP-155PT fulfills your needs. The VIP-155PT is SIP 2.
Configuration of the VIP-155PT can be performed in minutes via the keypad, or web interfaces. Using the built-in LCD display, the VIP-155PT offers user-friendly configuration guidelines, machine operation status, call status displays, and incoming call identification.
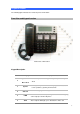
Physical Details The following figure illustrates the front/rear panel of VIP-155PT. Front View and Keypad function Front Panel of VIP-155PT Keypad Description 1 LCD Display Speed Dial 2 No.1~No.9 3 Sysinfo 4 Out call 5 FWD 6 Send Menu and all status shall be displayed for users. To make a speed dial call by pressing the speed dial key No.1 ~ No.9. Circularly show phone number, wan ip, registration status, server ip address, gateway and mask info. Show the outgoing calls history.
7 Redial 8 PWR Press to dial the last dialed number when the IP Phone is off-hooked. The green light goes on when power on. The green light goes on-off when there is an incoming call. 9 Message The light goes constant on when there have voice message (Proxy Mode.) 10 Handfree 11 Vol+ To switch between the usage of the handset and the speaker devices. To increase the volume of voice when at off-hooked state. To page up menu when at configuration mode.
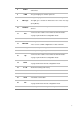
Rear View 3 2 1 Rear Panel of VIP-155PT 1 LAN RJ-45 connector, to maintain the existing network structure, connected directly to the PC through straight CAT-5 cable RJ-45 connector, for Internet access, connected directly to 2 WAN (PoE) Switch/Hub through straight CAT-5 cable. Please connect the WAN interface when using IEEE802.3af PoE power supply (PT model only) 3 12V DC y L Hint y 12V DC Power input outlet The Power over Ethernet support on PLANET VIP-155PT complies with the 802.
2 Chapter 2 Preparations & Installation Physical Installation Requirement This chapter illustrates basic installation of VIP-155PT • Network cables. Use standard 10/100BaseT network (UTP) cables with RJ45 connectors. • TCP/IP protocol must be installed on all PCs.
Note Please locate your PC in the same network segment (192.168.0.x) of VIP-155PT. If you’re not familiar with TCP/IP, please refer to related chapter on user’s manual CD or consult your network administrator for proper network configurations. LAN/WAN Interface quick configurations Nature of PLANET VIP-155PT is an IP Sharing (NAT) device, it comes with two default IP addresses, and default LAN side IP address is “192.168.0.1”, default WAN side IP address is “172.16.0.1”.
Parameter Description Bridge Mode Enable this option to switch to bridge mode. VIP-155PT won’t assign IP for its LAN port in bridge mode and its LAN and WAN port will be in the same network. LAN IP address of VIP-155PT IP address Default: 192.168.0.1 LAN IP address of VIP-155PT Subnet Mask Default: 255.255.255.0 DHCP Service Enable DHCP service in LAN port Enable NAT function. If Bridge mode is enable, this NAT function will be disabled.
Connection Type Data required. Static IP The ISP will assign IP Address, and related information. DHCP PPPoE L Hint Get WAN IP Address automatically; it is no need to configure the DHCP settings. The ISP will assign PPPoE username / password for Internet access, Please consult your ISP personnel to obtain proper PPPoE/IP address related information, and input carefully.
3 Chapter 3 Web Configurations Configuring and monitoring your VIP-155PT from web browser The VIP-155PT integrates a web-based graphical user interface that can cover most configurations and machine status monitoring. Via standard, web browser, you can configure and check machine status from anywhere around the world. Overview on the web interface of VIP-155PT With web graphical user interface, you may have: More comprehensive setting feels than traditional command line interface.
VIP-155PT main page Current State Current state information Shows the WAN and LAN port connecting state and Network current settings Part show the working state of VoIP, you can see whether VOIP IP Phone has registered the public sip server Phone Number Shows the public sip and private sip phone numbers 16
WAN Config: Three methods are available for Internet Access Static IP If you are a leased line user with a fixed IP address, fill out Fixed IP User the following items with the information provided by your ISP. IP Address check with your ISP provider Netmask check with your ISP provider Default Gateway check with your ISP provider DHCP IP If there is DHCP server in your local network, VIP-155PT Dynmaic IP User will automatically obtain WAN port network information from your DHCP server.
LAN Config Field Description Bridge Mode Enable this option to switch to bridge mode. IP phone won’t assign IP for its LAN port in bridge mode and its LAN and WAN port will be in the same network (This setting won’t take effect unless you save the config and reboot the device) LAN IP address of VIP-155PT IP address Default: 192.168.0.1 LAN IP address of VIP-155PT Subnet Mask Default: 255.255.255.
Setting page of public SIP server.
DTMF Mode Server Type DTMF signal sending mode: support RFC2833, DTMF_RELAY (inband audio) and SIP info It could support different SIP Proxy providers Current IP PHONE SIP version. Set to RFC 2543 if the gate need RFC Protocol Edition to communicate to devices (such as CISCO5300) using the SIP 1.0. Default is RFC 3261 Co-work with Server Auto Swap and Detect Interval Time.
Start IP Start IP of lease table End IP of lease table. Network device connecting to the IP PHONE End IP LAN port can dynamic obtain the IP in the range between start IP and end IP Netmask Netmask of lease table Gateway Default gateway of lease table DNS Default DNS server of lease table Notice: This setting won’t take effect unless you save the config and reboot the device NAT Advance NAT setting. Maximum 10 items for TCP and UDP port mapping.
Inside IP LAN device IP for port mapping Inside Port LAN device port for port mapping Outside Port WAN port for port mapping Click Add to add new port mapping item and Delete to delete current port mapping item. Net Service Field Description Configure HTTP transfer port, default is 80.User may change this HTTP Port port to enhance system’s security. When this port is changed, please use http://xxx.xxx.xxx.xxx:xxxx/ to reconnect.
Firewall setting page. User may set up firewall to prevent unauthorized Internet users from accessing private networks connected to the Internet (input rule), or prevent unauthorized private network devices to access the internet. Access list support two type limits: input_access limit or output_access limit. Each type support 10 items maximum. IP PHONE firewall filter is base WAN port. So the source address or input destination address should be WAN port IP address.
Dest Addr Src Mask Des Mask destination address. Can be IP address or network address source address mask. Indicate the source is dedicate IP if set to 255.255.255.255. Otherwise is network ID Destination address mask. Indicate the source is dedicate IP if set to 255.255.255.255. Otherwise is network ID QoS settings IP PHONE IP phone implement QoS based on 802.1p, The QoS is used to mark the network communication priority in the data link/MAC sub-layer.
This page is used to set the private sip server, stun server, and back up sip server information.
User can register two sip servers: Public sip server and private sip server.these two sip servers are independent from each other and running in the same time. For how to configure private sip server. Please refer to SIP_Config Digital Map Digit map is a set of rules to determine when the user has finished dialing.
server. VIP-155PT support following digital map: Field Description End With “#” Use # as the end of dialing Fixed Length When the length of the dialing match, the call will be sent Specify the timeout of the last dial digit.
User configure the value add service such as hotline, call forward, call transfer, 3-way conference call .etc in this page Field Hotline Description Configure hotline number. IP PHONE immediately dials this number after hook-off if it is set Forward when busy: select Busy in the Call Forward Field, and Key in the destination phone number in the Forward Number. If some one calls you when you having a call, the caller will be forwarded to the destination number.
Ban Outgoing Enable this to ban outgoing calls Check the Enable Call Transfer. Unattended transfer: If A is the IP PHONE user, and B calls and talking with A through VoIP. A can press FWD button to hold the call with B, and then enter C’s number. B will be transferred to C Enable Call Transfer and can talk with C. Attended transfer: If A is the IP PHONE user, and B calls and talking with A through VoIP. A can press Hold button to hold the call with B, and then enter C’s number to talk will C.
Incoming Record Playing Play the message when recording User-Defined Voice Use customizes greeting voice for answering machine Record local message: User may use local message to leave message to other local users.
Field CODEC Description select the prefer CODEC; support ulaw, alaw,G729 and G7231 5.3/6.
----Make direct IP to IP call ----Place the call to different servers according the prefix. You can click “Add” to add a new dial rule. Below is the detail setting of the dial-rule: Field Description The Number suit for this dial rule, can be set as full match or prefix match. Full match means that if the number user dialed is completely the same as this number, the call will use this dial-rule.
Field 2T rule 3T rule 123 rule 0T rule 179 rule Description If the call starts with 2, the first 2 will be deleted, and the rest number will be sent to private SIP server. If the call starts with 3, the first 3 will be deleted, and the rest number with be sent to public SIP server. Dial 123 and will send 8675583018049 to your server. Used as speed dial function If the calls is begin with 0, the first 0 will be replace by 86.
FTP/TFTP Update Backup: Back up configure file to your FTP/TFTP server. * configure use .cfg extension. Auto update: IP PHONE IP phone support FTP and TFTP auto update. The gateway will auto obtain the configure file from your update server if configured. To obtain the original configure file, you can use the FTP/TFTP back up as describe above. Configure file using module structure, user may remain the concerned modules and remove other modules.
Configure file version was in the <> and ConfFile Version Example: Gateway original version is: <>Version:1.0000 ConfFile Version:6 User may edit the configure file version to: <>Version:1.0007 ConfFile Version:7 Account Manage Set web access account or keypad password of IP PHONE.
Phone Book User may set contacts in this page, and the contacts will be saved in the memory. Then using the Pbook, Vol+,Vol-,Menu/OK and Exit keys to choose your friend in the contacts and then press # to call out. Syslog Config Field Description Enable Syslog Enable syslog function. Server IP Server Port VIP-155PT will automatic send the system logs to define server. Fill in the server IP address. Fill in the transmission port.
Reboot Reboot IP phone, some setting needs to reboot to make it works. Please always save config before reboot, otherwise the setting will return to previous setting.
4 Chapter 4 Keypad Configurations Keypad Function User can configure IP PHONE through its keypad.
# Calling mode Use as end key of dialing or the dial number Hold Calling mode Hold, detail refer value add service FWD Calling mode Transfer, detail refer value add service Redial Calling mode Redial key Send Calling mode call key No.1~No.9 Idle mode Speed dial key Keypad Menu User may use SET, Menu/ok, Exit, Vol+, Vol- to config IP PHONE detail setting. Press Menu/ok to enter config mode, and the default password is 123.
DEL FastCall Three Call Call-Transfer Call-Waiting Call-Forward Condition SIP Transfer Num Transfer IP Port Dial-Rule End With # Fixed Length Switch Length SIP Reg Status Public Reg Private Reg Reg Switch Public Private Server Private Register Proxy Domain Public Private User Agent Public Private Detect-server Dtmf-mode Interval-time Swap-server RFC-version Signal-Port Stun Switch Addr Port Effect Time DSP Codec Handdown-time Dtmf-Volume Input-volume Output-Volume System Save Reboot 4
Set Default Other Setting Syslog Switch Server-IP Server-Port 41
5 Chapter 5 Telnet Console Introduce Basic Structure User may use telnet command to access and manage IP phone. IP PHONE adopts tree structure for telnet. Every node contains its sub-nodes or local command. User can type “help” or “?” whenever to see sub-nodes and all local command under current node. Besides local command, there are some global commands can be used in each node. Basic command Logout: exit telnet mode. Write: save current settings.
Global Command Global command is available under all nodes, IP PHONE support following commands: Command Function Example chinese Set to Chinese UI #chinese clear Clear telnet screen #clear english Set to English UI #english exit Return to parent-node #exit help 1. Show help info 1.#help ping 2. Show sub-nodes and local command 2.#help history Show command history #history logout Exit #logout ping Ping command, use to check network, #ping www.google.
delete firewall rule ---no entry –I/O xxx –index xxx Example :#no entry –I/O input –index 1 Show firewall settings ---show [disable] enable input filter ---[no]in-access [disable] enable output filter ---[no]out-access ¾ DHCP path: # add DHCP rule ---entry –name xxx –startip x.x.x.x –endip x.x.x.x –netmask x.x.x.x –gateway x.x.x.x –dnsserver x.x.x.x _time xxx Example:#entry –name lan2004 –startip 192.168.1.2 –endip 192.168.1.254 –netmask 255.255.255.
Show LAN port IP address ---ipshow Show NAT info ---natshow Change LAN port IP address ---ip –addr x.x.x.x –mask x.x.x.x Example:#ip –addr 192.168.1.10 –mask 255.255.255.0 ¾ WAN interface settings path: # [disable]enable dhcp client ---[no]dhcp [disable]enable pppoe ---[no]pppoe [disable]enable QOS ---[no]qos Set default gateway IP ---gateway x.x.x.
Example:#tcp-entry –ip 192.168.1.5 –lanport 1720 –wanport 1000 Delete TCP mapping rule ---no entry –ip x.x.x.x –lanport xxx –wanport xxx Example:#no tcp-entry –ip 192.168.1.5 –lanport 5060 –wanport 1000 Add UDP mapping rule ---udp-entry –ip x.x.x.x –lanport xxx –wanport xxx Delete UDP mapping rule ---no udp-entry –ip x.x.x.x –lanport xxx –wanport xxx Show NAT info ---show ¾ Netservice path: # Set DNS address ---dns -ip x.x.x.
---entry –number xxx –ip x.x.x.x –protocol xxx _add xxx Example:#entry –number 100 –ip 202.112.20.100 –protocol sip _add 123(dial 100 and will send 123100 according this rule) Add number-IP bond and replace the destination with another number ---entry –number xxx –ip x.x.x.x –protocol xxx _all xxx Example:#entry –number 100 –ip 202.112.20.
Set prefer codec ---codec xxx Set DTMF gain ---dtmfvolume xxx Set black list ---in-limit xxx Show black list ---in-limit Set input volume ---input xxx Set outgoing limit list ---out-limit xxx Show outgoing limit list ---out-limit Set output volume ---output xxx [disable]enable outgoing limit ---[no]shutdown out [disable]enable black list ---[no]shutdown in [disable]enable outgoing limit and black list ---[no]shutdown [disable]enable 3-way conference ---[no]threetalk Show port setting
Set local SIP signal port Set proxy server --- signalport xxx ---server proxy -ip x.x.x.x _port xxx _user xxx _password xxx Example:# proxy ip 210.25.23.22 _port 5060 _user aaa _password 123456 Set register server info ---server register -ip x.x.x.x _port xxx –user xxx _password xxx Set alter proxy info ---alter-server proxy –ip x.x.x.x _port xxx _user xxx _password xxx Set alter server info ---alter-server register –ip x.x.x.
Download configure to flash usage: #download tftp –ip x.x.x.x –file xxx #download ftp –user xxx –password xxx –ip x.x.x.x –file xxx Example: #download ftp –user abc –password 123 –ip 202.112.20.15 –file AG188.
path: # show debug info Example:##debugging ¾ dhcp-server path: # show LAN status and DHCP server info Example:## dhcp-server ¾ dial-rule path: # show digital-map info Example:## dial-rule ¾ interface path: # show LAN info Example:##interface fastethernet lan show WAN info Example:##interface fastethernet wan ¾ ip path: # show arp table info Example:##ip arp Show DNS server info Example:##ip dns Show netstate info Example:#
Show ip packets Stat. Example:##ip ip Show RTP packets Stat. Example:##ip rtp Show TCP packets Stat. Example:##ip tcp Show UDP packets Stat.
show current phone number Example:##port number show current port status Example:##port status ¾ PPPoE path: # show PPPoE info Example:## pppoe ¾ qos path: # show QoS table info Example:##qos ¾ sip path: # show sip info Example:##sip ¾ udptunnel path: # show UDP tunnel info Example:## udptunnel ¾ uptime path: # show running time Example:## uptime ¾ version path: # show IP phone version Example:## version Telnet
Password:xxx # #logout Telnet and logout path:
ping Check if the destination is accessible #ping www.google.com tracert Show network path info #tracert www.google.com show basic Show network settings #show basic show ip route Show route table #show ip route show ip arp Show arp table #show ip arp show ip netstat Netstat programe #show ip netstat telnet Telnet to another device #telnet 192.168.1.2 Reset to factory default #setdefault clear IP phone settings expect network part #setdefault all clear all settings.
Appendix A FAQ Q1: How many servers may VIP-155PT register simultaneously? A1: VIP-155PT is able to register two SIP servers simultaneously, and redundancy servers. User can configure the dial peer to route calls between these servers. Q2: Why the settings vanish after reboot? A2: Please go to Config ManageÆSave Config to save your setting always.
Appendix B Voice communications There are several ways to make calls to desired destination in IP Phone. In this section, we’ll lead you step by step to establish your first voice communication via keypad and web browsers operations. Peer to Peer (P2P) Mode Step 1: Assuming there are two VIP-155PT in the network the IP address are 172.16.0.1 and 172.16.0.2 VIP-155PT-A VIP-155T-B WAN IP Address WAN IP Address (172.16.0.1) (172.16.0.2) Step 2: Execute your web browser, and insert the IP address (172.
Step 4: Pick up handset or press “Handfree” key from keypad of VIP-155PT-A and dial “2#”. Then the phone of VIP-155PT-B should ring. You can do the same thing to the VIP-155PT-B. y L Hint y If the IP address of the remote calling party is known, you may directly make calls by preset number via its IP address and end with an “#”.
Please browse machine “VoIP” Æ “SIP Config” menu, and enable the “Enable Register” check box. Insert IP address of the remote calling party in the “Register Server Addr” field. Sample configuration screen is shown below: After these configurations, be sure to click the “Apply” button to apply settings. SETP 2: Browsing to “Dial-peer” configuration item, press “Add” button and fill in the below parameter. After these configurations, be sure to click the “Apply” button to apply settings.
SETP 3: Browsing to “Config Manage” Æ “Save Config” configuration item and press “Save” button to save the configuration. Browsing to “System Manage” Æ “Reboot” menu and press “Reboot” button reboot the machine to make the settings effective. After rebooting, the unit will register to SIP-50, the LCD screen will show below: VOIP PHONE SEP 20 13 12:30 SETP 4: At this moment, you may pick up the handset and dial “200” to connect with extension 200 of VIP-155PT-B to start the voice communications.
Appendix C VIP-155PT series Specifications Product Model Hardware WAN LAN LCD display Speaker Protocols and Standard Standard Voice codec NAT Traversal Voice Standard Supplementary services Call history Protocols Network and Configuration Access Mode Management Dimension (W x D x H) Operating Environment Power Requirement EMC/EMI Power over Ethernet SIP IP Phone VIP-155PT 1 x 10/100Mbps RJ-45 port Power Over Ethernet 802.3af compliant at PT model 1 x 10/100Mbps RJ-45 port 2 x 16 characters 8 Ohm/0.