SIP IP Phone User’s Manual
Table of Contents Chapter 1 Overview of the VIP-152T ................................................................................... 1 1.1 Hardware Overview ................................................................................................ 2 1.1.1 Front View and Keypad function ................................................................... 2 1.1.2 Rear panel .................................................................................................... 3 1.1.3 Specification ....
4.11. [flash] command................................................................................................. 34 4.12. [sysconf] command............................................................................................ 34 4.13. [sip] command ................................................................................................... 35 4.14. [security] command............................................................................................ 37 4.15. [voice] command.......
Chapter 1 Overview of the VIP-152T Based on the next-generation Internet telephony service demands--Session Initialization Protocol (SIP), the PLANET VIP-152T brings cost-effective solution for voice communications and interoperates with major other-vendor VoIP hardware and systems as well as the traditions of PLANET VoIP family. As a feature-rich IP Phone, the VIP-152T fulfills your needs.
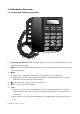
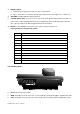
1.1 Hardware Overview 1.1.1 Front View and Keypad function ♦ System Indication LED: When VIP-152T didn’t register to Proxy server or having incoming call, system indication LED will be blinking. ♦ MENU: Press to enter LCD Menu when in standby mode; if already in LCD Menu, press this button can return to standby mode ♦ MUTE: 1. Mute the voice of Microphone and let others can’t hear from user in communication. 2.
♦ REDIAL / HOLD: 1. Redial the last outgoing call or hold one call in communication. 2. Upper-case/Lower-case character: change input character mode to be upper-case or lower-case. ♦ SPEAKER: Speaking without picking up handset. ♦ 5 Graphic Memory key: User presses these keys to do speed dial according to phone book data 1-5 (please refer to LCD configuration-Phone Book, Configuring the VIP-152T through Telnet command lines - [pbook] command, or Web Configuration-Phone Book chapter).
1.1.3 Specification 1. Ethernet Port: Ethernet port is for connecting VIP-152T to network, transmit rate supports 10/100 Base-T.
1.
z Three easy ways for system configuration z LCD Front Panel z Web Browser z Telnet Environmental z Operating and storage Humidity: 10 to 95 % (Non-condensing) z Operational Temperature: 0 to +40 °C z Storage Temperature: -10 to 60℃ 6 PLANET VIP-152T User’s Manual
Chapter 2 Configuring the VIP-152T through LCD Phone menu 1. After any configuration has changed for the VIP-152T, user has to do reboot in the selection “Reboot”. " Note: 2. It is suggested to setup IP address via LCD menu Network→Get IP mode / IP Address / Subnet Mask / Default GW first, then go to chapter 3 to do other configurations via web browser. If user need to do more detail or advanced configurations, please refer to chapter 4 and use Telnet command lines. 3.
3. Press MENU to enter configuration mode then press OK to enter sub menus; press FLASH can jump out current menu to previous level. 1. Call List 2. Forward 3. Phone Book 4. Ringer 5. Network 6. Advanced Set (can be protected by password) 7.
2.2 LCD Menu Configuration User can set the following configurations via LCD keypad. 1. " Press REDIAL/HOLD before input data can switch characters to be capital or lowercase. 2. Press MUTE before input data can switch input mode to be character mode or IP mode; for example, user wants to enter IP address, after pressing SPEED can enter digits Note: directly. 3. When user is inputting data, press ▲ will clear previous input data. 1. Call List User can check all call records in this call list menu.
Uncondition (Unconditional Forward) It is included the above two types. Whether the VIP-152T is in which status, calls will be automatically forwarded to the assigned phone number. Activate Enter a forwarded phone number to activate Unconditional Forward function. Deactivate Deactivate Unconditional Forward function. Exit Return to upper level of LCD Menu Delete All: Delete all forward activated data. Exit: Return to upper level of LCD Menu. 3. Phone Book 1.
Mode: Display current network connection mode of VIP-152T to be Static (Fixed IP), DHCP, or PPPoE. 2. IP, Mask, Gateway: display current IP information. Get IP Mode Set network mode of VIP-152T to be Fix (Fixed IP), DHCP, or PoE (PPPoE). 3. IP address Set IP address of VIP-152T. 4. Subnet Mask Set subnet mask address of VIP-152T. 5. Default GW Set default gateway address of VIP-152T. 6. DNS (Domain Name Server) Set IP address of Domain Name Server.
Peer-to-Peer mode or Proxy mode (doesn’t support endpoint behind NAT function), on IP sharing must enable “DMZ” function or set “Virtual Server” to open ports (UDP port: 5060 and 16384, 16385). VIP-152T must enable this IP sharing function. 9. User must enter public IP address of IP sharing. Exit: Return to upper level of LCD Menu 6.
User Info User Name (Mandatory) Set User Name of VIP-152T to register to Proxy Server. If Proxy server doesn’t request specific User name, please enter Line number here. Line No. Set Line Number of VIP-152T to register to Proxy Server. Password Set User Password of VIP-152T to register to Proxy Server. This configuration is not necessary, if Proxy server doesn’t request client to set password, user only has to set User Name the same as Line Number.
Note: z Menu Password Set entry password of phone LCD menu. z Exit Return to upper level of LCD Menu 7. Reboot Reboot machine. It is necessary and important for user to reboot VIP-152T after any configurations has been made. VIP-152T will ask user again before reboot.
Chapter 3 Configuring the VIP-152T through Web Pages The VIP-152T web management interface provides user an easier way to configure rather than command line method through TELNET. The configuration function and steps are similar with the way through command line. Please refer to the chapter 4-Configuring the VIP-152T through Telnet command lines for more detail information. Below is a guide for user to configure via web interface. Step 1.
" Note: User can set password later in PASSWORD configuration menu.. Step 3. Enter the web interface main screen After logging in machine, user can see web interface main screen as below. Step 4. Start configuration Most important items are Network Interface, SIP Information, and Phone Book (in Peer-to-Peer mode). Please remember to configure these commands before start to work with VIP-152T.
" After change any settings, please remember to reboot (in Reboot System) VIP-152T so that Note: changes can take effect. 1. Network Interface - IP Address: Set IP Address of VIP-152T - Subnet Mask: Set the Subnet Mask of VIP-152T - Default routing gateway: Set Default routing gateway of VIP-152T - Get IP Mode: User has to set VIP-152T to use which network mode. 1. Fixed IP: User has to assign a fixed IP to VIP-152T. 2.
- GMT: Set time zone for SNTP Server time User can set different time zone according to the location of VIP-152T. For example, in Taiwan the time zone should be set as 8,which means GMT+8. - IP Sharing: Enable it if VIP-152T is behind IP Sharing router. - UPnP: Enable it if IP sharing or NAT device supports UPnP function so that no need to configure IP sharing or VIP-152T when VIP-152T is behind NAT device.
2. SIP Information - Run Mode: Select VIP-152T to work under Peer-to-Peer mode or Proxy mode. - Proxy IP Address: Set Proxy IP Address or URL address (Domain Name Server must be configured. Please refer to Network Interface). - Outbound Proxy: Set IP Address or URL address (Domain Name Server must be configured. Please refer to Network Configure) of outbound Proxy server.
- RTP Port: set RTP port for sending voice data. - Expire: set expire time of registration.
3. System Configuration - Keypad DTMF Type: set DTMF type. User can select DTMF type VIP-152T transmits. - RFC2833 Payload Type: change RFC2833 Payload type. This is for special request from the other site, if RFC2833 payload types of 2 sites are different, it may cause some problem of connection. - Inter Digit Time: Set the DTMF inter digit time (second) To set the duration (in second) of two pressed digits in dial mode as timed out.
4. PPPoE Configure - User Name: Set PPPoE authentication User Name. - Password: Set PPPoE authentication password. - Reboot After Remote Host Disconnection: Enable/Disable auto reboot after PPPoE disconnection If user enables this function, after PPPoE being disconnected, VIP-152T will automatically reboot to re-connect, and after reboot, if VIP-152T still can’t get contact with server, VIP-152T will keep trying to connect. After re-connected, VIP-152T will also restart system.
5. Voice Setting - Codec Priority: set codecs priority in order. Please notice that user can set from 1 to 5 codecs as their need. For example, user can only set first priority as G.723.1, and set the others as x, that means only G.723.1 is available. - Frame Size: User can set different packet size for each codec. - G.723 Silence Suppression: Enable / Disable sound compression and comfort noise generation. It is only for codec G.723.
6. Phone Book - Add Data: User can specify only 10 sets of phone book via web interface. Please input index, Name, IP Address and E.164 number of the destination device. From Telnet command line can set up to 100 sets of phone book data. - Delete Date: User can delete any configured phone book data by assign index.
7. Password - Change: First select login name as root or administrator, then enter current password, new password and confirm new password again to set new password. - Abort: Press abort will clean all inputs. User who requests authorization to execute all configuration commands needs to login with “root”. If a user login with “administrator”, commands below are not functional: 1. Password: set password of login: “root” users. 2. Flash clean: clean all current configurations 3.
8.
9. Version Information - Application: Application image version information of VIP-152T. This field has no default value.
10. Reboot System - Press reboot will reset VIP-152T. " Note: To execute reboot via web browser, VIP-152T will automatically save all data before reboot. To execute reboot via TELNET command, please remember to do commit before reboot.
Chapter 4 Configuring the VIP-152T through Telnet command lines After setting up the network parameters of VIP-152T, you may now enter the Telnet command lines for more options in machine configuration. • " After user enter VIP-152T configuration via telnet, please use login: ”root”, password: null, press enter to enter command lines. • User must input lower-case command, but contents of configurations such as SIP alias or user name etc, user can set as capital case.
4.2. [quit] command Type quit/exit/close will logout VIP-152T and Telnet Program. 4.3. [debug] command This command is for engineers to debug system of VIP-152T. User can add debug flag via command debug –add “debug flags”, and then start debug function via command debug –open. When VIP-152T is working on screen will display related debug messages. Most frequently used debug flag are “sip”, “fsm”, “msg”…etc. usr/config$ debug Debug message information and configuration Usage: debug [-add type1 [[type2]...
(pbook –print). Furthermore, user can also print only a section of data by indicate parameter “start index” and “end index” (pbook –print “start index” “end index”). If parameter “end index” is omitted, only record “start index” will be displayed. (pbook –print “start prefix”). 2. -add: add a new record in phone book table by giving name, IP address, and e.164 number of callee endpoint. (pbook –add name “X” ip “xxx.xxx.xxx.xxx” e164 “X”) 3.
4.7. [ping] command Command ping can test which the IP address is reachable or not. Usage: ping “IP address” The message will display packets transmitting condition or no answer from the IP address. usr/config$ ping 168.95.1.1 PING 168.95.1.1: 56 data bytes 64 bytes from 168.95.1.1: icmp_seq=0. time=50. ms 64 bytes from 168.95.1.1: icmp_seq=1. time=50. ms 64 bytes from 168.95.1.1: icmp_seq=2. time=50. ms 64 bytes from 168.95.1.1: icmp_seq=3. time=50. ms ----168.95.1.
5. -dns: User can set primary and secondary Domain Name Server IP address. Once VIP-152T can connect with DNS server, user can specify URL address instead of IP address for Proxy Server and phone book IP address...etc. (ifaddr –dns 1 “primary DNS server address” –dns 2 “secondary DNS server address”) 6. –timezone: User can set different time zone according to the location VIP-152T is. For example, in Taiwan the time zone should be set as 8,which means GMT+8. (GMT-8: ifaddr –timezone -8) 7.
2. –id: to set PPPoE authentication user name. 3. –pwd: to set PPPoE authentication password. 4. –reboot: Select enable or disable this function. If user enables this function, after PPPoE disconnected, VIP-152T will automatically reboot to re-connect, and after reboot, if VIP-152T still can’t connect with server, VIP-152T will keep trying to connect. On the other hand, if user disables this function, VIP-152T won’t reboot and keep trying to connect.
2. -idtime: set the duration(in second) of two pressed digits in dial mode as timed out. If after the duration user hasn’t pressed next number, VIP-152T will dial out all number pressed. 3. -keypad: set DTMF type .User can select DTMF type VIP-152T receive and transmit.(sysconf –keypad 0/1 , 0 for in band ,1 for RFC2833.) 4. -2833type: change RFC2833 Payload type. 5. -eod: select end of dialing key, e.g. set end of dial key as “*” button , after finished pressing dialing number then press “*” will dial out.
function is for special proxy server. 7. –line: identify one number for the VIP-152T to register to the Proxy " Note: (SIP –line “line number”). In proxy mode please remember to set user account information under security command. 8. –pbsearch: enable/disable phone book search function under Proxy Mode.
4.14. [security] command 1. –print: display all current configurations. 2. -name: set user ID of VIP-152T for registering. User can set user name and password for registering. If password is no need, please set user name the same as line number or VIP-152T won’t register successfully. 3. –pwd: set account password for registering.
volume”, voice –volume input “value of volume”, voice –volume dfmt “value of volume”) " Note: If value of volume set as 0 means –32db, 1 means –31db…etc. 5. -nscng: enable or disable sound compression and comfort noise generation. It is only for codec G.723.1. (0 for off, 1 for on) 6. -echo: enable or disable echo cancellation function . 7. -mindelay: set minimum delay of jitter buffer(0~150) 8. -maxdealy: set maximum delay of jitter buffer(0~150) " Note: It is for advanced administrator use only.
4.16. [tos] command TOS/DiffServ (DS) priority function can discriminate the Differentiated Service Code Point (DSCP) of the DS field in the IP packet header, and map each Code Point to a corresponding egress traffic priority. As per the definition in RFC2474, the DS field is Type-of-Service (TOS) octet in IPv4. The recommended DiffServ Code Point is defined in RFC2597 to classify the traffic into different service classes.
4.17. [bureau] command 1. -print: display all current configurations. 2. –hotline: set hotline IP and remote phone number. If user has enable Hotline function, once VIP-152T been off-hook, it will automatically dial out to assigned IP and phone number. (bureau –hotline “IP of destination” “Phone number of destination”) " Note: To set VIP-152T under hotline mode must set following configurations: 1. Peer-to-Peer mode: sip –mode 0 2.
6. -f: the file name prepared for upgrading is necessary as well. 7. –method: specify download method to be TFTP or FTP(0 for TFTP.1 for FTP) 8. –ftp: specify user name and password for FTP download method. For example: User prepares to upgrade the latest app rom file – vip152t.100, the TFTP server is 192.168.0.10, User has to input command as below: rom –app –s 192.168.0.1 –f vip152t.
2. –clean: clean up password restored before, and user can login :”root/administrator”, password: ”press enter”. User who requests authorization to execute all configuration commands needs to login with “root”. If a user login with “administrator”, commands below are not functional: B. password –set root: set password of login : “root”. C. passwd –clean: clean up password restored before, and user can login :”root/administrator”, password: ”press enter”. D. flash –clean: clean all current configurations E.
Chapter 5 Upgrading Software on the VIP-152T VIP-152T supports three methods to upgrade the new version. All methods are necessary to prepare the TFTP or FTP program on the host PC as TFTP/FTP server. After installing TFTP/FTP program on one PC and connecting to network, VIP-152T is ready to be upgraded. 1. LCD Panel Control 2. Remote Control: Telnet 3. Web Management 5.1 From LCD Phone Menu Please select the Advanced Set → SW Upgrade. Press OK to enter into the sub-selection as below.
" Note: Download via LCD command can only upgrade new application rom file. 5.2 Web Management - FTP/TFTP Server IP Address: Set TFTP server IP address - Target File name: Set file name prepared to upgrade - Method: Select download method as TFTP or FTP - FTP Login: Set FTP login name and password - Target File Type: Select which sector of VIP-152T to upgrade " Note: 1. After 2mb file download is finished, all configurations might change to default values, user has to configure again. 2.
3. -boot2m: to upgrade 2mb rom file, which includes all firmware file mentioned in item 2. 4. -s: it is necessary to prepare TFTP/FTP server IP address for upgrading firmware rom file. 5. -f: the file name prepared for upgrading is necessary as well. 6. –method: specify download method to be TFTP or FTP(0 for TFTP.1 for FTP) 7. –ftp: specify user name and password for FTP download method. For example: User prepares to upgrade the latest app rom file – vip152t.100, the TFTP server is 192.168.0.