
User's Manual
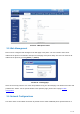
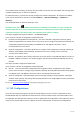

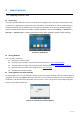
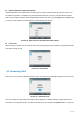
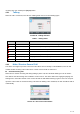
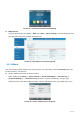
Table Of Contents
- 1 Overview
- 2 Appendix Table
- 3 Introduction to the User
- 4 Basic Function
- 5 Advance Function
- 6 Phone Settings
- 7 Web Configurations
- 8 Network >> Basic
- 8.1 Network >> Service Port
- 8.2 Network >> VPN
- 8.3 Network >> Advanced
- 8.4 Line >> SIP
- 8.5 Line >> SIP Hotspot
- 8.6 Line >> Dial Plan
- 8.7 Line >> Basic Settings
- 8.8 Phone settings >> Features
- 8.9 Phone settings >> Media Settings
- 8.10 Phone settings >> MCAST
- 8.11 Phone settings >> Action
- 8.12 Phone settings >> Time/Date
- 8.13 Phone settings >> Tone
- 8.14 Phone settings >> Advanced
- 8.15 Phonebook >> Contact
- 8.16 Phonebook >> Cloud phonebook
- 8.17 Phonebook >> Call List
- 8.18 Phonebook >> Web Dial
- 8.19 Phonebook >> Advanced
- 8.20 Call Log
- 8.21 Function Key >> Function Key
- 8.22 Function Key >> Softkey
- 8.23 Function Key >> Advanced
- 8.24 Application >> Manage Recording
- 8.25 Security >> Web Filter
- 8.26 Security >> Trust Certificates
- 8.27 Security >> Device Certificates
- 8.28 Security >> Firewall
- 8.29 Device Log >> Device Log
- 9 Trouble Shooting

38 / 122
again to call out the current located number.
Picture 21 - Redial set
4.5 Auto-Answering
User may turn on the auto-answering mode on the device and any incoming call will be automatically
answered (not including call waiting). The auto-answering can be enabled on line basis.
The user can start the automatic answer function in the telephone interface or the webpage interface.
Phone interface:
Press [Menu] >> [Features] >> [Auto Answer] button;
Press the button to select the line, use the left/right navigation key to turn on/off the auto answer option, and
set the auto answer time to 5 seconds by default.
After completion, press [OK] key to save;
The icon in the upper right corner of the screen indicates that auto answer is enabled.
Picture 22 - Line 1 enables auto-answering