
User's Manual
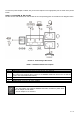


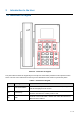
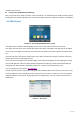
Table Of Contents
- 1 Overview
- 2 Appendix Table
- 3 Introduction to the User
- 4 Basic Function
- 5 Advance Function
- 6 Phone Settings
- 7 Web Configurations
- 8 Network >> Basic
- 8.1 Network >> Service Port
- 8.2 Network >> VPN
- 8.3 Network >> Advanced
- 8.4 Line >> SIP
- 8.5 Line >> SIP Hotspot
- 8.6 Line >> Dial Plan
- 8.7 Line >> Basic Settings
- 8.8 Phone settings >> Features
- 8.9 Phone settings >> Media Settings
- 8.10 Phone settings >> MCAST
- 8.11 Phone settings >> Action
- 8.12 Phone settings >> Time/Date
- 8.13 Phone settings >> Tone
- 8.14 Phone settings >> Advanced
- 8.15 Phonebook >> Contact
- 8.16 Phonebook >> Cloud phonebook
- 8.17 Phonebook >> Call List
- 8.18 Phonebook >> Web Dial
- 8.19 Phonebook >> Advanced
- 8.20 Call Log
- 8.21 Function Key >> Function Key
- 8.22 Function Key >> Softkey
- 8.23 Function Key >> Advanced
- 8.24 Application >> Manage Recording
- 8.25 Security >> Web Filter
- 8.26 Security >> Trust Certificates
- 8.27 Security >> Device Certificates
- 8.28 Security >> Firewall
- 8.29 Device Log >> Device Log
- 9 Trouble Shooting

21 / 122
Step 3. Computer Network Setup
Set your computer’s IP address to 192.168.0.x, where x is a number between 2 and 254 (except 1 where is
being used for the phone by default). If you don’t know how to do this, please ask your network administrator.
Step 4. Login Prompt
Use Web browser (Internet Explorer 8.0 or above), Chrome, Firefox, or Safari (for Mac) to connect to
192.168.0.1 (Type this address in the address bar of Web browser.)
You’ll be prompted to input user name and password: admin and 123
Picture 4 - Landing page