
User's Manual
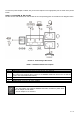

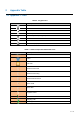

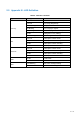
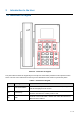
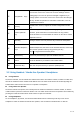
Table Of Contents
- 1 Overview
- 2 Appendix Table
- 3 Introduction to the User
- 4 Basic Function
- 5 Advance Function
- 6 Phone Settings
- 7 Web Configurations
- 8 Network >> Basic
- 8.1 Network >> Service Port
- 8.2 Network >> VPN
- 8.3 Network >> Advanced
- 8.4 Line >> SIP
- 8.5 Line >> SIP Hotspot
- 8.6 Line >> Dial Plan
- 8.7 Line >> Basic Settings
- 8.8 Phone settings >> Features
- 8.9 Phone settings >> Media Settings
- 8.10 Phone settings >> MCAST
- 8.11 Phone settings >> Action
- 8.12 Phone settings >> Time/Date
- 8.13 Phone settings >> Tone
- 8.14 Phone settings >> Advanced
- 8.15 Phonebook >> Contact
- 8.16 Phonebook >> Cloud phonebook
- 8.17 Phonebook >> Call List
- 8.18 Phonebook >> Web Dial
- 8.19 Phonebook >> Advanced
- 8.20 Call Log
- 8.21 Function Key >> Function Key
- 8.22 Function Key >> Softkey
- 8.23 Function Key >> Advanced
- 8.24 Application >> Manage Recording
- 8.25 Security >> Web Filter
- 8.26 Security >> Trust Certificates
- 8.27 Security >> Device Certificates
- 8.28 Security >> Firewall
- 8.29 Device Log >> Device Log
- 9 Trouble Shooting

20 / 122
Connect the power adapter, network, PC, phone and earphone to the appropriate port as shown in the picture
below.
Step 2. Connecting to the Device
Please connect PoE network, PC and handset to the corresponding ports as described in the diagram below.
Picture 3 - Connecting to the Device
Table 1 - Hardware Interface Description
Index
Description
1
Power port: External standard power supply (5V DC, 2A, optional)
2
Internet port: Connect to the Internet
(Only Internet port supports PoE. Connect to an IEEE802.3af/at PSE device such as 802.3af
injector / hub or 802.3af/at PoE switch.)
3
PC port: Connect to the computer
4
Headset port: External RJ9 earphone (optional)
5
Handset port: Connect to IP phone handset
1. The VIP-1260PT also supports IEEE 802.3af/at. Be reminded to power either
from AC adapter or PoE switch.
2. The AC adapter is not included.