Intelligent Ethernet over VDSL Switch VC-412 User’s Manual
VC-412 User’s Manual Trademarks Copyright PLANET Technology Corp. 2002. Contents subject to revision without prior notice. PLANET is a registered trademark of PLANET Technology Corp. All other trademarks belong to their respective owners. FCC Warning This equipment has been tested and found to comply with the limits for a Class A digital device, pursuant to Part 15 of the FCC Rules.
VC-412 User’s Manual 1. INTRODUCTION ..................................................................................................................................... 1 1.1 FEATURE ............................................................................................................................................... 1 1.2 VC-412 TECHNICAL SPECIFICATIONS ................................................................................................... 2 1.
VC-412 User’s Manual 4.4.2 Set Each VDSL Port Name of Unit ............................................................................................ 26 4.4.3 Display All Ports Status of Unit ................................................................................................. 27 4.4.4 Display All Trunks Status of Unit............................................................................................... 28 4.5 RESET TO DEFAULT ..........................................................
VC-412 User’s Manual 1. INTRODUCTION Thank you for choosing the VC-412 VDSL Managerial Switch for your MDU Solution. PLANET has been on the forefront of VDSL (Very High Bit-Rate Digital Subscriber Line) technologies since their inception, and will always strive to create quality, cost-effective solutions for VDSL users and installers.
VC-412 User’s Manual Back Pressure and IEEE 802.3x compliant flow control Supports 8K MAC addresses entries 1 MB Buffer Memory Back Pressure flow control for half-duplex PAUSE Frame flow control for full-duplex (802.3x) 1.
VC-412 User’s Manual Operating Temperature: 32 to 122°F (0 to 50°C) Storage Temperature: -13 to 158°F (-25 to 70°C) Humidity: 10% - 90% Non-Condensing Certification: FCC, VCCI, CE Net Weight: 4.16 kg Dimensions: 446 × 300 × 44 mm 1.
VC-412 User’s Manual 1.
VC-412 User’s Manual Button Function Reset Push to reboot the switch Normal / Uplink Normal: When connect port D to PC or other end nodes. Uplink: When connect port D to other switch or hub.
VC-412 User’s Manual 2. INSTALLATION 2.1 Connecting VC-412 The VC-412 has the ability to provide up to 12 remote VDSL connections. The VC-412 serves as a VDSL Managerial Switch, it can connect up to 12 sets of PLANET remote VDSL modems such as the VC-101S. The VC-412 connects to the PBX through the POTS/ISDN ports to provide telephone services to the remote ends. The VC-412 VDSL ports then connect to the remote VDSL modems via telephone wires with a maximum distance up to 1.5 km.
VC-412 User’s Manual 2.
VC-412 User’s Manual The VC-412 contains a powerful management interface accessible through the Console Port. This section will discuss connecting to the switch through Console Port or Telnet. For connection to the VC-412 via the console port, you must use the included DB-9 to DB-9 cable. Once out of the box and powered on, you must use the Console Port to setup the switch core settings.
VC-412 User’s Manual . Once you have assigned a valid IP address to the Switch, proceed to chapter 4 for an explanation of the menu systems and commands. 2.3 Telnet Setup Once you have setup the switch IP address via the Console Port, you are ready to access the management functions from any station on your network via Telnet. To connect, simply start your telnet client and enter the address you configured into the switch (Device IP Address).
VC-412 User’s Manual 3. WEB CONFIGURATION 3.1 Web configuration setup Configuration through Web browser interface is a fast and convenient way. Although this is an easy method, you do not have the full flexibility and control granted as you would under Telnet or Console. The HTTP interface allows basic functions, such as Reset Unit Counters. However, we recommend users to perform modifications through Console or Telnet interfaces.
VC-412 User’s Manual E. A password dialog will appear prompting for username and password. The default username is VDSL and password is admin, unless it has been changed previously in the preliminary setup. Important: Username and password are both case sensitive. Note: Browsing is available without becoming an administrator by default. However, the administrator can turn off the browse option (this will be discussed in later).
VC-412 User’s Manual 3.2 Monitor Configuration 3.2.1 Unit Information After the correct username and password are entered, you will be redirected to an administrator page. On this particular screen you will be able to see the Virtual LAN status. This window also contains the serial number information of the units. However, the only adjustable value this panel is the Reset Unit Counter option. This option will reset the Receive, Send and Collision counters for the unit.
VC-412 User’s Manual 3.2.2.2 TRUNK PORT INFORMATION Under this section you will be able to monitor the Ethernet Link, Active and Collision LEDs. A green signal in the LED columns represents active status in the corresponding port and column. 3.3 System configuration 3.3.
VC-412 User’s Manual settings of the switch such as refresh time (the rate at which the monitoring screen refreshes itself to report back statuses) and IP Address. The System Configuration screen is illustrated below; the settings are self-explanatory. 3.3.2 Reset To Default Also available under the System Link is the Reset to Default. Reset to Default option will clear the VC-412 settings, then restore the initial factory settings to it.
VC-412 User’s Manual 3.3.3 Reboot System Reboot System option reboots the VC-412 when it seems to be malfunctioning. It will not reset or change any settings. Select the option from the drop-down menu and press the Set Value button. 3.4 Network Configuration 3.4.1 Protocol Control Selecting on the Network link will allow you to set access methods and set the capability of future firmware updates. In the Protocol Control section you are presented with the selections shown below.
VC-412 User’s Manual 3.4.2 SNMP Access Table Under SNMP Access Table and SNMP Trap Receiver Table options, you can set IP addresses that will be enter into SNMP database relating to the functionality and status of the VC-412. You can grant or deny accesses to a single PC or an entire subnet by entering the appropriate IP address. To utilize this feature, you must have a workstation with SNMP client access and protocols installed.
VC-412 User’s Manual 3.4.3 SNMP Trap Receiver Table The SNMP Trap Receiver Table is a set of user-defined addresses that belonged to the SNMP Trap server. When enabled (entered addresses, 4 receivers maximum) the VC-412 will send out SNMP information to the trap clients. Currently the VC-412 offers 6 Trap Conditions in addition to port information and counters. The 6 trap conditions are: 1. Unit Up (Power On and Check Status OK) 2. Unit Down (Error or Power Off) 3.
VC-412 User’s Manual Note: Be sure to press the Set Value button at the bottom of the screen to administer the new settings, failure to do so will result in lost of settings at refresh time.
VC-412 User’s Manual 4. COMMANDS FOR CONSOLE AND TELNET Once successfully logged into the VC-412, administrator is ready to issue commands to the VC-412. This chapter will cover option menus and their structures, giving details to each option and setting. We will also list the ICD commands index in this chapter. The ICD commands grant a variety of management controls and monitoring reports. The following section will discuss the VC-412 Telnet menu structures and their functions.
VC-412 User’s Manual 4.2.1 System Configuration Choosing System Configuration will allow you to change the basic settings such as IP Address, Subnet, Gateway etc., as well as date and time and login password. I. Select the number you wished to edit and press “Enter” key. Type in the new value and press “Enter”. If you do not wish to change any information press “Enter” key without typing in any information.
VC-412 User’s Manual Figure 24 II. To change password select option 7 and press “Enter” key. Type in the new password and press Enter. III. Enter the new password again to confirm.
VC-412 User’s Manual Important: There is only one set of password; therefore the password will apply to Console connection, Telnet, HTTP, and SNMP client. 4.2.2 Network Configuration Choosing the Network Configuration will allow you to set the access methods for administering the VC-412 as well as some future product enhancements.
VC-412 User’s Manual the VC-412. Note: The password for HTTP is the same as the password in Console, but you will need to specify username for HTTP access. HTTP Security Control: When enabled, anyone who tries to access the VC-412 via HTTP is required to enter a password and username before able to see any settings or information.
VC-412 User’s Manual Enter key, otherwise press Enter key without entering any information to cancel operation. 4.2.3 System MIB Configuration Choosing the System MIB Configuration will allow you to set your Management Information Base fields. This feature allows administrator to enter contact information and it is useful in situations where there is a problem with the unit or the network. The customer can refer to this information from the Web interface or console to contact the vendor or installer.
VC-412 User’s Manual 4.3 SNMP Access Table/SNMP Trap Receive Control Table Choosing option 2 in the Main menu (SNMP Access Table/SNMP Trap Receive Control Table) enables the administrator to set Community and SNMP Access properties.
VC-412 User’s Manual 4.4 VDSL Unit Control To monitor and issue commands to the VC-412: Select option 3 - VDSL Unit Control from the Main menu. 4.4.1 Pass-Through ICD Command to Unit Option 1 will be discussed in “Using the ICD Command Interface” section. In the section, you will learn how to access the command line interface (ICD command interface) of the VC-412, and how to issue commands to the VC-412 via this interface. 4.4.
VC-412 User’s Manual 4.4.3 Display All Ports Status of Unit This option displays the statuses of all twelve VDSL ports. The three counter columns to the right of the status indicators report the amount of packets have received, sent, and collided. Using these statistics you will be able to monitor your network status easily and quickly, allowing you to alleviate network build-up before problems occur.
VC-412 User’s Manual The E/S/A/Er Column represents the current operating status of the ports. E- Enabled S- Sync A- Activity Er- Error 4.4.4 Display All Trunks Status of Unit This option will display the statuses of all four trunk ports. The three counter columns to the right of the status indicators report the amount of packets have received, sent, and collided.
VC-412 User’s Manual Note: Packet throughput is polled every 6 seconds. 4.5 Reset To Default At the Main menu, you have the options to reset the VC-412 to its factory default settings. The Reset option will reset ALL settings back to factory default; IP Addresses, Gateway Address, Subnet Address, Auto Refresh Time, and any other commands issued to the VC-412 will be lost by the reset.
VC-412 User’s Manual 4.7 Logout After finished issuing commands to the VC-412, it is recommended that you log out of the interface. Logging out will ultimately end the session and require to re-enter password to re-login. Note: Make sure to save all changes before logging out.
VC-412 User’s Manual 5. ICD COMMANDS FOR TELNET AND CONSOLE NOTE: DO NOT ATTEMPT TO ISSUE COMMANDS TO THE SWITCH VIA THE ICD COMMAND LINE INTERFACE UNLESS YOU HAVE READ THIS SECTION. This section will discuss accessing the command line interface within the switch, and the commands available in this mode. It is recommended that you read this section before proceeding into the command line interface. 5.
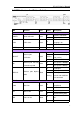
VC-412 User’s Manual The above line indicates “U00-ICD>”. The unit is now ready to be administered through ICD commands. 5.2 ICD command Index Table Please find the following table for available commands. ICD Console Command & Description Index Table Command Description System Command ? Display command list U Display unit information S Save data to EEPROM This command will save: VDSL and Trunk port settings.
VC-412 User’s Manual VDSL port Enable Speed Mode = Auto Speed X To exit ICD command prompt VLAN Command V Show the current VLAN settings VO Set VLAN to ON *1 VF Set VLAN to OFF VG -, ..., Select the to belong to The available VLAN group number is from 1 to 16. Issue this VG command will automatically switch the VLAN mode to USER DEFINED. Example: “VG 2-1,2,3,B” will create VLAN group 2 with member ports:1,2,3 and B.
VC-412 User’s Manual P Show the status of all ports. Legend: RS Err = Reed Solomon Error AUT = Auto PRE = Preset MAN = Manual P/A = Preset/Actual * = Don't Care PE enable PD Disable Note: There are three VLAN modes: ON, OFF and USER DEFINED. When the VLAN mode is OFF, all VDSL and Ethernet ports can communicate each other. When VLAN mode is ON, the switch will automatically create the following 13 VLANs.
VC-412 User’s Manual non-communicative to the other ports on the VC-412 in regards to local traffic. Deactivating VLAN allows the switch to act as a normal Ethernet VC-412, by passing along multicast and broadcast traffic to each port. Disabling this feature would be useful when installing the VC-412 in office settings and for file/print sharing. Within the ICD command interface or web interface, you can turn the VLAN function on or off.
VC-412 User’s Manual VG 1-1,2,A Add port-4, port-8 and port-D to group 1 from previous example VG 1-1,2,4,8,A,D Delete port-2 and port-8, port-A of group 1 from previous example VG 1-1,4,D Empty group 1 VG 1Add port-1, port-3, port-6, port-10, port-B, port-C, port-D to group 5 VG 5-1,3,6,10,B,C,D You can verify the VLAN groups through the “V” command. 5.4 VDSL Command For VDSL local and remote connections to establish, local switch and remote modem must adjust to a corresponding rate.
VC-412 User’s Manual connected port of the VC-412 to the same speed. The reason you need to set the speed on the remote modem first is when you adjusts the speed on the remote modem, connection with end since speeds on both sides will be different. After setting the VC-412 port to the same speed as the remote modem, connection will re-establish if it is within the distance limitation. For example if you want to test the quality of transmission with the stream rate speed at speed level-B (5 Mbps symmetric).
VC-412 User’s Manual The “PC” command displays all ports Transmit, Receive and Collision statuses.
VC-412 User’s Manual APPENDIX A – VC-412 FACTORY DEFAULT Virtual LAN – On Ethernet Speed – 100 Full/Half Duplex VDSL Port Line Rate – Downstream at 4 Mbps Upstream at 1 Mbps IP Address – 192.168.1.
VC-412 User’s Manual APPENDIX B – UPDATE VC-101S FIRMWARE TO R4.5 REMOTELY THROUGH VC-412 The purpose of this appendix is to upgrade older versions of VC-101 (R2 or R4) into the newest version (R4.5) remotely through VC-412. The new version will contain auto-speed function which can seek the maximum transmission speed automatically. The default speed of version R4.
VC-412 User’s Manual can not be saved. Thus, you have to continue the following command to update the VC-101S firmware. Refer to the table below for speed versions Speed VC-101S Version P R2 (12.5/12.5) Q R4 (18/16) A LWD (4/1) 4. Now set the remote modem’s speed to A which is the LWD mode.
VC-412 User’s Manual For more detailed ICD command description please refer to the Chapter 5.