
Manual

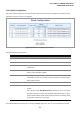
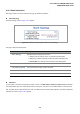


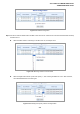

Table Of Contents
- 1. INTRODUTION
- 2. INSTALLATION
- 3. SWITCH MANAGEMENT
- 4. WEB CONFIGURATION
- 4.1 Main WEB PAGE
- 4.2 System
- 4.3 Simple Network Management Protocol
- 4.4 Port Management
- 4.5 Link Aggregation
- 4.6 VLAN
- 4.7 Rapid Spanning Tree Protocol
- 4.8 Quality of Service
- 4.9 Multicast
- 4.10 IEEE 802.1X Network Access Control
- 4.10.1 Understanding IEEE 802.1X Port-Based Authentication
- 4.10.2 802.1X System Configuration
- 4.10.3 802.1X and MAC-Based Authentication Port Configuration
- 4.10.4 802.1X Port Status
- 4.10.5 802.1X and MAC-Based Authentication Statistics
- 4.10.6 Windows Platform RADIUS Server Configuration
- 4.10.7 802.1X Client Configuration
- 4.11 Access Control Lists
- 4.12 Address Table
- 4.13 Port Security (To be Continued)
- 4.14 LLDP
- 4.15 Network Diagnastics
- 4.16 Stacking – SGSW-24040 / SGSW-24040R
- 4.17 Power over Ethernet (SGSW-24040P / SGSW-24040P4)
- 5. COMMAND LINE INTERFACE
- 6. Command Line Mode
- 6.1 System Command
- 6.2 Port Management Command
- 6.3 Link Aggregation Command
- 6.4 VLAN Configuration Command
- 6.5 Spanning Tree Protocol Command
- 6.6 Multicast Configuration Command
- 6.7 Quality of Service Command
- 6.8 802.1x Port Access Control Command
- 6.9 Access Control List Command
- 6.10 MAC Address Table Command
- 6.11 LLDP Command
- 6.12 Stack Management Command
- 6.13 Power over Ethernet Command
- 7. SWITCH OPERATION
- 8. POWER OVER ETHERNET OVERVIEW
- 9. TROUBLE SHOOTING
- APPENDEX A
- APPENDEX B : GLOSSARY

User’s Manual of WGSW-24040 Series
SGSW-24040/24240 Series
201
4.16.1 Stack
This section provides information for understand stacking architecture, include the below items:
Switch IDs
• Assigning and Swapping Switch IDs
• Removing a Switch From the Stack
• Replacing a Switch
• General Switch ID Assignment Rules
Master Election
Stack Redundancy
Shortest Path Forwarding
4.16.1.1 Switch IDs
The Switch ID (1-16) assigned to a SGSW Switch.
Assigning and Swapping Switch IDs
When a switch is added to the stack, a Switch ID is automatically assigned to the switch. The automatic SID assignment can
be modified by choosing a different Switch ID on the Stack Configuration page. This method allows Switch IDs to be assigned
so that it is easier for the user to remember the ID of each switch.
The Switch IDs of two switches can be swapped by simply interchanging the values in the Switch ID column.
Changing Switch IDs does not result in any interruption of the stack operation.
Removing a Switch From the Stack
When a switch is removed from the stack, the configuration for the switch is preserved, and the switch still appears on the
Stack Configuration page. If the configuration of the switch is not to be transferred to another switch, then the configuration
may be deleted by choosing Delete, followed by "Save".
Replacing a Switch
If a switch is to be replaced with another switch (for example, replacing failing hardware), the following procedure must be
used to assign the configuration of the failing switch to the new hardware:
1. Remove the failing switch from the stack. For example, assume that the failing switch had Switch ID 3.
2. Insert the new switch into the stack. The new switch is assigned an unused Switch ID.
3. To remove the automatic switch ID assignment, choose "Delete", followed by "Save". The new switch is then
shown with Switch ID set to "-".
4. To assign the configuration of Switch ID 3 to the new hardware, simply choose 3 in the Switch ID column and click