
User's Manual

– 5 –
– 6 –
– 7 –
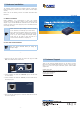
1. Select the right DC power output and connect DC plug from “DC
OUT” of the POE-172S to remote device.
DC Out Ethernet
10/100/1000BASE-T
12V 19V 24V
Incorrect voltage might cause device damage
CAUTION
Disconnect “PoE In” cable
before changing Voltage
Note
2. Connect standard UTP cable from “Ethernet” port of the POE-172S
to remote device.
3. Connect standard UTP cable from “PoE In” port of the POE-172S to
PoE switch/injector.
PoE In
POE-172S
Ultra PoE Splitter
10/100/1000BASE-T
4. Power on the PoE switch/injector to enable the POE-172S and remote
device to be powered.
5. Hardware Installation
The following section describes the hardware features of POE-172S.
Before connecting any network device to them, please read this chapter
carefully.
Please refer to the following sections for detailed information about
POE-172S.
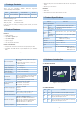
5.1 Before Installation
Before installation, it is recommended to check your network
environment. If there is diculty in nding a power socket for AC-DC
adapter of your non-PoE IEEE 802.3at networked device, the POE-172S
provides you with a way out to supply DC power to this Ethernet device
conveniently and easily.
Note
1. Please ensure the output voltage is correct for remote
device. Otherwise, it will damage your remote device.
2. Don’t change the DC-output voltage during operation.
Otherwise, it will damage your POE-172S and remote
device. If you want to change the DC-output voltage,
please plug out the “PoE In” cable and wait for 5
seconds until the PWR LED is completely off.
5.2 The POE-172S Installation
Note
Please turn off the POE-172S before you change the
DC-output voltage.
6. Customer Support
Thank you for purchasing PLANET products. You can browse our online
FAQ resource at the PLANET Web site rst to check if it could solve your
issue. If you need more support information, please contact PLANET
support team.
PLANET online FAQs:
http://www.planet.com.tw/en/support/faq.php?type=2
Support team mail address:
support@planet.com.tw