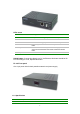
Networking & Communication Powerline Communication Powerline to Ethernet Converter – PL-101E USB to Powerline Network Adapter - PL-101U USER’S MANUAL 1
Copyright Copyright (C) 2002 PLANET Technology Corp. All rights reserved. The products and programs described in this User’s Manual are licensed products of PLANET Technology, This User’s Manual contains proprietary information protected by copyright, and this User’s Manual and all accompanying hardware, software, and documentation are copyrighted.
Table of Content Chapter 1 Introduction...................................................................................1 1.1 Powerline to Ethernet Converter – PL-101E .......................................1 1.1.1 Features ...................................................................................2 1.1.2 Package Content ......................................................................2 1.1.3 Hardware Description ...............................................................2 1.1.
1. Introduction Powerline communication is revolution in home and small office networking, greatly simplifying the task of installing a high-speed local area network. With PLANET’s powerline communication products, you can utilize existing AC power outlets and wires to connect your computers, servers and other devices safely, securely and at true LAN speeds of up to 14Mbit/second.
advantage of the router's features. The PL-101E can also be plugged directly into a cable or DSL modem to allow Internet access and data transfer rates up to 14Mbps over powerlines. 1.1.1 Features HomePlug Powerline Alliance Specification 1.
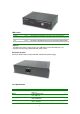
LEDs status LED definition Color Description Power Green The power LED will light up when PL-101E is powered on. Col Green The collision LED flashes when there is a collision. Link Green The link LED will light up when PL-101E is ready for use. Act Green Ethernet port Green Ethernet port Amber The activity LED flashes when there is powerline network traffic. The LED will be lit steadily when there is a physical Ethernet connections and flashes when there is Ethernet network traffic.
Ports Cabling Type Speed Powerline Frequency Band Encryption LEDs: Dimension Weight Certifications Operating Temp. Storage Temp. Operating Humidity Storage Humidity OS support HomePlug 1.0 One Powerline Port One 10Base-T RJ-45 port Powerline: Power Cord LAN: UTP Cat 3 or better Powerline: 14Mbps (actual throughput is about 6Mbps) LAN: 10Mbps 4.3MHz to 20.9MHz 56-bit DES with Key configuration software Power Powerline: Link, ACT, Col LAN: LNK/ACT 146 x 101 x 34 mm 0.
1.2.1 Features ♦ HomePlug Powerline Alliance Specification 1.
LEDs status LED definition Power Col Link Act Color Green Green Green Green Description The power LED will light up when PL-101U is powered on. The collision LED flashes when there is a collision. The link LED will light up when PL-101U is ready for use. The activity LED flashes when there is powerline network traffic. USB port The USB port is where you will connect your USB cable. To work with USB ports, your computer must be running Windows98, ME, 2000 and XP.
Powerline Frequency Band Encryption LEDs: Dimension Weight Certifications Operating Temp. Storage Temp. Operating Humidity Storage Humidity OS support 4.3MHz to 20.9MHz 56-bit DES with Key configuration software Power Powerline: Link, ACT, Col 146 x 101 x 34 mm 0.47 kg FCC Class B, CE 0 ~ 50 degree C -20 ~ 70 degree C 10~90% non-condensing 5~95% non-condensing Windows 98, 2000, Me and XP 1.2.
2. Planning your Powerline Network With PLANET PowerLine products, a network can be created using home powerline. Computers can be networked over powerline using a USB Adapter or an Ethernet converter. Use PL-101U for a USB-enabled computer or use PL-101E for an Ethernet-enabled computer. The PL-101E is also ideal for any user who already has a router and wants to share high-speed Internet access across the powerline network.
3. Powerline to Ethernet Converter Installation 1. Plug the other end of the UTP category 5 cable into the computer’s LAN port. 2. Plug the UTP category 5 cable into the 10/100 RJ45 Ethernet port on PL-101E. 3. Plug the power cord into the powerline port on PL-101E. 4. Plug the other end of the power cord into a power outlet. Note! Use only the supplied power cord to connect PL-101E to the power outlet.
4. USB to Powerline Network Adapter Installation 4.1 Connecting USB to Powerline Network Adapter 1. Plug the other end of the USB cable into the computer’s USB port. 2. Plug the USB cable into the USB port on PL-101U. 3. Plug the power cord into the powerline port on PL-101U. 4. Plug the other end of the power cord into a power outlet. Note! Use only the supplied power cord to connect PL-101U to the power outlet. Windows 95 and NT do not support the USB adapter.
2. Select “Search for the best driver for your device. (Recommended)” and click the Next button. 3. Windows will look for new drivers and ask you which locations you want to search. Select Specify a location and choose the path as D:\Driver\PL-101U\ (if “D” is the letter of your CD-ROM drive). Click the Next button to continue.
NOTE: Windows 2000 and XP will inform you that there is no digital signature found. Click the Yes button to continue the installation. 4. Windows will tell you when it has finished installing the new driver. Click the Finish button.
5. Click the Yes button to restart your computer, or click the No button to restart later.
5. Encrypting Your Powerline Network 5.1 Install the PowerPacket Encryption Utility To start installation of all the powerline devices, you will use the bundled CD-ROM to run the PowerPacket installshield wizard: 1. Insert the CD into the computer’s CD-ROM drive. Click My Computer on desktop and double-click on your CD-ROM icon. Double clicks “setup.exe” in D:\Utility\PL-101E (if “D” is the letter of your CD-ROM drive) or D:\Utility\PL-101U. 2. Click the Next button to continue.
3. Enter your User Name and Company Name. Select Anyone who uses this computer (all users) to install a shortcut to the security configuration utility on every user’s desktop (The selection is not available for Windows 98 and ME users). Then click the Next button to continue. 4. Click the Install button to begin installation of the security configuration utility.
5. If you are running the utility of PL-101E, it may show the following window. Click Yes button if PL-101E has connected to your computer and the outlet properly. 6. Click Finish button to finish the PowerPacket InstallShield wizard.
7. You will be asked to restart your computer. After you click Yes button to restart, the entire installation is complete.
5.2 Run the PowerPacket Encryption Utility After installing the PowerPacket encryption utility for your PL-101E/U, your computer desktop will display this icon, Powerline Network Configuration Utility. Note: Make sure your TCP/IP protocol is set up appropriately on your computer before running security configuration utility. Double-click the icon, “Powerline Network Configuration Utility”, on your desktop. 1. Click Next button to continue. 2.
3. The security configuration utility will search your powerline network for other PL-101E or PL-101U devices configured with the same network password. These devices will be listed in the powerline network devices MAC address box. Then click the Next button.
4. The security configuration utility will tell you when the PL-101E/U device has been configured with the network password. Click Finish button.
6. Troubleshooting The power LED does not light up after I installed the PL101E/U device? A: Unplug the UTP category 5 from the computer. Unplug the power cord from the power outlet. Then repeat the hardware installation process. Make sure the power outlet is working properly. The Link LED does not light up on PL-101E/U. A: When the Ethernet port detects a LAN connection, the Link LED will light up. Check the Ethernet adapter on your computer to see if the connection and adapter are working properly.