
User's Manual
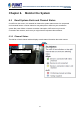
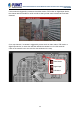
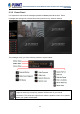
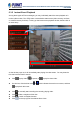
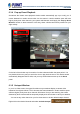
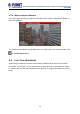
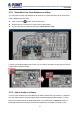


Table Of Contents
- Chapter 1. Product Description
- Chapter 2. Hardware Installation
- Chapter 3. Log in to the System
- Chapter 4. NVR User Interface Overview
- Chapter 5. Live View
- Chapter 6. Monitor the System
- 6.1 Read System Alerts and Channel Status
- 6.2 Live View Operations
- 6.2.1 Show Mini Live View Windows on a Map
- 6.2.2 Adjust Audio-in Volume
- 6.2.3 Send Audio Signal
- 6.2.4 Trigger Digital-out Device
- 6.2.5 Watch Instant Playback of a Channel
- 6.2.6 Manual Recording
- 6.2.7 Take a Snapshot of Live Image
- 6.2.8 Digital PTZ Operation
- 6.2.9 Optical PTZ Operation
- 6.2.10 Navigate a Fisheye Camera Channel
- Chapter 7. Playback
- 7.1 Playback UI Introduction
- 7.2 How to Do Playback
- 7.3 Search on Time Bar
- 7.4 Digital Zoom on Channel View
- 7.5 Explore Fisheye View
- 7.6 Search by Time
- 7.7 Search by Event Type
- 7.8 Search by Video Analytics
- 7.9 View Search Results
- 7.10 Take a Snapshot of the Playback View
- 7.11 Export the Recordings
- 7.12 Set the Export Video Settings
- Appendix A: Default Setting
- Appendix B: NVR Performance

64-Channel Windows-based Network Video Recorder with 8-bay Hard Disks
NVR-E6480
44
6.1.3 Instant Event Playback
Among these types of Event messages, you may individually watch the event playback of a
motion (video motion, DI or PIR) event or transmission status event (video recovery and loss,
or network recovery and loss). To bring up the instant event playback window, double-click on
an event entry:
As the window pops out, it will immediately start playing live view stream. You may draw the
time bar back and forth to search.
Click
to play video, to pause, or to play live view video.
On time bar, click the blue mark
or which indicates the event’s occurrence, and then
to play back this event.
Click
to manually start recording the currently-playing video.
Click
to take a snapshot of this view.
Click
to switch to Playback screen.
Click
on the top right of the window title to close.