
User's Manual
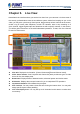
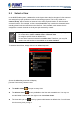
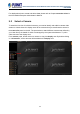

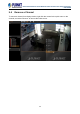

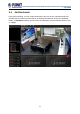


Table Of Contents
- Chapter 1. Product Description
- Chapter 2. Hardware Installation
- Chapter 3. Log in to the System
- Chapter 4. NVR User Interface Overview
- Chapter 5. Live View
- Chapter 6. Monitor the System
- 6.1 Read System Alerts and Channel Status
- 6.2 Live View Operations
- 6.2.1 Show Mini Live View Windows on a Map
- 6.2.2 Adjust Audio-in Volume
- 6.2.3 Send Audio Signal
- 6.2.4 Trigger Digital-out Device
- 6.2.5 Watch Instant Playback of a Channel
- 6.2.6 Manual Recording
- 6.2.7 Take a Snapshot of Live Image
- 6.2.8 Digital PTZ Operation
- 6.2.9 Optical PTZ Operation
- 6.2.10 Navigate a Fisheye Camera Channel
- Chapter 7. Playback
- 7.1 Playback UI Introduction
- 7.2 How to Do Playback
- 7.3 Search on Time Bar
- 7.4 Digital Zoom on Channel View
- 7.5 Explore Fisheye View
- 7.6 Search by Time
- 7.7 Search by Event Type
- 7.8 Search by Video Analytics
- 7.9 View Search Results
- 7.10 Take a Snapshot of the Playback View
- 7.11 Export the Recordings
- 7.12 Set the Export Video Settings
- Appendix A: Default Setting
- Appendix B: NVR Performance

64-Channel Windows-based Network Video Recorder with 8-bay Hard Disks
NVR-E6480
31
View Chapter 5. Live
Live View is the interface where you see the live views from your cameras. It is where most of
the security professionals access the surveillance system. Aside from keeping an eye on the
video, you may also cycle through View layouts, drag and drop various cameras to the screen,
review a log of events, take snapshots, control PTZ cameras, start or stop recording on a
given channel, trigger Digital output and broadcast or talk to specific cameras. In this section,
you will be given instructions on the said fundamental operations. To start, click Live View tab
to enter live view screen.
QuickCommandBar
View Info: Displays the information: [Current View name][Focused Channel name].
Video Source Panels: View List panel and Camera list panel provide two types of video
source for live view display area.
Event Panel: Displays alerts of detected motion, abnormal system and device status.
PTZ Panels: Displays the onscreen buttons for you to manipulate PTZ operations.
Layout Selection Bar: Offers different layout styles.
View Tool Bar: You may create a view and save it using the buttons here. You may also
assign specific layout to start patrolling.
Live View Display Area: You may add up to 64 channels into this area to monitor them
concurrently.