
User's Manual
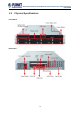
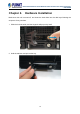
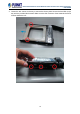
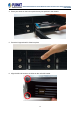
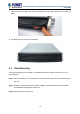
Table Of Contents
- Chapter 1. Product Description
- Chapter 2. Hardware Installation
- Chapter 3. Log in to the System
- Chapter 4. NVR User Interface Overview
- Chapter 5. Live View
- Chapter 6. Monitor the System
- 6.1 Read System Alerts and Channel Status
- 6.2 Live View Operations
- 6.2.1 Show Mini Live View Windows on a Map
- 6.2.2 Adjust Audio-in Volume
- 6.2.3 Send Audio Signal
- 6.2.4 Trigger Digital-out Device
- 6.2.5 Watch Instant Playback of a Channel
- 6.2.6 Manual Recording
- 6.2.7 Take a Snapshot of Live Image
- 6.2.8 Digital PTZ Operation
- 6.2.9 Optical PTZ Operation
- 6.2.10 Navigate a Fisheye Camera Channel
- Chapter 7. Playback
- 7.1 Playback UI Introduction
- 7.2 How to Do Playback
- 7.3 Search on Time Bar
- 7.4 Digital Zoom on Channel View
- 7.5 Explore Fisheye View
- 7.6 Search by Time
- 7.7 Search by Event Type
- 7.8 Search by Video Analytics
- 7.9 View Search Results
- 7.10 Take a Snapshot of the Playback View
- 7.11 Export the Recordings
- 7.12 Set the Export Video Settings
- Appendix A: Default Setting
- Appendix B: NVR Performance

64-Channel Windows-based Network Video Recorder with 8-bay Hard Disks
NVR-E6480
18
7. Press the latch and push the right end towards the unit’s right handle until it clicks into
place.
8. The NVR with front cover is shown below.
2.1 Rack Mounting
This unit is designed to be mounted on a standard server rack, which occupies 2U (3.5”) of
vertical space.
Step 1: Allow a minimum of 5 cm clearance at the front and the rear for front-to-back airflow of
the unit.
Step 2: Prepare a rack shelf rated for the unit’s weight or purchase the rail kit from PLANET,
and install that to support the entire unit.
Step 3: Secure the unit onto the rack.