
User's Manual
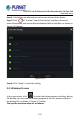
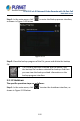
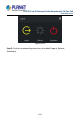


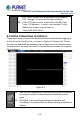
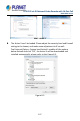
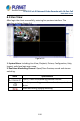
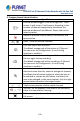

Table Of Contents
- Copyright
- Declaration
- Contents
- Chapter 1 Outlines and Features
- Chapter 2 NVR Appearance
- Chapter 3 Connecting NVR
- Chapter 4 NVR Startup
- Chapter 5 NVR Menu
- Chapter 6 Web Operation
- 6.1 Internet connection
- 6.2 Browser Login
- 6.3 Active X download, installation
- 6.4 Live View
- 6.5 Configuration
- 6.5.1 Local Config
- 6.5.2 Camera
- 6.5.3 Storage
- 6.5.3.1 Channel Recording
- Step 1: In the main interface, click "Configuration → Storage→ Channel Recording" to enter the recording setting interface, as shown in Figure 6-14 below.
- Figure 6-14
- Step 2: Set parameters, see the table below.
- Table 6-1
- Step 3: Click "Save" to complete configuration.
- Encode
- In the main interface, click "Configuration →Record →Encode" to enter the encoding setting interface, as shown in Figure 6-15 below. Here you can view and set the encoding parameter values for accessing the IPC. The relevant parameters and NVR-side se...
- Figure 6-15
- 6.5.3.2 Storage Manage
- HDD
- In the main interface, click "Configuration →Storage →Storage Manage" to enter the HDD interface, as shown in Figure 6-16 below. Here you can view the HDD information of the connected device and format the hard disk. The operation steps of formatting ...
- Figure 6-16
- Cloud Storage
- In the main interface, click "Configuration →System →Network →Cloud Storage" to enter Cloud Storage and IPEYE setting interface, as shown in Figure 6-17 below. Here you could enable and set the function of Cloud Storage and IPEYE, the specific setting...
- Figure 6-17
- 6.5.4 System
- 6.5.5 Maintain
- 6.6 Playback
- 6.7 Picture
- Chapter 7 Appendix

H.265 25-ch 4K Network Video Recorde with 16-Port PoE
NVR-2500 Series
194
Chapter 6 Web Operation
Different types of devices have different interface displays.
The following pictures are for reference only. Please refer to
the actual ones.
The NVR supports accessing and managing devices on the PC
through the Web.
The Web page provides application modules such as real-time
preview, playback, configuration, and logout.
The device supports a variety of browser monitoring, such as
IE browser, 360 browser, Firefox browser (52 or less version),
Google Chrome (Chrome45 or less version).
Users can access the device's Web control interface through
multiple PCs at the same time.
6.1 Internet connection
Before using the browser to log in to the web interface, check whether the
network between the PC and the NVR is normal.
Step 1: Confirm that the NVR device is properly connected to the network.
Step 2: Set the IP address, subnet mask, and gateway for the PC and NVR
devices, respectively.
If there is no routing device on the network, allocate the IP address
of the same network segment: If there is a routing device on the
network, you need to set the corresponding gateway and subnet
mask.
The default IP address of the NVR device is 192.168.1.88.
Step 3: Check whether the network between the PC and the NVR device is
normal. The method is as follows: When the network between the PC and
the NVR device is normal, you can log in to the web interface of the NVR
through the PC.
On the PC, ping***.***.***.*** (NVR IP address) verifies that the
network is connected and the returned TTL value is generally equal
to 255.
Log in to the local interface of the NVR device, and fill in the IP
address of the PC on the "Network Test" interface to test whether