
User's Manual
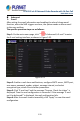


Table Of Contents
- Copyright
- Declaration
- Contents
- Chapter 1 Outlines and Features
- Chapter 2 NVR Appearance
- Chapter 3 Connecting NVR
- Chapter 4 NVR Startup
- Chapter 5 NVR Menu
- Chapter 6 Web Operation
- 6.1 Internet connection
- 6.2 Browser Login
- 6.3 Active X download, installation
- 6.4 Live View
- 6.5 Configuration
- 6.5.1 Local Config
- 6.5.2 Camera
- 6.5.3 Storage
- 6.5.3.1 Channel Recording
- Step 1: In the main interface, click "Configuration → Storage→ Channel Recording" to enter the recording setting interface, as shown in Figure 6-14 below.
- Figure 6-14
- Step 2: Set parameters, see the table below.
- Table 6-1
- Step 3: Click "Save" to complete configuration.
- Encode
- In the main interface, click "Configuration →Record →Encode" to enter the encoding setting interface, as shown in Figure 6-15 below. Here you can view and set the encoding parameter values for accessing the IPC. The relevant parameters and NVR-side se...
- Figure 6-15
- 6.5.3.2 Storage Manage
- HDD
- In the main interface, click "Configuration →Storage →Storage Manage" to enter the HDD interface, as shown in Figure 6-16 below. Here you can view the HDD information of the connected device and format the hard disk. The operation steps of formatting ...
- Figure 6-16
- Cloud Storage
- In the main interface, click "Configuration →System →Network →Cloud Storage" to enter Cloud Storage and IPEYE setting interface, as shown in Figure 6-17 below. Here you could enable and set the function of Cloud Storage and IPEYE, the specific setting...
- Figure 6-17
- 6.5.4 System
- 6.5.5 Maintain
- 6.6 Playback
- 6.7 Picture
- Chapter 7 Appendix

H.265 25-ch 4K Network Video Recorde with 16-Port PoE
NVR-2500 Series
132
Enable E-mail: Enable / disable mail sending.
SMTP Server: Select the SMTP sever type.
SMTP Port: Please input corresponding port value here.
User Name: Please input the user name to login the sender email box.
Password: Please input the corresponding password here.
Sender: Please input sender email box here.
Recipient 1/2/3 : Recipient e-mail address 1/2/3 .
Subject: Please input email subject here. System support English
character and Arabic number, default "XNVR_ALERT ".
Message Interval (Min): The interval between sending emails. After the
email sending interval is set, when the alarm is triggered, the system
does not trigger the immediate sending of the email according to the
alarm signal. Instead, the email is sent according to the interval time of
the same type of event email. Avoid frequent alarms and generate a lot
of mail, causing the mail server to be overstressed. The time range is
0~600 minutes, and 0 minutes means that the mail is sent without
interval.
Encryption: Select the Mailbox server encryption, including NONE, SSL,
TLS, and default "SSL".
Attach File: Turn on/off the email attachment function. After the alarm
is turned on, the system can send snap shots when the alarm is sent.
Week: Select the time to send emails according to the week, and you
can set two time periods per day.
Time period (1/2): Set the time range for sending mail. After setting,
send the alarm message at that time; do not send mail at other times.
Enable Auto Email: Enable / disable automatic email sending.
Email interval (min): Mail sending interval.
E-mail Test: Test email sending and receiving functions are normal. In
the correct configuration, the receiving email will receive a test email.
When the test fails, check the parameters or network status.