
User's Manual

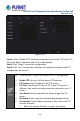
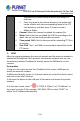


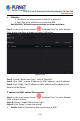

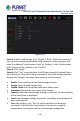
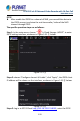
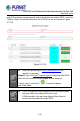
Table Of Contents
- Copyright
- Declaration
- Contents
- Chapter 1 Outlines and Features
- Chapter 2 NVR Appearance
- Chapter 3 Connecting NVR
- Chapter 4 NVR Startup
- Chapter 5 NVR Menu
- Chapter 6 Web Operation
- 6.1 Internet connection
- 6.2 Browser Login
- 6.3 Active X download, installation
- 6.4 Live View
- 6.5 Configuration
- 6.5.1 Local Config
- 6.5.2 Camera
- 6.5.3 Storage
- 6.5.3.1 Channel Recording
- Step 1: In the main interface, click "Configuration → Storage→ Channel Recording" to enter the recording setting interface, as shown in Figure 6-14 below.
- Figure 6-14
- Step 2: Set parameters, see the table below.
- Table 6-1
- Step 3: Click "Save" to complete configuration.
- Encode
- In the main interface, click "Configuration →Record →Encode" to enter the encoding setting interface, as shown in Figure 6-15 below. Here you can view and set the encoding parameter values for accessing the IPC. The relevant parameters and NVR-side se...
- Figure 6-15
- 6.5.3.2 Storage Manage
- HDD
- In the main interface, click "Configuration →Storage →Storage Manage" to enter the HDD interface, as shown in Figure 6-16 below. Here you can view the HDD information of the connected device and format the hard disk. The operation steps of formatting ...
- Figure 6-16
- Cloud Storage
- In the main interface, click "Configuration →System →Network →Cloud Storage" to enter Cloud Storage and IPEYE setting interface, as shown in Figure 6-17 below. Here you could enable and set the function of Cloud Storage and IPEYE, the specific setting...
- Figure 6-17
- 6.5.4 System
- 6.5.5 Maintain
- 6.6 Playback
- 6.7 Picture
- Chapter 7 Appendix

H.265 25-ch 4K Network Video Recorde with 16-Port PoE
NVR-2500 Series
121
Steps 2: Choose "Enable NTP" to set NTP related parameters.
NTP Sever: Select the domain name of the server where the NTP service
is installed.
Custom: When the NTP server selects "Custom", enter the NTP server
domain name manually.
NTP Port: Select the port corresponding to the NTP server.
Interval (Min): The interval of NTP time correction, the default is 720
minutes, and the settable range is 30-1440 minutes.
Steps 3: Click "Apply" to save the setting.
FTP
With FTP (File Transfer Protocol) server, you can store alarm pictures on the
FTP server.
Prerequisites
You need to purchase or download the FTP service tool and install the
software on your PC.
To create an FTP user, you must set FTP folder write
permission. Otherwise, the picture will not be uploaded
successfully.
The specific operation steps are as follows:
Step 1: On the main menu page, click "
→ Network → FTP" to enter
the FTP interface, as shown in Figure 5-47.