
User's Manual
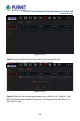

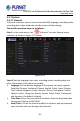


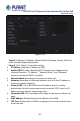
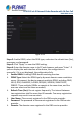
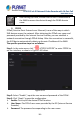
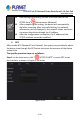
Table Of Contents
- Copyright
- Declaration
- Contents
- Chapter 1 Outlines and Features
- Chapter 2 NVR Appearance
- Chapter 3 Connecting NVR
- Chapter 4 NVR Startup
- Chapter 5 NVR Menu
- Chapter 6 Web Operation
- 6.1 Internet connection
- 6.2 Browser Login
- 6.3 Active X download, installation
- 6.4 Live View
- 6.5 Configuration
- 6.5.1 Local Config
- 6.5.2 Camera
- 6.5.3 Storage
- 6.5.3.1 Channel Recording
- Step 1: In the main interface, click "Configuration → Storage→ Channel Recording" to enter the recording setting interface, as shown in Figure 6-14 below.
- Figure 6-14
- Step 2: Set parameters, see the table below.
- Table 6-1
- Step 3: Click "Save" to complete configuration.
- Encode
- In the main interface, click "Configuration →Record →Encode" to enter the encoding setting interface, as shown in Figure 6-15 below. Here you can view and set the encoding parameter values for accessing the IPC. The relevant parameters and NVR-side se...
- Figure 6-15
- 6.5.3.2 Storage Manage
- HDD
- In the main interface, click "Configuration →Storage →Storage Manage" to enter the HDD interface, as shown in Figure 6-16 below. Here you can view the HDD information of the connected device and format the hard disk. The operation steps of formatting ...
- Figure 6-16
- Cloud Storage
- In the main interface, click "Configuration →System →Network →Cloud Storage" to enter Cloud Storage and IPEYE setting interface, as shown in Figure 6-17 below. Here you could enable and set the function of Cloud Storage and IPEYE, the specific setting...
- Figure 6-17
- 6.5.4 System
- 6.5.5 Maintain
- 6.6 Playback
- 6.7 Picture
- Chapter 7 Appendix

H.265 25-ch 4K Network Video Recorde with 16-Port PoE
NVR-2500 Series
114
Record Mode: For "Overwrite", when the disk is full, it will
automatically overwrite the oldest video; when the disk is not full, but
the number of video days reaches the user setting, the oldest video will
be automatically overwritten.
Record Days: Set the number of days for NVR recording storage. There
are no Limit, 30, 15, 7, 6, 5, 4, 3, 2, 1 options in the drop-down menu.
Auto Log Out: The default is 10 minutes, can be set range: 1 Minute, 2
Minutes, 5 Minutes, 10 Minutes, 20 Minutes, 30 Minutes, 60 Minutes
and Never, where "Never" for the permanent standby.
Device Name: Fill in the name of the device according to actual needs,
the default is NVR.
Mouse Pointer Speed: Set the mouse movement speed, the larger the
value, the faster the mouse response, and the smaller the value, the
slower the mouse response, you can set 0-5.
Enable Wizard: Click the "
", open the startup wizards, and then
directly enter the "Startup Wizard" interface each time you boot.
Date Format: Select the date display format, including "Day Month
Year", "Month Day Year" and "Year Month Day".
Time Format: Choose a 24-Hour or 12-Hour format.
Separator: Select the separator for the date format.
Enable DST: Check "
", open the daylight saving time function, set the
relevant parameters, such as Type, Date, Start Time, End Time and so
on.
Type: Daylight saving time setting.
Start Time: The start time for daylight saving time
End Time: The end time for daylight saving time
Offset(min): The offset time for daylight saving time
Channel Check Time: Select the channel whose time needs to be
checked, set the update interval, and click "Save" to set the channel
time to be consistent with the NVR time.
Steps 3: Click "Apply" to save the setting.