
User's Manual
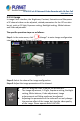
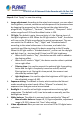
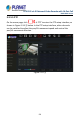

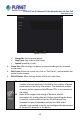
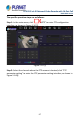
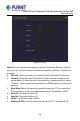
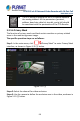
Table Of Contents
- Copyright
- Declaration
- Contents
- Chapter 1 Outlines and Features
- Chapter 2 NVR Appearance
- Chapter 3 Connecting NVR
- Chapter 4 NVR Startup
- Chapter 5 NVR Menu
- Chapter 6 Web Operation
- 6.1 Internet connection
- 6.2 Browser Login
- 6.3 Active X download, installation
- 6.4 Live View
- 6.5 Configuration
- 6.5.1 Local Config
- 6.5.2 Camera
- 6.5.3 Storage
- 6.5.3.1 Channel Recording
- Step 1: In the main interface, click "Configuration → Storage→ Channel Recording" to enter the recording setting interface, as shown in Figure 6-14 below.
- Figure 6-14
- Step 2: Set parameters, see the table below.
- Table 6-1
- Step 3: Click "Save" to complete configuration.
- Encode
- In the main interface, click "Configuration →Record →Encode" to enter the encoding setting interface, as shown in Figure 6-15 below. Here you can view and set the encoding parameter values for accessing the IPC. The relevant parameters and NVR-side se...
- Figure 6-15
- 6.5.3.2 Storage Manage
- HDD
- In the main interface, click "Configuration →Storage →Storage Manage" to enter the HDD interface, as shown in Figure 6-16 below. Here you can view the HDD information of the connected device and format the hard disk. The operation steps of formatting ...
- Figure 6-16
- Cloud Storage
- In the main interface, click "Configuration →System →Network →Cloud Storage" to enter Cloud Storage and IPEYE setting interface, as shown in Figure 6-17 below. Here you could enable and set the function of Cloud Storage and IPEYE, the specific setting...
- Figure 6-17
- 6.5.4 System
- 6.5.5 Maintain
- 6.6 Playback
- 6.7 Picture
- Chapter 7 Appendix

H.265 25-ch 4K Network Video Recorde with 16-Port PoE
NVR-2500 Series
92
Steps 4: Click "Apply" to save the setting.
Image adjustment: According to the actual environment, you can adjust
the brightness, contrast, saturation and sharpness of the preview screen
by dragging the progress bar. You can also set the value behind the
progress bar, "Brightness", "Contrast", "Saturation", "Sharpness". Valid
values range from 0-255 and the default value is 128.
Fill light: The default is auto, the sensitivity is 3, the filtering time is 3,
the light brightness is 100. When the fill light mode is "Auto", the device
will turn on the fill light according to the actual environment. The user
can switch the fill mode to "Day", "Night" and "Scheduled switch"
according to the actual video scene in the scene, and switch the
sensitivity and filtering time of the device according to the fill mode.
When the fill light mode is "Scheduled switch", you can set the daylight
and dark time (i.e., start and end fill time) and fill light brightness.
When the fill mode is "Day", the device monitor video is added to
the daytime effect.
When the fill mode is "Night", the device monitor video is patched
into a night effect.
Filtering time: It is used to prevent the ambient light from getting
better and the light is frequently turned on and off, and the
filtering time is set. During this time period, the camera is not
disturbed by ambient light.
Light brightness: It is used to adjust the brightness of fill light, and
the adjustable range is 0-100.
Exposure setting: The default is Aunto, which switches the Manual
mode according to actual needs. When "Manual" is selected, the
exposure time and gain control are activated.
Backlight: It is used to set backlight compensation and strong light
suppression. The default is off, it can be turned on manually, and the
backlight can be set.
White balance: The default is auto and can be switched to "Manual".
Manual white balance: Support R, G, B gain adjustable, adjustment
range is (0-255), please click "Save" after setting.
Video adjustment: Here you can turn on and set 2D or 3D digital noise
reduction.