
User's Manual
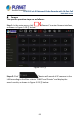
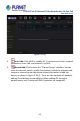
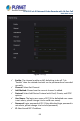
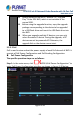
Table Of Contents
- Copyright
- Declaration
- Contents
- Chapter 1 Outlines and Features
- Chapter 2 NVR Appearance
- Chapter 3 Connecting NVR
- Chapter 4 NVR Startup
- Chapter 5 NVR Menu
- Chapter 6 Web Operation
- 6.1 Internet connection
- 6.2 Browser Login
- 6.3 Active X download, installation
- 6.4 Live View
- 6.5 Configuration
- 6.5.1 Local Config
- 6.5.2 Camera
- 6.5.3 Storage
- 6.5.3.1 Channel Recording
- Step 1: In the main interface, click "Configuration → Storage→ Channel Recording" to enter the recording setting interface, as shown in Figure 6-14 below.
- Figure 6-14
- Step 2: Set parameters, see the table below.
- Table 6-1
- Step 3: Click "Save" to complete configuration.
- Encode
- In the main interface, click "Configuration →Record →Encode" to enter the encoding setting interface, as shown in Figure 6-15 below. Here you can view and set the encoding parameter values for accessing the IPC. The relevant parameters and NVR-side se...
- Figure 6-15
- 6.5.3.2 Storage Manage
- HDD
- In the main interface, click "Configuration →Storage →Storage Manage" to enter the HDD interface, as shown in Figure 6-16 below. Here you can view the HDD information of the connected device and format the hard disk. The operation steps of formatting ...
- Figure 6-16
- Cloud Storage
- In the main interface, click "Configuration →System →Network →Cloud Storage" to enter Cloud Storage and IPEYE setting interface, as shown in Figure 6-17 below. Here you could enable and set the function of Cloud Storage and IPEYE, the specific setting...
- Figure 6-17
- 6.5.4 System
- 6.5.5 Maintain
- 6.6 Playback
- 6.7 Picture
- Chapter 7 Appendix

H.265 25-ch 4K Network Video Recorde with 16-Port PoE
NVR-2500 Series
87
Domain: Need to add IPC domain name address, such as peanut
shell address, DDNS address.
Port: Access to the port used by IPC, the default is 80.
Update: Select one or more upgrade devices of the same type,
insert the U disk storing the upgrade package of the device into the NVR,
click "Upgrade", the system will find the upgrade package in the U disk
and display it, select the upgrade package, click "Upgrade ", Upgrade IPC
in batches at the same time.
Delete: In the list of added devices, select the channel to be deleted
and click the "Delete" button to delete all selected devices.
Enable H264+/H265+: Click to turn on H264 + / H265 + encoding for
all channels. To turn off H264 + / H265 + encoding, you can turn off the
channel H264 + / H265 + in the Parameters interface.
: Click and enter the channel setting interface, this function is the
same as” manual add”.
: Delete the current IPC from the device list.
Link: "
" indicates that the connection is successful, and " "
indicates that the connection fails. If the connection fails, the
connection status will indicate the cause of the failure. If the password
is incorrect, the user password will be incorrect.
An IPC can only be added once by the NVR.
When modifying IPs in batches, ensure that the user
name and password of all selected devices are the
same.
If you modify IPs in batches and the IP addresses
conflict, the system automatically skips conflicting IPs
and re-assigns them incrementally.
After modifying the IP in batches, search for the
remote device again. The new IP address will be
displayed in the list.
After you select a device to add a button, all devices
will re-assign the IP address. Use NOTE.