
User's Manual
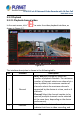
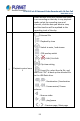
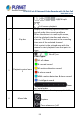
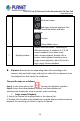
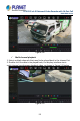
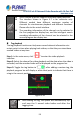
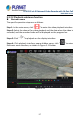
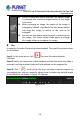

Table Of Contents
- Copyright
- Declaration
- Contents
- Chapter 1 Outlines and Features
- Chapter 2 NVR Appearance
- Chapter 3 Connecting NVR
- Chapter 4 NVR Startup
- Chapter 5 NVR Menu
- Chapter 6 Web Operation
- 6.1 Internet connection
- 6.2 Browser Login
- 6.3 Active X download, installation
- 6.4 Live View
- 6.5 Configuration
- 6.5.1 Local Config
- 6.5.2 Camera
- 6.5.3 Storage
- 6.5.3.1 Channel Recording
- Step 1: In the main interface, click "Configuration → Storage→ Channel Recording" to enter the recording setting interface, as shown in Figure 6-14 below.
- Figure 6-14
- Step 2: Set parameters, see the table below.
- Table 6-1
- Step 3: Click "Save" to complete configuration.
- Encode
- In the main interface, click "Configuration →Record →Encode" to enter the encoding setting interface, as shown in Figure 6-15 below. Here you can view and set the encoding parameter values for accessing the IPC. The relevant parameters and NVR-side se...
- Figure 6-15
- 6.5.3.2 Storage Manage
- HDD
- In the main interface, click "Configuration →Storage →Storage Manage" to enter the HDD interface, as shown in Figure 6-16 below. Here you can view the HDD information of the connected device and format the hard disk. The operation steps of formatting ...
- Figure 6-16
- Cloud Storage
- In the main interface, click "Configuration →System →Network →Cloud Storage" to enter Cloud Storage and IPEYE setting interface, as shown in Figure 6-17 below. Here you could enable and set the function of Cloud Storage and IPEYE, the specific setting...
- Figure 6-17
- 6.5.4 System
- 6.5.5 Maintain
- 6.6 Playback
- 6.7 Picture
- Chapter 7 Appendix

H.265 25-ch 4K Network Video Recorde with 16-Port PoE
NVR-2500 Series
56
Multi-channel playback supports maximum speed playback.
The interface shown in Figure 5-
7 is for reference only.
Different models have different maximum number of
channels for simultaneous playback and different functions.
Please refer to the actual interface.
The recording information of the channel can be selected in
the first progress bar display box, and the intelligent search
recording information of the channel can be selected in the
second progress bar display box.
Tag playback
The tag playback function can help users record relevant information at a
certain point in time when playing back videos, so that they can view these
marked videos at any time.
Step 1: In the main menu, click "
" to enter the video playback
interface.
Steps 2: Select the channel for video playback and the date when the video is
recorded, and the searched video will be displayed on the progress bar.
Steps 3: Toggle the tag button to "
"; after adding a custom tag, the
playback progress bar will display a white label point to indicate that there is
a tag in the current position.
Figure 5-10
After adding the tag, the system will automatically clip
and save the 5 second video before and after the
tagging time.