
User's Manual
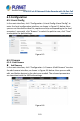

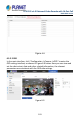
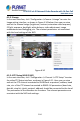
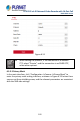
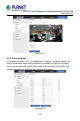

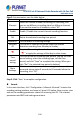

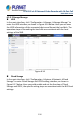
Table Of Contents
- Copyright
- Declaration
- Contents
- Chapter 1 Outlines and Features
- Chapter 2 NVR Appearance
- Chapter 3 Connecting NVR
- Chapter 4 NVR Startup
- Chapter 5 NVR Menu
- Chapter 6 Web Operation
- 6.1 Internet connection
- 6.2 Browser Login
- 6.3 Active X download, installation
- 6.4 Live View
- 6.5 Configuration
- 6.5.1 Local Config
- 6.5.2 Camera
- 6.5.3 Storage
- 6.5.3.1 Channel Recording
- Step 1: In the main interface, click "Configuration → Storage→ Channel Recording" to enter the recording setting interface, as shown in Figure 6-14 below.
- Figure 6-14
- Step 2: Set parameters, see the table below.
- Table 6-1
- Step 3: Click "Save" to complete configuration.
- Encode
- In the main interface, click "Configuration →Record →Encode" to enter the encoding setting interface, as shown in Figure 6-15 below. Here you can view and set the encoding parameter values for accessing the IPC. The relevant parameters and NVR-side se...
- Figure 6-15
- 6.5.3.2 Storage Manage
- HDD
- In the main interface, click "Configuration →Storage →Storage Manage" to enter the HDD interface, as shown in Figure 6-16 below. Here you can view the HDD information of the connected device and format the hard disk. The operation steps of formatting ...
- Figure 6-16
- Cloud Storage
- In the main interface, click "Configuration →System →Network →Cloud Storage" to enter Cloud Storage and IPEYE setting interface, as shown in Figure 6-17 below. Here you could enable and set the function of Cloud Storage and IPEYE, the specific setting...
- Figure 6-17
- 6.5.4 System
- 6.5.5 Maintain
- 6.6 Playback
- 6.7 Picture
- Chapter 7 Appendix

H.265 25-ch 4K Network Video Recorde with 16-Port PoE
NVR-2500 Series
208
Step 2: Set parameters, see the table below.
Parameter Description
Channel
Select the channel number for setting the recording, and
you can set different recording plans for different channels.
If you set the same for all channels, select "All".
Enable Enable / Disable the current channel recording function.
Del Delete the selected recording time period.
Delete All Click to delete all recording settings.
Selected
All
Click to set all channels to normal video and motion
detection recording from Monday to Sunday.
Copy to. After setting the video for a certain day, click
" " to apply the settings of that day to other times.
Time
period
setting
Click one of the set recording time periods, pop up the time
period setting, select the recording type, set the time
period, and click "Save" to complete the setting. When you
click "Del", the selected time period is deleted.
More
Settings
Click to enter the pre-record time setting interface, set the
prerecord action status 0 seconds to 30 seconds before the
recording, click "OK".
Table 6-1
Step 3: Click "Save" to complete configuration.
Encode
In the main interface, click "Configuration →Record →Encode" to enter the
encoding setting interface, as shown in Figure 6-15 below. Here you can view
and set the encoding parameter values for accessing the IPC. The relevant
parameters and NVR-side settings consistent.