
User's Manual
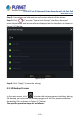
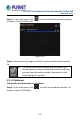
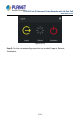

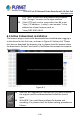
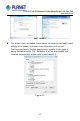
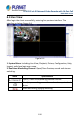
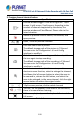

Table Of Contents
- Copyright
- Declaration
- Contents
- Chapter 1 Outlines and Features
- Chapter 2 NVR Appearance
- Chapter 3 Connecting NVR
- Chapter 4 NVR Startup
- Chapter 5 NVR Menu
- Chapter 6 Web Operation
- 6.1 Internet connection
- 6.2 Browser Login
- 6.3 Active X download, installation
- 6.4 Live View
- 6.5 Configuration
- 6.5.1 Local Config
- 6.5.2 Camera
- 6.5.3 Storage
- 6.5.3.1 Channel Recording
- Step 1: In the main interface, click "Configuration → Storage→ Channel Recording" to enter the recording setting interface, as shown in Figure 6-14 below.
- Figure 6-14
- Step 2: Set parameters, see the table below.
- Table 6-1
- Step 3: Click "Save" to complete configuration.
- Encode
- In the main interface, click "Configuration →Record →Encode" to enter the encoding setting interface, as shown in Figure 6-15 below. Here you can view and set the encoding parameter values for accessing the IPC. The relevant parameters and NVR-side se...
- Figure 6-15
- 6.5.3.2 Storage Manage
- HDD
- In the main interface, click "Configuration →Storage →Storage Manage" to enter the HDD interface, as shown in Figure 6-16 below. Here you can view the HDD information of the connected device and format the hard disk. The operation steps of formatting ...
- Figure 6-16
- Cloud Storage
- In the main interface, click "Configuration →System →Network →Cloud Storage" to enter Cloud Storage and IPEYE setting interface, as shown in Figure 6-17 below. Here you could enable and set the function of Cloud Storage and IPEYE, the specific setting...
- Figure 6-17
- 6.5.4 System
- 6.5.5 Maintain
- 6.6 Playback
- 6.7 Picture
- Chapter 7 Appendix

H.265 25-ch 4K Network Video Recorde with 16-Port PoE
NVR-2500 Series
199
3. Preview channel shortcut button
Mark
Specification
Preview window toggle. From left to right are: 1 split
screen, 4 split screen, 9 split screen. According to the
number of channels supported by the device, the
preview window will be different. Please refer to the
actual situation.
Switch all preview channel master, sub streams, and
open preview
/
Open / Close all preview channels.
Click this icon to take a picture.
The default storage path of the picture is C:\Record.
You can enter the Configuration → Local Config
interface to modify it.
Click this icon to start recording on all channels; click
the icon again to stop recording.
The default storage path of the recording is C:\Record.
You can enter the Configuration → Local Config
interface to modify it.
Local electronic zoom, click this icon to open the
electronic zoom function, select to enlarge the channel,
hold down the left mouse button to select the area to
be zoomed in, release the left button, and select the
area to be enlarged; in the zoom channel, click the right
mouse button to restore the original status.
1 Split screen preview, click to switch channels
/
Turn on / off the speaker. If the audio is not turned on,
there is no sound when listening.
Full-screen playback, press the keyboard Esc to exit the
full screen.
Table 6-2