
User's Manual
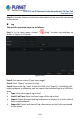
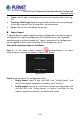
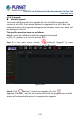
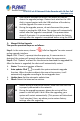
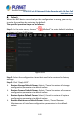
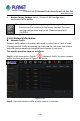
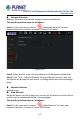
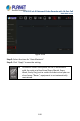
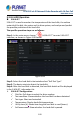
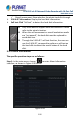
Table Of Contents
- Copyright
- Declaration
- Contents
- Chapter 1 Outlines and Features
- Chapter 2 NVR Appearance
- Chapter 3 Connecting NVR
- Chapter 4 NVR Startup
- Chapter 5 NVR Menu
- Chapter 6 Web Operation
- 6.1 Internet connection
- 6.2 Browser Login
- 6.3 Active X download, installation
- 6.4 Live View
- 6.5 Configuration
- 6.5.1 Local Config
- 6.5.2 Camera
- 6.5.3 Storage
- 6.5.3.1 Channel Recording
- Step 1: In the main interface, click "Configuration → Storage→ Channel Recording" to enter the recording setting interface, as shown in Figure 6-14 below.
- Figure 6-14
- Step 2: Set parameters, see the table below.
- Table 6-1
- Step 3: Click "Save" to complete configuration.
- Encode
- In the main interface, click "Configuration →Record →Encode" to enter the encoding setting interface, as shown in Figure 6-15 below. Here you can view and set the encoding parameter values for accessing the IPC. The relevant parameters and NVR-side se...
- Figure 6-15
- 6.5.3.2 Storage Manage
- HDD
- In the main interface, click "Configuration →Storage →Storage Manage" to enter the HDD interface, as shown in Figure 6-16 below. Here you can view the HDD information of the connected device and format the hard disk. The operation steps of formatting ...
- Figure 6-16
- Cloud Storage
- In the main interface, click "Configuration →System →Network →Cloud Storage" to enter Cloud Storage and IPEYE setting interface, as shown in Figure 6-17 below. Here you could enable and set the function of Cloud Storage and IPEYE, the specific setting...
- Figure 6-17
- 6.5.4 System
- 6.5.5 Maintain
- 6.6 Playback
- 6.7 Picture
- Chapter 7 Appendix

H.265 25-ch 4K Network Video Recorde with 16-Port PoE
NVR-2500 Series
184
After several attempts to refresh, the device still cannot
detect the upgrade package. Please check whether the USB
disk is in good contact with the USB interface of the device,
and the upgrade file name is correct.
During the upgrade process, do not disconnect the power
supply or unplug the USB drive. The system will automatically
restart after the upgrade is completed. This process takes
about 1-6 minutes. It is recommended to restore the factory
settings after the upgrade is completed before using the NVR.
Manual Online Upgrade
The specific operation steps are as follows:
Step 1: In the main menu, choose "
→Online Upgrade" to enter manual
online upgrade interface.
Step 2: Click "Check", a prompt interface pops up, if a new version is
detected, the system will prompt information about the new version.
Step 3: Click "Update" and wait for the device to download the upgraded file.
After the device is upgraded, the device will automatically restart.
Status: The current version of device.
Auto update: Click "
" to enable the system automatic upgrade
function. When the device detects the new online version, it will
automatically upgrade according to the set upgrade time.
Update time: Set the automatic update time.
Check: Detect the latest online version.
Before testing a new online version, make sure that the NVR
is properly connected to the network.
During the upgrading process, please do not cut off the
power or take off your U disk. After the upgrading, your
system will restart automatically. (This process will take about
1 to 6 minutes.) Here, we advise you to restore factory
settings after the upgrading.