
User's Manual
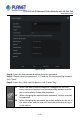
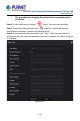


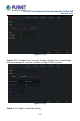
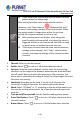
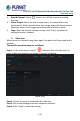
Table Of Contents
- Copyright
- Declaration
- Contents
- Chapter 1 Outlines and Features
- Chapter 2 NVR Appearance
- Chapter 3 Connecting NVR
- Chapter 4 NVR Startup
- Chapter 5 NVR Menu
- Chapter 6 Web Operation
- 6.1 Internet connection
- 6.2 Browser Login
- 6.3 Active X download, installation
- 6.4 Live View
- 6.5 Configuration
- 6.5.1 Local Config
- 6.5.2 Camera
- 6.5.3 Storage
- 6.5.3.1 Channel Recording
- Step 1: In the main interface, click "Configuration → Storage→ Channel Recording" to enter the recording setting interface, as shown in Figure 6-14 below.
- Figure 6-14
- Step 2: Set parameters, see the table below.
- Table 6-1
- Step 3: Click "Save" to complete configuration.
- Encode
- In the main interface, click "Configuration →Record →Encode" to enter the encoding setting interface, as shown in Figure 6-15 below. Here you can view and set the encoding parameter values for accessing the IPC. The relevant parameters and NVR-side se...
- Figure 6-15
- 6.5.3.2 Storage Manage
- HDD
- In the main interface, click "Configuration →Storage →Storage Manage" to enter the HDD interface, as shown in Figure 6-16 below. Here you can view the HDD information of the connected device and format the hard disk. The operation steps of formatting ...
- Figure 6-16
- Cloud Storage
- In the main interface, click "Configuration →System →Network →Cloud Storage" to enter Cloud Storage and IPEYE setting interface, as shown in Figure 6-17 below. Here you could enable and set the function of Cloud Storage and IPEYE, the specific setting...
- Figure 6-17
- 6.5.4 System
- 6.5.5 Maintain
- 6.6 Playback
- 6.7 Picture
- Chapter 7 Appendix

H.265 25-ch 4K Network Video Recorde with 16-Port PoE
NVR-2500 Series
148
If you need to set motion detection for other channels,
please repeat the above steps.
After setting to enable email notification for motion
detection, click "Main menu→
→Advanced→E-mail"
to enter E-mail setting interface to set up the email. When
the system sends a linkage alarm within the set time
period, the recipient receives
the alarm e-mail.
After enabling email notification, after setting the
specific week and time period, only when the alarm is
triggered within the set time period, the NVR can send
an email to the set mailbox to notify the user.
If the other channels have the same motion detection
settings as that channel, click "Copy", select another
channel, and copy the settings of this channel to other
channels.
Channel: Select to set the channel.
Enable: Check "
" to turn on / off motion detection alarm.
Set Area: Select all areas by default, click to enter the area setting
interface, set the range of the dynamic detection area, press and hold
the left mouse button to select the alarm area. After selection, the
alarm area is replaced by the red grid. Select the red grid again to cancel
the alarm area setting.
Sensitivity: According to the need, it can be set 0-10 eleven file
sensitivity; the higher the value, the more sensitive the device.
Week: Select "All Week" or "X" according to the day of the week to set
the time for sending alarm emails. Up to two time periods can be set
each day.
Time period1/Time period2: Set the time for sending alarm emails.
E-mail Notification: Check "
" to turn on / off when the device alerts
the mail function.
Buzzer Alarm: Check "
" to turn on / off the buzzer alarm function.