
User's Manual
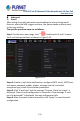

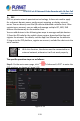
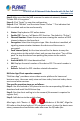

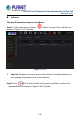
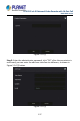
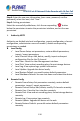
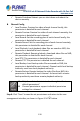

Table Of Contents
- Copyright
- Declaration
- Contents
- Chapter 1 Outlines and Features
- Chapter 2 NVR Appearance
- Chapter 3 Connecting NVR
- Chapter 4 NVR Startup
- Chapter 5 NVR Menu
- Chapter 6 Web Operation
- 6.1 Internet connection
- 6.2 Browser Login
- 6.3 Active X download, installation
- 6.4 Live View
- 6.5 Configuration
- 6.5.1 Local Config
- 6.5.2 Camera
- 6.5.3 Storage
- 6.5.3.1 Channel Recording
- Step 1: In the main interface, click "Configuration → Storage→ Channel Recording" to enter the recording setting interface, as shown in Figure 6-14 below.
- Figure 6-14
- Step 2: Set parameters, see the table below.
- Table 6-1
- Step 3: Click "Save" to complete configuration.
- Encode
- In the main interface, click "Configuration →Record →Encode" to enter the encoding setting interface, as shown in Figure 6-15 below. Here you can view and set the encoding parameter values for accessing the IPC. The relevant parameters and NVR-side se...
- Figure 6-15
- 6.5.3.2 Storage Manage
- HDD
- In the main interface, click "Configuration →Storage →Storage Manage" to enter the HDD interface, as shown in Figure 6-16 below. Here you can view the HDD information of the connected device and format the hard disk. The operation steps of formatting ...
- Figure 6-16
- Cloud Storage
- In the main interface, click "Configuration →System →Network →Cloud Storage" to enter Cloud Storage and IPEYE setting interface, as shown in Figure 6-17 below. Here you could enable and set the function of Cloud Storage and IPEYE, the specific setting...
- Figure 6-17
- 6.5.4 System
- 6.5.5 Maintain
- 6.6 Playback
- 6.7 Picture
- Chapter 7 Appendix

H.265 25-ch 4K Network Video Recorde with 16-Port PoE
NVR-2500 Series
134
Step2: Make sure that the NVR accesses the external network; choose
"Enable P2P→ Encryption ".
Steps 3: Click "Apply" to save the configuration.
Steps 4: Click "Refresh" and the status shows "Online ". This indicates that
P2P is enabled and can be used normally.
Status: Display device P2P online status.
Enable P2P: Turn on / off device P2P function. The default is "Online".
Channel Number: Shows the current user viewing the number of NVR
channel videos on the App client.
Encryption: Select the encryption type. After the device is enabled, all
signaling communication between the device and the server is
encrypted.
Push interval (min): Set the time interval for the device to snap the
alarm picture to the mobile client, and you can also select "Turn off the
push" to stop the device from pushing the picture to the mobile
terminal.
Android &IOS: P2P client download link.
SN: Displays the serial number of the device P2P. This serial number is
unique.
Refresh: Refresh the P2P interface related information.
BitVision App Client operation example
"BitVision App" provides a micro video service platform for home and
business users. Users can easily view real-time video, historical video, alarm
service and other services.
The specific operation steps are as follows:
Step 1: Use the Android or iOS phone to scan the corresponding QR code to
download and install the BitVision App.
Step 2: Run the client and log in to the account (No account is required to
register first).
Step 3: Add devices to the mobile client.
After login, click "Device →
→ Add device → SN Add", Align the
QR code on the device body or P2P interface to scan → enter the device user
name, password and verification code after scan the QR code (the