
User's Manual

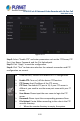
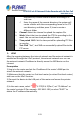
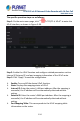

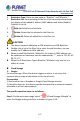
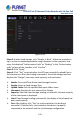
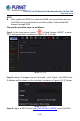
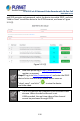
Table Of Contents
- Copyright
- Declaration
- Contents
- Chapter 1 Outlines and Features
- Chapter 2 NVR Appearance
- Chapter 3 Connecting NVR
- Chapter 4 NVR Startup
- Chapter 5 NVR Menu
- Chapter 6 Web Operation
- 6.1 Internet connection
- 6.2 Browser Login
- 6.3 Active X download, installation
- 6.4 Live View
- 6.5 Configuration
- 6.5.1 Local Config
- 6.5.2 Camera
- 6.5.3 Storage
- 6.5.3.1 Channel Recording
- Step 1: In the main interface, click "Configuration → Storage→ Channel Recording" to enter the recording setting interface, as shown in Figure 6-14 below.
- Figure 6-14
- Step 2: Set parameters, see the table below.
- Table 6-1
- Step 3: Click "Save" to complete configuration.
- Encode
- In the main interface, click "Configuration →Record →Encode" to enter the encoding setting interface, as shown in Figure 6-15 below. Here you can view and set the encoding parameter values for accessing the IPC. The relevant parameters and NVR-side se...
- Figure 6-15
- 6.5.3.2 Storage Manage
- HDD
- In the main interface, click "Configuration →Storage →Storage Manage" to enter the HDD interface, as shown in Figure 6-16 below. Here you can view the HDD information of the connected device and format the hard disk. The operation steps of formatting ...
- Figure 6-16
- Cloud Storage
- In the main interface, click "Configuration →System →Network →Cloud Storage" to enter Cloud Storage and IPEYE setting interface, as shown in Figure 6-17 below. Here you could enable and set the function of Cloud Storage and IPEYE, the specific setting...
- Figure 6-17
- 6.5.4 System
- 6.5.5 Maintain
- 6.6 Playback
- 6.7 Picture
- Chapter 7 Appendix

H.265 25-ch 4K Network Video Recorde with 16-Port PoE
NVR-2500 Series
125
Server Name: The web server name.
Protocol: The type of agreement.
Internal Port: The port that the local machine needs to map.
External Port: The port mapped on the router.
Add: Click "Add" to increase the mapping, enter the service name,
internal port, and external port.
Server Name: Enter the service name and define it yourself.
Internal Port: You need to enter the corresponding HTTP port, RTSP
port, TCP port.
External Port: Can be self-defined, and the internal port can be the
same, but cannot and NVR other ports repeat.
Delete: Select the mapping information in the port mapping table and
delete the mapping relationship.
When setting the external port of the router mapping
port, try to use the port between 1024 and 65535.
Avoid using the well-known port 1~255 and the system
port 256~1023 to avoid conflict.
When deploying multiple devices in the same LAN,
plan the port mapping to avoid mapping multiple
devices to the same external port.
When performing port mapping, ensure that the
mapped port is not occupied or restricted.
TCP internal and external ports must be consistent and
cannot be modified.
Address Filter
The black and white list restricts the PC to log in to the NVR web client by
filtering the IP address or MAC address. There are two types: black list and
white list.
Blacklist:
1. NVR cannot connect to IPC's IP address or MAC address in the
blacklist.
2. The computer with the IP or MAC address in the blacklist will not
be able to log in to the NVR web page.