
User's Manual

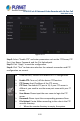
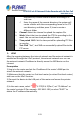
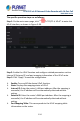
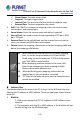

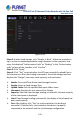
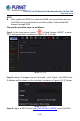
Table Of Contents
- Copyright
- Declaration
- Contents
- Chapter 1 Outlines and Features
- Chapter 2 NVR Appearance
- Chapter 3 Connecting NVR
- Chapter 4 NVR Startup
- Chapter 5 NVR Menu
- Chapter 6 Web Operation
- 6.1 Internet connection
- 6.2 Browser Login
- 6.3 Active X download, installation
- 6.4 Live View
- 6.5 Configuration
- 6.5.1 Local Config
- 6.5.2 Camera
- 6.5.3 Storage
- 6.5.3.1 Channel Recording
- Step 1: In the main interface, click "Configuration → Storage→ Channel Recording" to enter the recording setting interface, as shown in Figure 6-14 below.
- Figure 6-14
- Step 2: Set parameters, see the table below.
- Table 6-1
- Step 3: Click "Save" to complete configuration.
- Encode
- In the main interface, click "Configuration →Record →Encode" to enter the encoding setting interface, as shown in Figure 6-15 below. Here you can view and set the encoding parameter values for accessing the IPC. The relevant parameters and NVR-side se...
- Figure 6-15
- 6.5.3.2 Storage Manage
- HDD
- In the main interface, click "Configuration →Storage →Storage Manage" to enter the HDD interface, as shown in Figure 6-16 below. Here you can view the HDD information of the connected device and format the hard disk. The operation steps of formatting ...
- Figure 6-16
- Cloud Storage
- In the main interface, click "Configuration →System →Network →Cloud Storage" to enter Cloud Storage and IPEYE setting interface, as shown in Figure 6-17 below. Here you could enable and set the function of Cloud Storage and IPEYE, the specific setting...
- Figure 6-17
- 6.5.4 System
- 6.5.5 Maintain
- 6.6 Playback
- 6.7 Picture
- Chapter 7 Appendix

H.265 25-ch 4K Network Video Recorde with 16-Port PoE
NVR-2500 Series
123
automatically creates different folders according to IP
and time.
Enter the name of the remote directory, the system will
create a folder with the corresponding name in the FTP
root directory, and then press IP, time to create a
different folder.
Channel: Select the channel to upload the capture file.
Week: Select the time to upload the FTP file according to the
week. You can set two time periods each week.
Time period 1 & 2: Set the time period for uploading FTP files
in one day.
Test: Click "Test", test NVR can successfully upload files to the
FTP server.
UPNP
After the mapping between the internal network and the external network is
established through the UPnP protocol, the external network user can use
the external network IP address to directly access the NVR device on the
intranet.
Prerequisites
1) Log in to the router and set the IP address of the router's WAN port to
access the external network.
2) Make sure that the router is a first-level router (or virtual first-level router)
and turn on the UPnP function.
3) Connect the device to the LAN port of the router and access the private
network.
4) In the main menu, select "
→ TCP/IP→ IP/Port", set "IP Address" as
the router's private IP (for example: 192.168.1.101) or select "DHCP" to
obtain the IP address automatically.