
User's Manual
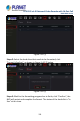
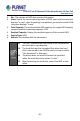
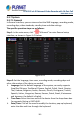
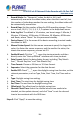
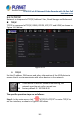
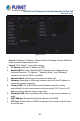
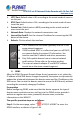
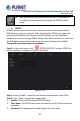
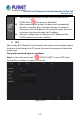
Table Of Contents
- Copyright
- Declaration
- Contents
- Chapter 1 Outlines and Features
- Chapter 2 NVR Appearance
- Chapter 3 Connecting NVR
- Chapter 4 NVR Startup
- Chapter 5 NVR Menu
- Chapter 6 Web Operation
- 6.1 Internet connection
- 6.2 Browser Login
- 6.3 Active X download, installation
- 6.4 Live View
- 6.5 Configuration
- 6.5.1 Local Config
- 6.5.2 Camera
- 6.5.3 Storage
- 6.5.3.1 Channel Recording
- Step 1: In the main interface, click "Configuration → Storage→ Channel Recording" to enter the recording setting interface, as shown in Figure 6-14 below.
- Figure 6-14
- Step 2: Set parameters, see the table below.
- Table 6-1
- Step 3: Click "Save" to complete configuration.
- Encode
- In the main interface, click "Configuration →Record →Encode" to enter the encoding setting interface, as shown in Figure 6-15 below. Here you can view and set the encoding parameter values for accessing the IPC. The relevant parameters and NVR-side se...
- Figure 6-15
- 6.5.3.2 Storage Manage
- HDD
- In the main interface, click "Configuration →Storage →Storage Manage" to enter the HDD interface, as shown in Figure 6-16 below. Here you can view the HDD information of the connected device and format the hard disk. The operation steps of formatting ...
- Figure 6-16
- Cloud Storage
- In the main interface, click "Configuration →System →Network →Cloud Storage" to enter Cloud Storage and IPEYE setting interface, as shown in Figure 6-17 below. Here you could enable and set the function of Cloud Storage and IPEYE, the specific setting...
- Figure 6-17
- 6.5.4 System
- 6.5.5 Maintain
- 6.6 Playback
- 6.7 Picture
- Chapter 7 Appendix

H.265 25-ch 4K Network Video Recorde with 16-Port PoE
NVR-2500 Series
117
HTTP Port: Default value is 80, according to the actual needs of users to
set the port.
RTSP Port: Default value is 554, according to the actual needs of users
to set the port.
Private Port: Default value is 6000, according to the actual needs of
users to set the port.
Network Rate: Displays the network transmission rate.
Internal Net Card IP: Set the intranet IP address for connecting the POE
device of the device.
Refresh: Click to refresh the interface.
The IP address and the default gateway must be in the
same network segment.
If NVR enabled DHCP is in effect and you turn off DHCP,
you cannot display the original IP information. You
need to reset the IP address and other parameters.
Only PoE-capable devices have an internal network
card function. Please refer to the actual product.
The internal network adapter IP and NVR IP address
cannot be on the same network segment.
DDNS
After the DDNS (Dynamic Domain Name Server) parameter is set, when the
IP address of the NVR device changes frequently, the system can dynamically
update the relationship between the domain name and the IP address on the
DNS server. You can use the domain name to access the NVR directly without
recording the constantly changing IP address.
Prerequisites
Before configuring DDNS, make sure that the device supports the type of
domain name resolution server, and log in to the DDNS service provider's
website to register user name, password, domain name, and other
information on the WAN PC.
The specific operation steps are as follows:
Step 1: On the menu page, select "
→TCP/IP →DDNS" to enter the
DDNS interface, as shown in Figure 5-44.