Networking & Communication ADSL Bridge Router ADE-3000 User’s Manual PDF created with FinePrint pdfFactory Pro trial version http://www.fineprint.
Copyright (C) 2002 PLANET Technology Corp. All rights reserved. The products and programs described in this User ’s Manual are licensed products of PLANET Technology, This User’s Manual contains proprietary information protected by copyright, and this User’s Manual and all accompanying hardware, software, and documentation are copyrighted.
TABLE OF CONTENTS CHAPTER 1 INTRODUCTION.............................................................................................. 1 ADE-3000 Features ........................................................................................................... 1 Internet Access Features ............................................................................................... 1 Advanced Functions......................................................................................................
Windows XP………………………………………………………………………………33 Macintosh Clients ............................................................................................................ 34 Linux Clients .................................................................................................................... 34 CHAPTER 6 ADMIN PRIVILEGE ...................................................................................... 35 WAN Status..............................................................................
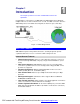
Chapter 1 Introduction 1 This Chapter provides an overview of ADE-3000's features and capabilities. Congratulations on the purchase of ADE-3000. The ADSL Bridge Router will allow multiple LAN users to share an Internet user account, via a DSL connection. Once the ADSL Bridge Router is installed and configured, the Internet is just a click away.
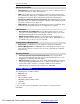
ADE-3000 User Manual Advanced Functions · Virtual Servers. This feature allows Internet users to access Internet servers on your LAN. The required setup is quick and easy. · DMZ. One (1) PC on your local LAN can be configured to allow unrestricted 2way communication with Servers or individual users on the Internet. This provides the ability to run programs, which demand for bi-directional communication.
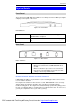
Introduction Physical Details Front Panel The front panel of ADE-3000 has 2 LEDs for one LAN port and one ADSL port. Figure 2 displays a front panel of the router. Figure 1-2: Front Panel LED definitions Status ADSL On – ADSL LED status will be on after chaining procedure with DSLAM is completed Status LAN On –LAN LED will be on while RJ-45 connector is plugged in.
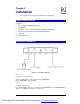
Chapter 2 Installation 2 This Chapter covers the physical installation of ADE-3000. System Requirements Computer · PC or TCP/IP compliant workstations · 32 MB RAM · 20 MB of free disk space minimum (for USB driver installation) · Ethernet Network Interface Controller (NIC) RJ45 Port · USB Port · Internet Browser Installation Procedure Figure 2-1: Installation Diagram Step 1 Choose an Installation Site Select a suitable place on the network to install ADE-3000.
Login And System Status If required, use a standard LAN cable to connect the "Uplink" port to a standard port on another hub. Step 3 Connect WAN Cable Connect one end of the RJ-11 phone cord to the LINE port on your ADSL modem. Connect the other end of the RJ-11 phone cord to your wall phone jack. Step 4 Power Up Connect the supplied power adapter to ADE-3000 and power up. Use only the power adapter provided.
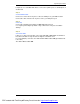
ADE-3000 User Manual Chapter 3 Login And System Status 3 This Chapter details the first time login procedure and the Status screen Login ADE-3000 contains an HTTP server. This enables you to connect to it, and configure it, using your Web Browser. Your Browser must have JavaScript support. The configuration program has been tested on the following browsers: · Netscape V4.
Login And System Status Figure 3-1: Logon Window If you can't connect If ADE does not respond, check the following: · Machine is properly installed, LAN connection is OK, and it is powered ON. You can test the connection by using the "Ping" command: · Open the MS-DOS window or command prompt window. · Enter the command: ping 10.0.0.2 If no response is received, either the connection is not working, or your PC's IP address is not compatible with ADE-3000's IP Address. (See next item.
ADE-3000 User Manual Status Home Once you login in ADE-3000, its Home page will appear. It shows the firmware versions and WAN and LAN interface status. Figure 3-2: Home page ADSL The ADSL Status page shows the ADSL physical layer status. Figure 3-3: ADSL status 8 PDF created with FinePrint pdfFactory Pro trial version http://www.fineprint.
Login And System Status LAN The LAN page shows the information and status of LAN port, DHCP client table, linking status of Ethernet and USB interface. Figure 3-4: LAN status 9 PDF created with FinePrint pdfFactory Pro trial version http://www.fineprint.
Chapter 4 System Configuration 4 This Chapter details the configurations for ADE-3000 Overview This chapter describes the setup procedure for: · WAN Access · LAN configuration PCs on your local LAN may also require configuration. For details, see Chapter 5 - PC Configuration. WAN configuration Select the WAN link under Configuration column to set up WAN connection. It is required to know the type of Internet connection service used by your ISP.
System Configuration Figure 4-2: Per VC Settings To switch between the PVCs, please choose the options of virtual circuit and click on the Submit button to switch over. Figure 4-3: Switch between PVCs Internet connection services Types of Internet connection services supported by ADE-3000 are explained below. Bridge Mode Step 1 At the WAN Configuration page, insert the VCI/VPI provided by ISP. Enable “Bridge”, and choose suitable packet encapsulation.
ADE-3000 User Manual Figure 4-5: Encapsulation types of Bridge mode Step 2 Click “submit” to commit modifications you’ve done, then click “Save Configuration” to store settings. (Modifications will not take effects until next reboot.) Step 3 Click on “NAT” tab on left panel, and disable the NAT function in the option menu. Figure 4-6: NAT Disable screen Step 4 Click “Save settings” on left panel to write configuration into machine, and reboot to make settings effective.
System Configuration PPPoE, PPPoA Connection for WAN (Routing mode) If PPPoE (Point-to-Point Over Ethernet) or PPPoA (Point-to Point Over ATM) is provided to establish communications, User Name and Password are required to be obtained from ISP. And VCI/VPI values must be obtained from them as well, for some local ISPs don’t offer this information actively. To set up a PPPoE or PPPoA connection for WAN, follow the instructions below: Step 1 Fill in the VCI/VPI entries with the information you get from ISP.
ADE-3000 User Manual Figure 4-8: PPP setting Screen Step 3 Click on “NAT” tab on left panel, and enable the NAPT function in the option menu. Step 4 Click “Save settings” on left panel to write configuration into machine, and reboot to make settings effective. Fixed IP for WAN If your ISP has assigned static IP address (See Appendix A About Static and Dynamic IP Address), you may connect to the Internet by using a fixed, or static address.
System Configuration Figure 4-9: Fixed IP set-up screen Step 2 Choose suitable packet encapsulation (1483 Bridged/ Routed LLC, 1483 Bridged/ Routed Mux, Classical IP over ATM). And Disable “Bridge” function. Step 3 Click “submit” to commit modifications you’ve done, then click “Save Configuration” to store settings. (Modifications will not take effects until next reboot.) Step 3 Click on “NAT” tab on left panel, and enable the NAPT function in the option menu.
ADE-3000 User Manual Figure 4-10: DHCP client enable Step 3 Click on “NAT” tab on left panel, and enable the NAPT function in the option menu. Step 4 Click “Save settings” on left panel to write configuration into machine, and reboot to make settings effective. Other settings Here are explanations about some fields not mentioned above. MAC Spoofing The MAC Spoofing is developed to solve the scenario when the ISP only recognizes one MAC address. Copy the ISP-recognized MAC address here.
System Configuration requirement and case: •On CO side, there must be at least one IGMP querier (router) present. IGMP querier will send IGMP query packet. The ADSL modem is responsible to relay these IGMP query to Ethernet. •End-user multicast application device send IGMP report while receiving IGMP query or being activated by user, the ADSL modem should be responsible to proxy (that is, change source IP to ADSL modem’s WAN IP) the IGMP report to ADSL WAN side, include all PVCs.
ADE-3000 User Manual Note: Encapsulation is based on the ISP configuration. It may be different for different ISPs and countries. 18 PDF created with FinePrint pdfFactory Pro trial version http://www.fineprint.
System Configuration LAN Configuration The LAN IP and Subnet Mask of ADE-3000 are the values seen by the users on their internal network. The default IP is 10.0.0.2 for IP and 255.0.0.0 for Subnet Mask. Figure 4-13: LAN Configuration DHCP Setting A DHCP (Dynamic Host Configuration Protocol) Server automatically assigns IP address to each computer on your network. Unless you already have one, it is highly recommended that your router be set up as a DHCP server..
ADE-3000 User Manual Figure 4-14: DHCP server settings • Ethernet Mode Setting: By clicking this link, you will be directed to Ethernet Mode page. You can specify the type of LAN connection or use AutoSense. Default is AutoSense. Figure 4-15: Ethernet Mode NAT Settings By clicking NAT link under Configuration column, NAT Configuration page will be shown. You have to define the session used for NAT first. Click the Session Name Configuration link below, you will see NAT Session Name Configuration page.
System Configuration Figure 4-16: NAT configuration Enter the session name you want to use for NAT. Select VC number, which is assigned to the session. Choose Add, and then click Submit button, the new defined session should be added to the table below immediately. If you want to remove an existing session, the procedures are similar as above, just choose Delete instead. Figure 4-17: NAT Session Name Configuration After session defining, click the Go back to NAT Configuration link.
ADE-3000 User Manual NAT NAT option only maps single WAN IP address to the local PC IP address. This is peerto-peer mapping (1 on 1). For each PVC, only one local PC IP address can be associated with each WAN PVC. If more than one IP address is inserted for one NAT session, only the first IP address of each session takes effect. NAPT NAPT option maps the IP address and UDP/TCP port ID of the WAN PVC to the IP address and UDP/TCP port ID of the local PCs. (1 to N). It is the multiple-mapping mechanism.
System Configuration After all these settings are done, click “Submit” button, the record will be added to the table below immediately. Figure 4-20: Adding a new record Virtual Servers Virtual server feature allows users to make Servers on your LAN accessible to Internet users. Normally, Internet users would not be able to access a server on your LAN because of native NAT protection. The "Virtual Server" feature solves these problems and allows Internet users to connect to your servers.
ADE-3000 User Manual To add a Virtual Server: Step 1 Select the public port number used by the service, ranged from 0 to 65535. Step 2 Select the private port number used on internal server mapping to public port, it is not required to be the same as public port number. Step 3 Select appropriate communication type via type of port checkbox. Step 4 Enter the Host IP Address of local server that you want the Internet users to be able to access. Step 5 Click the “Add This Setting” button to save the settings.
System Configuration Destination MAC When the bridge filtering is enabled, enter the Destination MAC address, select Block and click Add. Then all incoming WAN and LAN Ethernet packets matched with this destination MAC address will be filtered out. If the Forward is selected, then the packets will be forwarded to the destination PC. Type Enter the hexadecimal number for the Ethernet type field in Ethernet_II packets. For example, 0800 is for IP protocol.
ADE-3000 User Manual Figure 4-23: DNS Configuration Screen Note: Before the DNS proxy mode is enabled; please go to the Miscellaneous Configuration to enable the DNS proxy. Otherwise, DNS Proxy selection will not be valid. 26 PDF created with FinePrint pdfFactory Pro trial version http://www.fineprint.
System Configuration Chapter 5 PC Configuration 5 This Chapter details the PC Configuration required on the local ("Internal") LAN. Overview For each PC, the following may to be configured: · TCP/IP network settings · Internet Access configuration Windows Clients This section describes how to configure Windows clients for Internet access via ADE3000. The first step is to check the PC's TCP/IP settings.
ADE-3000 User Manual Windows 9x/ME 1. Select Control Panel - Network. You should see a screen like the following: Figure 5-1: Network Configuration 2. Select the TCP/IP protocol for your network card. 3. Click on the Properties button. You should then see a screen like the following. Figure 5-2: IP Address (Win 95) Ensure your TCP/IP settings are correct, as follows: Using DHCP To use DHCP, select the radio button Obtain an IP Address automatically. This is the default Windows settings.
System Configuration Figure 5-3: Gateway Tab (Win 95/98) · On the DNS Configuration tab, ensure Enable DNS is selected. If the DNS Server Search Order list is empty, enter the DNS address provided by your ISP in the fields beside the Add button, then click Add. Figure 5-4: DNS Tab (Win 95/98) Windows 2000 1. Select Control Panel - Network and Dial-up Connection. 2. Right click the Local Area Connection icon and select Properties.
ADE-3000 User Manual Figure 5-5: Network Configuration (Win 2000) 3. Select the TCP/IP protocol for your network card. 4. Click on the Properties button. You should then see a screen like the following. 30 PDF created with FinePrint pdfFactory Pro trial version http://www.fineprint.
System Configuration Figure 5-6: TCP/IP Properties (Win 2000) 5. Ensure your TCP/IP settings are correct: Using DHCP To use DHCP, select the radio button Obtain an IP Address automatically. This is the default Windows settings. Restart your PC to ensure it obtains an IP Address from ADE-3000. Using a fixed IP Address ("Use the following IP Address") If your PC is already configured, check with your network administrator before making the following changes.
ADE-3000 User Manual Windows XP 1. Select Control Panel - Network Connection. 2. Right click the Local Area Connection and choose Properties. You should see a screen like the following: Figure 5-7: Network Configuration (Windows XP) 3. Select the TCP/IP protocol for your network card. 4. Click on the Properties button. You should then see a screen like the following. Figure 5-8: TCP/IP Properties (Windows XP) 5. Ensure your TCP/IP settings are correct.
System Configuration Using DHCP To use DHCP, select the radio button Obtain an IP Address automatically. This is the default Windows settings. Restart your PC to ensure it obtains an IP Address from ADE-3000. Using a fixed IP Address ("Use the following IP Address") · If your PC is already configured, do NOT change the settings on the screen shown in Figure above, unless advised to do so by your network administrator. · You can enter ADE-3000's IP address in the Default gateway field and click OK.
ADE-3000 User Manual Macintosh Clients From your Macintosh, you can access the Internet via ADE-3000. The procedure is as follows. 1. Open the TCP/IP Control Panel. 2. Select Ethernet from the Connect via pop-up menu. 3. Select Using DHCP Server from the Configure pop-up menu. The DHCP Client ID field can be left blank. 4. Close the TCP/IP panel, saving your settings.
Chapter 6 Admin Privilege 6 This Chapter details the operation of ADE-3000 and the status screens. The links under Admin Privilege are only to be accessed and configured, when it is login with administrator login name and password. WAN Status The WAN Status page shows the information and status of WAN PVCs. Select the VC number to view connection status. The DHCP Release and Renew allows users to release and renew the WAN IP address in the WAN DHCP Client Enabled (dynamic) mode.
ADE-3000 User Manual Figure 6-2: ATM Status Screen PPP Status The PPP Status page shows the status of PPP for each PVC. Connect and Disconnect allows you to manually connect/disconnect the PPP connection for specified PVC. If current connection is disconnected after the Disconnect Timeout, you will have to go to this page, choose the correct PVC and Connect option, and then click Execute to restart a new PPP secession.
Admin Privilege TCP Status The TCP Status page shows the statistics for all TCP connections. This is for internal network only. Figure 6-4: TCP Status Screen Route Table The Route Table page displays routing table and allows you to manually enter the routing entry. The interface br0 means the USB interface; lo0 means the loop back interface. Figure 6-5: Route Table Screen 37 PDF created with FinePrint pdfFactory Pro trial version http://www.fineprint.
ADE-3000 User Manual Learned MAC Table The Learned MAC Table page shows the current learned Bridge MAC table. The Aging Timeout is for determining the update period for the MAC table. Figure 6-6: Learned MAC Table Screen ADSL Configuration The ADSL Configuration page allows you to set the configuration for ADSL protocols. Trellis Trellis Code. By default, it is always enabled. Handshake Protocol This is for the ADSL handshake protocol. Wiring Selection The wiring selection for the RJ-11.
Admin Privilege Figure 6-7: ADSL Configuration Screen RIP Configuration RIP Configuration allows users to setup RIPv1/v2 support and related parameters in ADE-3000. RIP Start or Stop a RIP session. The resulting RIP session will monitor all network interfaces that are currently available for messages from other RIP routers.
ADE-3000 User Manual Figure 6-8: RIP Configuration Screen Password Configuration The Password Configuration page allows users to set the passwords for user and administrator. 40 PDF created with FinePrint pdfFactory Pro trial version http://www.fineprint.
Admin Privilege Miscellaneous Configuration The Miscellaneous Configuration allows users to set all the miscellaneous configurations in ADE-3000. Figure 6-9: Miscellaneous Configuration Screen WAN side HTTP server When it is enabled, the Web setting pages of ADE-3000 can be accessed from the WAN side. When it is disabled, you can only access the Web pages from the LAN side. FTP server When it is enabled, the FTP connection can be established from both the LAN and WAN sides.
ADE-3000 User Manual The HTTP server port can be changed to other secure port number. For example, when it is changed to 1001, the HTTP server address for the LAN side is http://10.0.0.2:1001. DMZ A DMZ (De-Militarized Zone) is added between a protected network and an external network, in order to provide an additional layer of security. When there is a suspected packet coming from WAN, the firewall will forward this packet to the DMZ host. DMZ Host IP The IP address of the DMZ host at LAN side.
Admin Privilege Reset to Factory Default The Reset to Factory Default page allows you to reset the modem to original factory default configuration (factory.reg). Diagnostic Test Click this link; system will perform diagnostic tests automatically. And show the testing result in Diagnostic Test page. If some of the tests fail, related help links are available for reference while troubleshooting.
ADE-3000 User Manual System Log Users may acquire information of the system from this screen, including the time, and connection process related messages. Figure 6-12: System Log Screen 44 PDF created with FinePrint pdfFactory Pro trial version http://www.fineprint.
Appendix A Troubleshooting A This Appendix covers the most likely problems and their solutions. Overview This chapter covers some common problems that may be encountered while using ADE-3000 and some possible solutions to them. If you follow the suggested steps and ADE-3000 still does not function properly, contact your dealer for further advice. General Problems Question 1: Can't connect to ADE-3000 to configure it.
ADE-3000 User Manual I reconnect it? Answer 2 You have to go to the PPP Status under Admin Privileged column, choose the correct PVC and Connect option, and then click Execute to restart a new PPP secession. Question 3 Since only one PVC is mapped to one local PC IP address, why can I input more than one IP address for one NAT session? Answer 3 Even it is applicable to insert multiple IPs for NAT mapping, only the first IP address of each session takes effect.
Appendix B Specifications B ADE-3000 Model ADE-3000 Dimensions 175 mm (W) * 130 mm (D) * 32 mm (H) Operating Temperature 0° C to 40° C Storage Temperature -10° C to 70° C Network Protocol: UDP, TFTP, TCP/ IP, ICMP, ARP, RIP I/ II, NAT, HTTP, DHCP, IGMP, IPSec, PPPoE, PPTP, L2TP, NAPT, ATM Protocol and Encapsulations RFC 2364 – PPP over ATM VCMUX RFC 2364 – PPP over ATM LLC RFC 2516 – PPP over Ethernet VCMUX RFC 2516 – PPP over Ethernet LLCSNAP RFC 1577 - Classic IP over ATM RFC 1483 – Bridged
ADE-3000 User Manual This device complies with Part 15 of the FCC Rules. Operation is subject to the following two conditions: (1) This device may not cause harmful interference. (2) This device must accept any interference received, including interference that may cause undesired operation. CE Marking Warning This is a Class B product. In a domestic environment this product may cause radio interference in which case the user may be required to take adequate measures.