802.
Copyright Copyright 2004 by PLANET Technology Corp. All rights reserved. No part of this publication may be reproduced, transmitted, transcribed, stored in a retrieval system, or translated into any language or computer language, in any form or by any means, electronic, mechanical, magnetic, optical, chemical, manual or otherwise, without the prior written permission of PLANET.
Federal Communication Statement Commission (FCC) Radiation Exposure This equipment complies with FCC radiation exposure set forth for an uncontrolled environment. In order to avoid the possibility of exceeding the FCC radio frequency exposure limits, human proximity to the antenna shall not be less than 20 cm(8 inches) during normal operation.
TABLE OF CONTENTS CHAPTER 1 INTRODUCTION .................................................................................................. 1 1.1 PACKAGE CONTENTS ......................................................................................................... 1 1.2 SYSTEM REQUIREMENTS .................................................................................................... 1 1.3 FEATURES .....................................................................................................
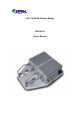
Chapter 1 Introduction WAP-5100 is an IEEE 802.11b Wireless Outdoor Bridge, which links two or more remote sites together. It offers up to 11Mbps transmission rate that is higher than an E1 or T1 line, and also eliminates the installation and maintenance cost of a lease line or cable. The special designed housing allows WAP-5100 to be installed in exposed locations under the rigorous weather conditions including heavy rain, wind, and snow.
1.3 Features • Wireless LAN IEEE802.
Electromagnetic FCC, CE Compatibility 1.5 Wireless Performance The following information will help you utilizing the wireless performance, and operating coverage of WAP-5100. 1. Site selection To avoid interferences, please locate WAP-5100 away from transformers, microwave ovens, heavy-duty motors, refrigerators, fluorescent lights, and other industrial equipments. 2. Environmental factors The wireless network is easily affected by many environmental factors.
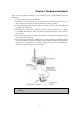
Chapter 2 Hardware Installation Before you proceed with the installation, it is necessary that you have enough information about the WAP-5100. 1. Locate an optimum location for the WAP-5100. 2. Assemble the antennas to WAP-5100. Try to place them to a position that can best cover your wireless network. The antenna’s position will enhance the receiving sensitivity. 3. Using provided CAT5 waterproof cable; connect the waterproof connector port of the WAP-5100 to the ODU port of DC Injector. 4.
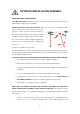
! OUTDOOR INSTALLATION WARNING IMPORTANT SAFETY PRECAUTIONS: LIVES MAY BE AT RISK! Carefully observe these instructions and any special instructions that are included with the equipment you are installing. CONTACTING POWER LINES CAN BE LETHAL. Make sure no power lines are anywhere where possible contact can be made. Antennas, masts, towers, guy wires or cables may lean or fall and contact these limes.
corrosion-resistant connectors. l Refer to the National Electrical Code for grounding details. IF A PERSON COMES IN CONTACT WITH ELECTRICAL POWER, AND CANNOT MOVE: l DON’T TOUCH THAT PERSON, OR YOU MAY BE ELECTROCUTED. l Use a non-conductive dry board, stick or rope to push or drag them so they no longer are in contact with electrical power. Once they are no longer contacting electrical power, administer CPR if you are certified, and make sure that emergency medical aid has been requested.
Chapter 3 PLANET Outdoor WLAN Management System 3.1 Introduction The bundled PLANET Outdoor WMS (WLAN Management System) is a powerful utility for managing WAP-5100. This utility is fully compatible with the industry-standard Simple Network Management Protocol (SNMP). A powerful auto-discovery algorithm is built into WMS. With a simple click on the Auto Discovery icon, all compatible devices within the subnet will be discovered.
3. You can click “Browse” to specify the Destination Folder that you want to install the utility. Or you can keep the default setting and click ”Next” to continue. 4. Click “Next” to continue.
5. The setup will start to copy necessary files to your computer. When the Setup Complete window appears, click “Finish” to complete the software installation.
3.3 Using PLANET Outdoor WMS After successfully installing the utility, you can found the icon on your desktop. To activate WMS, you can double click this icon or click Start > Programs > PLANET > PLANET Outdoor WLAN Management System. The main WMS window will then open. 3.3.1 Kick Start It is recommended to use Kick Start function when initial setting up a WAP-5100. Open Start menu and select Kick Start, or click on the icon from the main WMS window, then the Kick Start window appears as below.
3.3.1.1 Find This function helps you to quickly locate all compatible devices (include AP and Bridge). Open the Start menu and select Find, or click on the icon , or press F5. Few seconds later, the MAC addresses of all compatible devices will be listed below. If you select a specific device from the left field, its detailed settings will be shown in the right field.
3.3.1.2 Preference You can set the parameters for the Kick Start as desired. Open the Start menu and select Preference, a dialog box will appear as below. After completing desired modifications, click OK to close the dialog box and apply the changes to Kick Start. 3.3.1.3 New If the MAC address of the device is already known, you can use this function to connect it directly. Open the Edit menu and select New, or click on the icon , a dialog box will pop up.
3.3.1.7 Change IP Settings This function allows you to change the IP address of a specific device. Highlight the MAC address of the device from the list, open the Tools menu and select Change IP Settings, or click on the icon , a dialog box will pop up as below. Please note the modified IP address must be in the same subnet as Local Computer; otherwise the OK button remains unavailable. The default password of WAP-5000 is admin. 3.3.1.
3.3.1.10 Restore Default This function allows you to restore default settings of the device. Highlight the MAC address of a device from the list, open the Tools menu and select Restore Default, or click on the icon ,a dialog box will pop up and ask for the administrative password. Type in the correct password, then click OK button to close the box and restore default settings. 3.3.2 Hosts View Hosts View is the major part of the WMS.
will pop up as below. Identity The information shown here is read-only. • Device Name: WMS system default category name • Name: Device name assigned by the user for easier identification • S/W Version: Shows the device software version number • H/W Version: Shows the device hardware version number • Current Channel: Shows the wireless channel currently in use on the device Statistics The Statistics window shows both Ethernet and Wireless traffic statistics.
3.3.2.3 Config This function allows you to configure the parameters of WAP-5100. Open the Host menu and select Config, or click on the icon , a configuration window will pop up. IP WAP-5100 is a DHCP client by default. It will automatically ask the DHCP server for IP address. If you want to assign static IP to WAP-5100, please clear the check box in front of Obtain IP Settings Automatically (By DHCP).
Filter This is a one-way protocol filtering mechanism that prevents the WAP-5100 from transmitting specified protocols packet from a wired Ethernet LAN into the wireless LAN. If you do not require particular protocols on the wireless part of your network, you can save bandwidth by enabling the protocol filter.
Wireless The Wireless window allows you to configure wireless settings of WAP-5100.
• Name: Assigns the WAP-5100 a unique name that allows the device to be easily identified on the network. • SSID: Identifies the wireless domain that this WAP-5100 is in. A wireless domain, in the case of outdoor bridges, is ordinarily composed of two or more WAP-5100 that are in communication with each other via radio links. Wireless outdoor bridges that will be in communication with each other must be set to use the same SSID in order to be able to establish a wireless link or links.
MAC address. For example, if Bridge A is to connect with Bridge B, then Bridge B ’s MAC address must be entered on this page for Bridge A, and Bridge A’s MAC address must be entered here for Bridge B. • Point to Multipoint: This is for connecting more than two remote sites. At least one of the WAP-5100 must be set to Point-to-Multipoint mode in such network topology. Other WAP-5100 can be set to either Point-to-Point or Point-to-Multipoint mode. In this mode, up to six other bridges can be connected.
Encryption Click the Encryption tab to set up the security settings of WAP-5100.
There are two selectable options in Method pull-down menu: • WEP: Disable - Disable data encryption • WEP: Enable - Enable data encryption If data encryption is enabled, there would be two available options in Key Length menu: • 64-bit • 128-bit There are two ways to generate a security key. The first is by entering any text in the Passphrase field. Click the Generate button. For 64-bit WEP, it will generate four keys, Key 1, Key 2, Key 3, and Key 4.
When you select SNMP Access Control, the system will display four blank fields for setting (maximum of 4 SNMP devices can be set). Right-click on a blank in the list and click Edit Address. The New/Edit Address dialog box will appear. Type in the IP address and set the password for the SNMP device. There are two levels of access rights can be assigned: • Read: The user can read all information except the Access Control settings, but is not allowed to alter anything.
Click the icon and assign a station as a trap server by entering its IP address. To remove a trap server from the list, highlight it and click the icon . Click the icon to remove all assigned trap servers from the list. Advanced You may set the packet size of RTS Thresholds and Fragmentation Thresholds in the Advanced window.
Export/Import Configuration Profile The configuration file can be saved to a text file and safely kept. This configuration file can also be imported to recover the WAP-5100’s setting, if there is an accident. This profile can also be copied to the other WAP-5100. To do this, first click the Export button in the Config window. Then enter the file name for the configuration profile to be saved to. A configuration file can also be imported to recover the WAP-5100’s original settings.
also be copied to the other WAP-5100. To do this, first click the Import button in the Config window. Then enter the file name for the configuration profile to be imported from. Click Next. On Step 2 screen, you can select or clear the sessions of the configuration profile to be imported. Click Next. The configuration profile does not contain the security key settings. The attributes of security keys are externally write-only and cannot be saved into the configuration file.
Confirm the configurations again in Step 3 screen, then click Import button to start the process. 3.3.2.4 Antenna Alignment The WAP-5100 is usually used to connect two or more separate LANs via the radio link with a directional antenna to extend the distance between two wireless bridges. Sometimes the distance between two LANs might be several kilometers. Owing to the nature of the directional antenna, the higher the antenna gain is, the narrower the angle of the wave propagation will be.
Step 2: Set the parameters for testing The calculation of the antenna alignment is conducted by the following procedure: • Bridge A sends a packet to Bridge B • When Bridge B successfully receives the packet from Bridge A, it will automatically echo the packet back. • When Bridge A receives the packet echoed back by Bridge B, it can calculate the throughput and can present it as PPS (packets per second) and KBPS (kilobytes per second). The higher the throughput is, the better alignment is achieved.
Step 3: Execute the test and evaluate the performance After all the parameters have been properly entered, click Start on the right side of the window to execute the test. Test results are immediately presented as a three-dimension graphic. During the antenna alignment test, the bridge might receive interference owing to some unexpected reason. Under this circumstance, the wireless communication data rate will automatically fall back.
stored file as a reference to compare with the latest test results and evaluate the difference between them. In the following figure, the red line represents the latest test results and the green line represents the previous test results.
the Firmware File field or browse the file by clicking the Browse button, then click Upgrade button to start the process. 3.3.2.7 New/Edit/Delete Host Address Click the icon to open the New/Edit Address dialog box. After enter the IP address of a WAP-5100, WMS will automatically find the device and list it on the Host Table. You can also select any WAP-5100 on the table and click the icon to delete it whenever it is no longer necessary. 3.3.2.
3.3.3 Trap View If the administrative PC has been assigned as a Trap Server of a WAP-5100, you can use Trap View to view the trap log information of the WAP-5100. Open Start menu and select Start Trap View, or click on the icon from the main WMS window, then the Trap View window appears as below. The log shows the time, the IP address of the reporting WAP-5100, and the event. You can save, open, and delete log files through the File menu.
Chapter 4 Troubleshooting This chapter provides solutions to problems usually encountered during the installation and operation of the WAP-5100. How do I set the WAP-5100 back to its factory default settings? You can apply Factory Reset option from the menu of the WLAN Management System (WMS) or use Kick Start function by the following way: w Connect the WAP-5100 to your PC. Please make sure the Ethernet connection is normal. w Open WLAN Management System (WMS) application and click Kick Start icon.
w What error messages you saw w Whether the problem can be reproduced w The serial number of the product w The firmware version and the debug information - 34 -