Multi-Port Fast Ethernet Print Server FPS-3120 User’s Manual 1
Copyright (C) 2004 PLANET Technology Corp. All rights reserved. The products and programs described in this User ’s Manual are licensed products of PLANET Technology, This User’s Manual contains proprietary information protected by copyright, and this User ’s Manual and all accompanying hardware, software, and documentation are copyrighted.
Table of Contents CHAPTER1 INTRODUCTION................................................................1 1.1 Product Introduction............................................................................................................................... 1 1.2 Product Package ................................................................................................................................... 1 1.3 Network Printing Architecture .................................................................
8.1 Introduction.......................................................................................................................................... 43 8.2 Web Management of Print Server ........................................................................................ 43 8.2.1 Login ............................................................................................................................................. 43 8.3 Device Status ....................................................
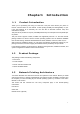
Chapter1 1.1 Introduction Product Introduction Thank you for purchasing and using our FPS-3120. This print server allows your printer to become a shared device on the network. It offers printing flexibility and manageability on your Local Area Network at an extremely low cost and with an absolute minimum setup and maintenance required. This print server provides a LAN port (10/100Mbps Ethernet), two USB ports and one parallel port for printers.
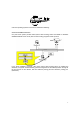
Network Printing Environment Print Server Client User Unix Print Server Network Server NetWare ServerWindows NT Server Windows NT Windows 2000 Windows 98 Workstation Detailed examples will then be illustrated through actual network environment. 1.3.
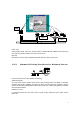
Client User Unix Print Server NetWare ServerWindows NT Server Windows NT Windows 2000 Windows 98 Workstation Common operating systems for clients are classified as following: Windows 95/98/Me/NT/2000/XP Our print server system provides PTPP (Peer-to-Peer Printing) driver and utilities for Windows 95/98/NT/2000/XP users. PTPP (Peer-to-Peer Printing) supports TCP/IP protocol.
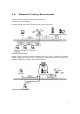
PTPP P1 Windows 98 P1 P2 Print Server MIS-2 P3 Print Server MIS-1 UNIX / Linux UNIX (include HP/UX, SCO Unix, SunOS, Solaris, Unixware DECUnix, IBM AIX and others) and Linux use the system-standard LPR to print to print server. MAC OS MAC OS can use the system-standard AppleTalk network to print to print server. 1.3.
1.4 Network Printing Environment Common network environment are classified as following: Windows Peer-to-Peer Network The client’s PTPP driver will use TCP/IP protocol to print to print server. Windows NT/2000 Network Network printing function will become available after PTPP driver is installed into Windows NT/2000. Adding this printing function into Windows NT/2000 Server allows print queue, user authority management, and many other advanced features.
1.5 Contents of the User’s Manual Chapter 2 explains print server’s hardware installation and configuration. It is strongly recommended for you to read. The following chapters 3, 4, 5, and 6 introduces: Chapter 3. Windows Peer-to-Peer Network Chapter 4. Windows NT/2000 Server-Based Network Chapter 5. NetWare Network Chapter 6. UNIX System Network You may select the appropriate chapters and sections to read depending on your network printing’s requirement.
Chapter2 Hardware Installation 1. Unpack the print server package and check all the items listed in section 1.2. 2. Connect the print server to the printer you want to share on the network by standard USB or parallel cable. 3. Connect the power adapter to the print server. 4. The print server will perform the Power-On-Self-Test (POST) after it is powered on. The PWR LED will still “off”, for few seconds it will turn “on” to indicate that the print server is ready.
Chap ter3 3.1 Windows Peer-toPeer Netwo rk System Architecture Print server supports Windows Peer-to-Peer network printing mode, which is suitable for most medium and small network environments. Through quick and simple installation procedure, users can immediately enjoy the convenience of network printing. Installation procedure is separated into following two parts: 1. Administrator Installation and Setup (refer to section 2 for more detailed information).
1. Insert Drivers and User’s Manual CD into the CD-ROM drive to initiate the autorun program. Once completed a menu screen will appear. 2. Click on “Administrator Installation” hyper link to initiate the installation. Or you can click the “Start” button and choose “Run”. (Suppose “E” is your CD-ROM drive). When the dialog box appears, enter “E:\Utility\Setup.exe” and press enter key. You will see the dialog box as below. Please click “Next” to continue. 3.
5. Specify the program folder name where the program icons will be add to. Please click “Next” to start installation. 6. For a while, the program will finish installing utility and driver you selected. Thus far you have completed the installation phase and prepare to configure the Print Server. The “Choose Print Server” dialog box will be displayed as following. Please select the print server and click “Next”.
7. “Name the print Server”, you can assign an easy to memorize name for management. But note that, this name will be the “Identifier” for the Peer-to-Peer Printing. NOTE: If this is the first time you configure the print server, the “Print Server Name” will be the same as the “Device Name” printed at the bottom of the print server. 8. In the system default, IPX and NetBEUI are enabled. But the Peer-to-Peer printing is not support those protocols, so it will show those protocols are not supported.
9. Configuration summary will display in this screen. Now, you have completed the “Print Server Setup”. By clicking “Finish”, your system will perform “Add network port” of the print server to your PC. 10. The “Setup complete” window is displayed to indicate that the Administrator Installation procedure is finished. Please click “Finish”.
After the installation, you have completed the following tasks, l Install utility and driver to the administrator’s PC l Configure the print server (including the print server name and network protocol) l Add the network port of the print server to the administrator’s PC Now, you have completed the administrator’s setup for most of the network environment. You can then perform the “Client Installation” procedure (section 3.4) on all client’s sides of the network.
Step4. Step5. Step6. Select a suitable printer manufacturer and model, then click “Next”. Choose the “Print Server’s Network Port” which was created by the administrator installation process and click “Next”. Complete the rest of the questions to finish the network printer setup.
3.3 Administrator Utilities After Administrator Installation is completed, there will be six utilities in print server ’s Program folder. 1. Network Ports Quick Setup Network Ports Quick Setup Utility offers a very simple method to add or remove print server’s printer port from the client’s computer. If you have just installed another new print server on the network, you must run this program first.
Step3. Press OK to add the remote printer port into your computer’s printer ports. In order to use the remote printing function, you will have to proceed with normal Add Printer procedure and select your printer port as the newly added remote printer port. 3. NetWare Quick Setup NetWare quick installation software (see chapter 5). 4. Print Server Configuration Complete print server management tool (see chapter 7 –Print Server Configuration). 5.
Clients just need to install Peer-To-Peer driver, so you don’t need to install the Configuration Utility to the client PC.
C hapter4 4.1 Windows N T /2000 Network System Architecture In Windows network environment, other than the Peer-to-Peer network printing architecture described in the previous chapter, we also offer the Server-Based Printing architecture for Windows NT/2000 server. Only one Windows NT/2000 is required to have Windows PTPP (Peerto-Peer Printing) driver installed and share the printing service on the network. Other network users can simply connect to the server and access the shared printer.
Step1. If this is your first time installing print server, please install the administrator software on Windows NT/2000 server first. Refer to section 3.2 for installation instructions. If your network has already installed a working print server and your Windows NT/2000 server has not yet installed the PTPP driver, please install the client software. Refer to section 3.4 for installation instructions. Step2.
20
Chap ter5 5.1 NetWare Network System Architecture We implement NetWare print sharing functionality into the print server itself, thus allowing one or more printers attached by a print server to be connected to the network. Embedded print server, which emulates the “queue management functionality” of NetWare print server, PSERVER program running on the NetWare server.
2. Refer to section 7.7 and use print server configuration utility, to configure print server attach to NetWare server print queue. Print server will get the print job from the print queue and print. 5.2.1 Installation with Pconsole 1. Run the NetWare PCONSOLE program. 2. Change the current file server, if necessary, using the Change Current File Server menu selection. 3. Choose the Print Queue Information menu selection. 4. Press the Insert key to add a new print queue. 5.
11. Select Printer Configuration. 12. Select Printer 0 (or Printer 1, Printer 2), and press Enter, then select Parallel LPT1 (or LPT2, LPT3) in the Type field. If your print server is with only one port, you do not need to configure this Type field. 13. Press Escape, and answer Yes to the Save Changes question. 14. Select Queues Serviced by Printer, then select Printer 0 (or Printer 1, Printer 2) and press Enter. 15.
Chapter6 6.1 UNI X Sys t e m N e twork Introduction The print server is available for TCP/IP printing by Unix LPD (Line Printer Daemon) protocol. The LPD protocol originated with Unix release is based on the BSD version of Unix and supported under most versions of Unix. This chapter explains how to configure the print server for TCP/IP operation, and how to modify configuration files on your Unix system to allow printing to the print server.
6.3.2 BOOTP If you have the BOOTP daemon, bootpd, running on your UNIX system that is accessible by the print server, you can use the BOOTP protocol to set up the IP address of the print server. We recommend that the BOOTP server should be located on the same subnet as the print server. If you use Network Information Services (NIS) in your system, you may need to rebuild the NIS map with the BOOTP services before doing the following BOOTP configuration.
6.5 Host Configure Remote LPD Printing on the The procedure you use to configure your Unix host(s) to allow printing to your network remote print server varies between different varieties of Unix. The procedure below can be used for Unix variants that are related to BSD Unix, such as SunOS or Linux. For other versions of Unix, consult your system documentation, keeping in mind that: 1. The print server should be treated as a BSD networked print server host. 2.
The rm= entry should correspond to the IP address you have assigned to the print server. You can also use a host name if you have assigned one in the /etc/hosts file. The sd= entry should correspond to the spool directory you created in the previous step. The rp= entry should correspond to the port name of the remote printer. The values should be one of lpt1, lpt2 or lpt3 depends on the printer port. The print server should now be available for printing from your Unix host.
Chap ter7 7.1 Co nfigu ration Util ity Introduction This chapter introduces print server’s system configuration utility in Windows environment. This utility is automatically installed during Windows Administrator Utility installation procedure - refer to section 3.2 and 3.3. This utility provides the most complete management and configuration functions on the print server side.
7.2 Search – Search for All Available Print Server Every time when you run print server’s configuration utility, click the “Search” icon on the tool bar. The configuration utility will delay for several seconds because the utility is using system’s available network protocols to search for all print servers on the network. All available print servers will be listed under “Print Server Group” on the left side of the window. You must select the print server you would like to configure from the list.
7.3 Status - Status of Print Server Click “Status” icon on the tool bar, the status of the current selected print server will be showed on the right side of the window. The information of the print server displayed are MAC ID, model type, firmware version, status of each printer port, NetWare file server name, NetWare file server polling interval, NetWare printer queue names, IP address, subnet mask, default gateway, AppleTalk printer type, AppleTalk zone and print server printing ability…etc.
7.4 Setting up the Print Server Click “Setup” icon on the tool bar, the setup items of the current selected print server will be showed on the right side of the window. You can modify all settings of the print server here. When you first time into one the configure options, system will ask you enter User Name and Password. The default User Name and Password are “admin”.
7.5 General Configuration Double Click “General” icon and the General configuration window will pop-up. You can see basic print server information in this page. You also can configure the “Print Server Name”, “User Name” and “Password” here. Printer Server Name: Name of the print server. You can use this name to identify the print server when you are searching for the print server by the administration and client utilities. SMB Group Name: Name of your network.
7.6 TCP/IP Configuration Double Click “TCP/IP” icon and the TCP/IP configuration window will pop-up. If there is a DHCP Server in your LAN. You can configure the print server to automatically obtain an IP address from DHCP server. Or you can manually specify a static IP address to this print server . If you need the print server to automatically obtain an IP address from LAN DHCP server, select “Auto IP”.
7.7 Netware Configuration Double Click “NetWare” icon and the NetWare configuration window will pop-up. This print server supports NetWare Bindery Printing method. The print server periodically polls the NetWare server printer queues for printing jobs. You have to assign the NetWare server name, print server polling interval and the name of queue on the NetWare server for each printer port. Polling Time is the polling interval of the print server for waiting printing jobs on the NetWare server.
7.8 AppleTalk Configuration Double Click “AppleTalk” icon and the AppleTalk configuration window will pop-up. AppleTalk is a data communication protocol often used by Macintoshes. The print server can use these parameters to join the AppleTalk network and share the printer to other AppleTalk workstations. You have to setup the “Zone Name” and “Printer Type” for each printer port of this print server. Zone Name: Print server has to join zones of AppleTalk before it can be shared to other workstations.
7.9 System Configuration Double Click “System” icon and the System configuration window will pop-up. In the System configuration page, you can select to enable/disable each printing protocol, assign name for each printer port of this print server and upgrade the new firmware for this print server. Port Name is the name of the printer port. Each printer port has to be assigned a name. The client utility uses this name to access the printer port.
7.10 Wizard Click “Wizard” icon on the tool bar, the setup wizard item of the current selected print server will be showed on the right side of the window. Double click the “Print Server Wizard”, the setup wizard will guide you through all the setup process from next page.
Step 1: Setup the Print Server Name and SMB Group Name of this print server and the name of each printer port. Please refer to section 7.5 and 7.9 for detail information. Step 2: Select to enable required printing protocol. Please refer to section 7.9 for detail information.
Step 3: Setup the IP of this print server. Please refer to section 7.6 for detail information. Step 4: Setup the NetWare printing. Please refer to section 7.7 for detail information.
Step 5: Setup the AppleTalk printing. Please refer to section 7.8 for detail information. Step 6. Setup Status Summary. This screen will show you the total settings of this print server. If those settings are correct, please press “Set” for next step to save the settings or press “Cancel” or “<
Step 10. Please press “Yes” to save the settings.
7.11 Report Click “Report” icon on the tool bar, the Report window will pop-up. The report list basic information of all available print servers on the network. The information includes Device Name, MAC ID, Model Type, Firmware Version and Status of print server.
Chap ter8 8.1 Web Manag ement Introduction Print server can be configured and managed on the web browser. Through Local Area Network, or even Internet when this print server has an legal IP address. Administrator can easily configure and manage print server’s various main functions in web browsers. Simply enter print server’s IP address into your browser’s address field to manage a print server by print server’s built-in Web Server. 8.2 8.2.
8.3 8.3.1 Device Status System In this page, it will show you all the system information such as “Device Name”, “Print Server Name”, “Model Type”, “System Up Time”, “Firmware Version”, “MAC Address” and other information.
8.3.2 Printer This page will display the information of printers connected to all printer ports.
8.3.3 TCP/IP This page lists all TCP/IP Settings, include “IP Address”, “Subnet Mask” and “Gateway”. 8.3.4 SMB This page will show the SMB Group Name.
8.3.5 SNMP This page will show the SNMP System Contact and SNMP System Location. If the settings are empty, this page will show you the settings “Disabled”. 8.3.6 NetWare This page lists NetWare settings, include “Polling Time”, “Use Bindery Mode”, “Name of the File Server” and “Queue Name of each Port”.
8.3.7 AppleTalk This page lists AppleTalk settings, include “AppleTalk Zone Name” and “Printer Type of printers connected to all print ports”.
8.4 8.4.1 Setup Wizard System You also can configure the “Print Server Name”, “User Name” and “Password” here. Printer Server Name, the name of the print server. You can use this name to identify the print server when you are searching for the print server by the administration and client utilities. Port Name: The name of the printer port. Each printer port has to be assigned a name. The printserver driver uses this name to access the printer port.
8.4.2 TCP/IP You can configure the print server to automatically obtain an IP addddress from your LAN DHCP server or manually specify a static IP address. If you need the print server to automatically get an IP from DHCP server, select “Enable Obtain TCP/IP settings automatically”. Or you can select “Disable Use the following TCP/IP settings” to manually assign IP Address, Subnet Mask and Gateway for the print server.
8.4.3 SMB You may Enable/Disable the SMB Printing protocl of this print server. When this setting enable, you have to enter the SMB Group Name, you should set this name as your network PCs assigned. Then the PCs can find this printserver in Network Neighbor and attach to this print server as a Network Printer.
8.4.4 SNMP This printserver has support SNMP protocol for users user SNMP management tool to monitor from a remote site. You can Enable this protocol and set the SNMP System Contact and SNMP System Location in this page. SNMP System Contact: Text Field - Name of the contact person. SNMP System Location: Text Field - Location of the contact person.
8.4.5 NetWare This print server supports NetWare Bindery Printing method. The print server periodically polls the NetWare server printer queues for printing jobs. You have to assign the NetWare server name, print server polling interval and the name of queue on the NetWare server for each printer port. Polling Time: The polling interval of the print server for waiting printing jobs on the NetWare server. Name of the File Server: Name of the NetWare file server that provides printer queues.
8.4.4 AppleTalk AppleTalk is a data communication protocol often used by Macintoshes. The print server can use these parameters to join the AppleTalk network and share the printer to other AppleTalk workstations. When you select “Enable”, you have to setup the “Zone Name” and “Printer Type” for each printer port of this print server. Zone Name: Print server has to join zones of AppleTalk before it can be shared to other workstations. Only workstations in the same zone can share the printer.
8.5 8.5.1 System Tools Load Default You can restore print server to factory default settings in this screen. All of your previous configuration will be cleared. 8.5.2 Upgrade Firmware You can upgrade new firmware for this print server in this screen. Click “Browse...” button to locate the new firmware and then click “OK”, the firmware will be updated in several minutes.
C hapter 9 9.1 I PP Printing Introduction IPP (Internet Printing Protocol) Printing provides a convenient way of remote printing service by TCP/IP. The print server can support IPP printing by default. It is needless to do any setting. Any PC that can support IPP printing, for example Windows 2000/XP, can directly uses the print server by IP. By using the IPP printing, you can share the printer to all the PC’s that can access the print server by IP. You can even share your printer to Internet users. 9.
server, the port name is “lpt1”. For the three port print server, the port name is one of the three – lpt1, lpt2 or lpt3. The last number 631 is IPP standard port number. One example of the URL is “http://192.168.12.13/lpt1:631”. After entering the URL of print server, click “Next >” and complete the configurations afterwards to access the shared printer.