High Definition IP Set-Top Box ITB-3001 User’s manual Version 1.0.
Copyright Copyright© 2010 by PLANET Technology Corp. All rights reserved. No part of this publication may be reproduced, transmitted, transcribed, stored in a retrieval system, or translated into any language or computer language, in any form or by any means, electronic, mechanical, magnetic, optical, chemical, manual or otherwise, without the prior written permission of PLANET.
FCC Caution To assure continued compliance (example-use only shielded interface cables when connecting to computer or peripheral devices). Any changes or modifications not expressly approved by the party responsible for compliance could void the user’s authority to operate the equipment. This device complies with Part 15 of the FCC Rules.
guidelines of this and of the computer manufacture must therefore be allowed at all times to ensure the safe use of the equipment. Revision User’s Manual for High Definition IP Set-Top Box Model: ITB-3001 Rev: 1.0 (Feb. 2010) Part No.
Table of Contents CHAPTER 1 INTRODUCTION .....................................................................6 1.1 Feature .......................................................................................6 1.2 Package Contents .........................................................................7 1.3 Physical Details ............................................................................7 CHAPTER 2 INSTALLATION .................................................................... 12 2.
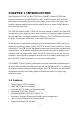
CHAPTER 1 INTRODUCTION High Definition IP Set Top Box ITB-3001is PLANET's latest IP STB that supports videos up to High Definition (HD) 1080P formats. With the next generation multimedia streaming technology, home users can enjoy high quality videos entertainment without having to go to video rental stores or even use Pay-Per-View. The ITB-3001offers DLNA / UPnP AV services, based on MPEG-4/H.
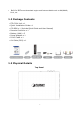
z Built-In BitTorrent download engine and Internet Media such as RM/RMVB, DivX, etc 1.2 Package Contents ITB-3001 Unit x 1 Quick Installation Guide x 1 CD-ROM x 1 (Include Quick Guide and User Manual) Remote Controller x 1 Battery (AAA) x 2 Power Adapter x 1 RJ-45 Cable x 1 AV Cable (RCA) x 1 1.
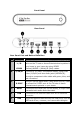
Front Panel Rear Panel Rear Panel Port and Button Definition No. Connector A Audio L-/RVIDEO B Y/Pb/Pr C S-PDIF Description Use AV cable to connect to the VIDO IN/ AUDIO L/R IN jacks on the TV sets or Home Entertainment systems in your home in your home by using VIDEO (Yellow)/AUDIO L (White)/R (Red) cables. Connect to a Y/Pb/Pr-compatible display using three video (Y/Pb/Pr) and two audio jacks (AUDIOL/R), through a component video cable with green, blue, and red connectors.
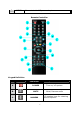
G DC IN Connects to the DC power adapter. Remote Controller Keypad Definition No. Description Connector A POWER Turn on/ off system B MUTE Mute/ Resume audio C NUMERS 0-9 number keys for selecting desired options.
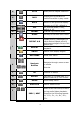
D GOTO Video/movie chapter selection. E INFO Display the information of media files while in play mode. F BACK Return to the previous display. G VOL H CANNEL I HOME Volume up (0-28), default is 16; Volume down (0-28), default is 16. Channel up/Channel down. Hot key to the main OSD menu. REPEAT Press once to mark desired repeat point A, press again to mark desired repeat point B, and press yet again to turn this feature off. Enable/disable repeat of file playback.
PLAY/PAUSE Play media / Pause media. PREV Media Skip Previous. NEXT Media Skip Next. STOP Stop playback and return to the previous Screen. Slow motion through video playback. SLOW MOTION Q L/R R AUDIO S Supports the following speeds: 1x, 3/4×, 1/2×, 1/4×,1/8×, 1/16×. Switch Left/Right speaker. Switch audio outputs. Enlarge image on video mode (, 2x, 3x, 4x, 8x). Reduce image on video mode ZOOM (4/5x, 3/4x, 2/3x, 1/2x).
CHAPTER 2 INSTALLATION This chapter offers information about installing your IP Set-Top Box. If you are not familiar with the hardware or software parameters presented here, please consult your service provider for the values needed. 2.1 Getting Start This chapter shows you how to configure these steps to connect ITB-3001, and the following figure is the Rear Panel of IP Set-Top Box. Connection Diagram Following is a connection example with network and UPnP devices.
Make sure you have the appropriate cables for connecting. Take care to watch the colors of the plugs on the cable. Step1: REAR PANEL-IDENTIFY CONNECTOR LOCATION Step2: TO SELECT VIDEO OUTPUT BY HDMI, OR AV CABLE 2-1.
2-2. Connect via Y/Pb/Pr or Composite Video cable (with Audio cable) 2-2-1. Connect via Y/Pb/Pr cable "Note Y/Pb/Pr cable is not bundle in the package 2-2-2. Connect via AV cable "Note RCA Audio is also available for audio output 2-2-3.
"Note S/PDIF (Sony/Philips Digital Interconnect Format and it is not bundle in the package Step3: CONNECT ETHERNET CONNECTOR Step4: CONNECT USB DEVICES IF AVAILABLE 15
"Note The USB cable is not bundle in the package Step5: CONNECT POWER ADAPTER Step6: INSTALL BATTERIES IN REMOTE CONTROL Step7: TURN ON THE ITB-3001 1. When DC power applied, the red LED light indicates standby mode.
2. To turn on the device, press Power button. 3. The blue LED light indicates Power on.
CHAPTER 3 CONFIGURAITON 3.1 Wired Network Setup Network Connections: needed only when using “PC Media”, “Download Media” and “YouTube TV” features. If your wired network equipment such as the IP Sharing router or AP (Access Point), uses DHCP to assign IP address, by default the ITB-3001 will automatically request the IP and other related information to set up ITB-3001 over the network in DHCP mode (under Setup> Network >Wired).
3.1.1 DHCP Button Description Step1: To access “Setup” on the main menu. Select “Network”. + Step 2: Select “Wired” on the Network menu. Select “DHCP”. + Step 3: Select Yes to implement DHCP network setting. ITB-3001 will automatically receive its IP address from a DHCP sever that is built into the access point or IP sharing router.
3.1.2 Static IP Button Description Step1: Select “Wired” on the Network menu. + Select “Static IP”. Step 2: Input the value IP Address, Subnet mask, Gateway, and DNS text box respectively. + "Note Please acquire information of these setting values from your ISP (Internet Service Provider) first.
3.2 File Sharing Configuration To activate this feature, please make sure: z z The ITB-3001 is connected to the network; The network is properly set up. For more information on this part, please refer to “Step 2” in “Setting up ITB-3001” section, and “Network” under “Setup Menu”. To allow the ITB-3001 to access folders on your computer, you need: 1) ITB-3001 already connected to the network 2) To designate the folders/files on your PC as shared resources.
Step 3: You may now specify a “Share Name”, which will be used for users on the network to access the shared folder. The icon of the shared folder will be changed to showing a hand holding the folder. If your operating system is Windows Vista, please refer to the following instructions: 1. Open the Control Panel and then open Network and Sharing Center. 2. Click the down arrow to the right of File Sharing to expand it.
3. Click Turn on file sharing and then click Apply. You may also refer to Setup menu on the OSD screen of ITB-3001 to select wired connection.
CHAPTER 4 PLAY MEDIA Button Description Enter OSD Menu > Play Media + + Under Play Media, select the media source from USB Device/ PCs/ UPnP/ Playlist. + Open your selected folders. There will a folder/file list on the left. Play the selected video/music/photo file. 4.1 USB Media ITB-3001 searches and plays all available images, music and video files on the external device with USB interface automatically.
4.2 PC Media Connect ITB-3001 to your PC using a USB 2.0 cable. By connecting your PC in the Local Area Network, you can play the media files from the remote PCs. Please confirm the network settings and sharing files setup have been finished successfully. (See Chapter 3 for more information.) 4.3 UPnP UPnP (Universal Plug and Play) allows you to connect UPnP-enabled devices (available on the network) and share their content with the media player.
Button + Description Add to Playlist Select/cancel the files which will be added. Edit Rename/delete file. For the files added to the playlist, ITB-3001 will separate the media files by video/music/photo tags. "Note 4.5 Video Playback Button Description Enter Play Media > Video Playback. Navigate the media file you want to play. The preview window will show the highlighted video. Edit Rename /Delete file. Add to Playlist Add selected file to Playlist Back Return to previous display.
Full screen mode. 4.5.1 Full Screen Mode Button Description Play/pause selected file. Rewind/Forward Slow motion. Return to previous file. Go to next file. Zoom Zoom in/out on photos or movies. Volume Increase/decrease the volume. Mute Mute the sound. GOTO Video/movie chapter selection. Subtitles Switch subtitle files. Info Display the infor of media files in play mode. Audio Switch audio outputs. L/R Enable/disable Left/Right speaker. Stop playback and leave full screen mode.
4.6 Music Playback Button Description Enter Play Media > Music Playback Navigate the media file you want to play. The preview window will show the file details of highlighted file. Edit + Rename /Delete file. Add to Playlist Add selected file to Playlist. Back Back to previous display. Play selected file. Play/pause selected file. Fast forward. Rewind. Previous file. Next file. Volume Increase/decrease the volume. Mute Mute the sound.
Info Display the infor of media files in play mode. Stop playback and return to the previous display PS Music will continue playing as background music when you leave MUSIC PLAYBACK menu. Press to stop playing. 4.7 Photo Playback Button Description Enter Play Media > Photo Playback Navigate the media file you want to play. The preview window will show the file details of highlighted file. Edit Rename /Delete file. + Add to Playlist Add selected file to Playlist. Thumbnail mode.
4.8 Thumbnail Mode Button Description Full screen mode. Back Back to previous display. Previous page. Next page. First page. Last page. Leave thumbnail mode.
4.9 Full Screen Mode Button Description Rotate the viewing picture counterclockwise Rotate the viewing picture clockwise. Info Display the infor of media files in play mode. Leave full screen mode. PS You can choose the preferred slide show effects in Setup menu. If you’d like to turn off the function, please enter Setup > Other> Transition Effect. EDIT FUNCTION Button Cancel Description Back to main OSD display.
Rename Rename the selected file. Delete Delete the selected file. Add to Playlist Add selected file to Playlist.
CHAPTER 5 WEB SERVICE 5.1 BT Download To activate this feature, please make sure: z z The ITB-3001 is connected to the network; The network is properly set up. For more information on this part, please refer to “Step 2” in “Setting up ITB-3001” section, and “Network” under “Setup Menu”. BitTorrent is the leading and the most common peer-to-peer file-sharing communications protocol.
Step 1: Connect external USB device into ITB-3001 USB port. Step 2: If your external hard drive has not been formatted, the warning message “This action will erase all data on the device. Are you sure to continue?” will appear to remind you to format your hard drive. Press + to select Yes to format your USB storage device. It may take up to several minutes, according to the size of your USB device.
Step 4: Press + to select .torrent files to download, and then you can see the download process page. To ensure the system’s efficiency, only 3 download tasks will take place simultaneously, and each .torrent file will be downloaded in sequence. You can also press adjust the priority of the download files. USB devices, see USB Media menu. + To see the downloaded files in your For more information on Download Media Step-by-Step, please visit www.planet.com.tw .
CHAPTER 6 SETUP MENU Button Description Cancel Back to main OSD display. Rename Rename the selected file. Delete Delete the selected file. Add to Playlist Add selected file to Playlist. 6.1 Audio Button Description Enter “Audio” setup menu. + + Select the item for adjustment. Confirm the change. Return to previous display.
Item Options Night Mode On/Off HDMI LPCM Digital Output HDMI RAW SPDIF LPCM SPDIF RAW L/R Change Audio L/R L/L R/R 6.2 Video Button Description Enter “Audio” setup menu. + + Select the item for adjustment. Confirm the change. Return to previous display.
1080P 50HZ 1080P 60HZ 6.3 System Button Description Enter “Audio” setup menu. + + Select the item for adjustment. Confirm the change. Return to previous display.
6.4 Other Button Description Enter “Audio” setup menu. + + Select the item for adjustment. Confirm the change. Return to previous display.
APPENDIX A: Trouble Shooting The following reference list represents situations that you may encounter, and methods for remedy. Please refer to this checklist prior to contacting qualified service personnel. You can also visit the FAQ page on www.planet.com.tw Symptom No picture is displayed. Remedy z Check the power cord connection. Or connect the power cord to another power outlet. z Are the Component Y/Pb/Pr/ AUDIO L/R cables or HDMI Cable loose or disconnected? Make sure one of connections is correct.
APPENDIX B: Product Specificaiton Product High Definition IP Set-Top Box Model ITB-3001 Hardware Specification Video Output Port HDMI Auto(480p,720p,1080i,1080p), YPbPr and Component Video Audio Output Audio L/R Ethernet USB 1Ethernet:10/100Mbps, Half or Full Duplex, Autonegotiation, Auto MID/MID-X 1 USB 2.
PNG BMP TIF TIFF Subtitle SRT, SMI, SUB, SSA, and IDX+SUB EXT3 Reading Storage File NTFS FAT16/32 System HFS+ Writing Storage File EXT3 NTFS System Environmental Dimension (W x D x H) 204× 145× 40 mm Weight 420 g Cables AV Cable (RCA) x 1 RJ-45 Cable x 1 Power 12V DC, 2A Operating Temp. 0 ~ 45 Degree C Storage Temp.
EC Declaration of Conformity For the following equipment: *Type of Product *Model Number : High Definition IP Set-Top Box : ITB-3001 * Produced by: Manufacturer‘s Name : Planet Technology Corp. Manufacturer‘s Address : 11F, No. 96, Min Chuan Road, Hsin Tien Taipei, Taiwan, R.O.C. is herewith confirmed to comply with the requirements set out in the Council Directive on the Approximation of the Laws of the Member States relating to Electromagnetic Compatibility (2004/108/EC).