
Quick Guide


– 5 – –6 –
– 7 – – 8 –
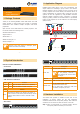
5. Operations
There are three ways to switch PC. Please see the below
operation instructions for more understanding.
Manual Key
You just need to press the Port Select Button on the
front panel of the KVM. The Selection LED (Green) is on,
indicating that you are switching to the corresponding port.
Note
The Port Select Button functions only when
connected to a PC.
Switch Hotkey
You can select the QVS (Quick View Setting) from the
OSD of the PC rst (for a quick switch of PC) and use the
keyboard to switch to the previous or next set of PC.
Scroll + Scroll + Num (Default setting)
Ctrl + Ctrl + Num
Alt + Alt + Num
Shift + Shift + Num
Example: Press Scroll + Scroll + 2 and switch to PC port 2.
OSD (On Screen Display) Activating Key
Press the Activating Key to start the OSD.
Ctrl + Ctrl (Default setting)
Scroll + Scroll
Alt + Alt
Shift + Shift
Figure: OSD Screen after press "Ctrl" twice.
Further Information:
The above steps introduce the simple installation of the KVM
Switch. For further details on the installation of the Combo
KVM Switch, please refer to the user manual which can be
downloaded from the PLANET website.
http://www.planet.com.tw/en/support/download.php?type1=102
&model=48924&type=3
If you have further questions, please contact the local dealer
or distributor where you purchased this product or you can
contact PLANET directly at the following email address:
support@planet.com.tw
PLANET Technology Corp.
11F., No. 96, Minquan Rd., Xindian Dist., New Taipei City 231, Taiwan
2011-F00330-000
Step 6. Connect the monitor to the KVM Switch. Using the
attached cable, or the one included with your monitor,
connect it to the HDB-15 female port on the back of
the KVM unit labeled with the monitor symbol at the
CONSOLE port connector.
DC 9V
8 7 6 5 4 3 2 1
Console
Step 7. Connect the keyboard to the KVM Switch, via PS/2 or
USB interface.
DC 9V
8 7 6 5 4 3 2 1
Console
Step 8. Connect the mouse to the KVM Switch, via PS/2 or USB
interface.
DC 9V
8 7 6 5 4 3 2 1
Console
Step 9. Attach the power supply to the KVM unit and plug the
other end into an electrical receptacle. Now you will see the LED
for Port 1 light up. Switch on your monitor.
Step 2. Attach a rack-mount bracket to each side of the KVM
Switch with supplied screws attached to the package.
2
1
ON Select
4
3
ON Select
6
5
ON Select
8
7
ON Select
8-Port Combo KVM Series
Reset
Note
1. You must use the screws supplied with the
mounting brackets. Damage caused to the parts
by using incorrect screws would invalidate your
warranty.
2. Please make sure computer and switch KVM are
turned off.
Step 3. Secure the brackets tightly.
Step 4. Follow the same steps to attach the second bracket to
the opposite side.
Step 5. After the brackets are attached to the Web Smart
Switch, use suitable screws to securely attach the
brackets to the rack.
2
1
ON Select
4
3
ON Select
6
5
ON Select
8
7
ON Select
8-Port Combo KVM Series
Reset