
Quick Guide


– 1 – – 2 –
– 3 – – 4 –
KVM-210-08/KVM-210-16
Quick Installation Guide
8/16-Port
Combo KVM Switch
1. Package Contents
Thank you for choosing PLANET Combo KVM Switch. The KVM
Switch provides a useful function that controls a computing
infrastructure that combines multiple computers with other
peripherals.
Open the box of the KVM Switch and carefully unpack it. The
box should contain the following items:
z Combo KVM Switch x 1
z Quick Guide x 1
z KVM Cable x 1
z Rack-mounting Kit x 1
z Power Adapter x 1
Note
If there is any item missing or damaged, please
contact the seller immediately.
2. Application Diagram
PLANET’s KVM switch family is the most cost-effective and
simple solution for controlling a group of PCs in the network.
Multiple computers can be managed via only one single set of
monitor, keyboard and mouse directly. No software drivers or
system conguration are required. iMac, Power Mac and Sun
systems can also be supported by using PLANET’s innovative
USB-PS2 adapter. Switching among computers is achieved
simply by pushing a button on the KVM switch or a pre-dened
hotkey on the keyboard or via the KVM-810’s on screen display
(OSD) function.
DC 9V
8 7 6 5 4 3 2 1
Console
Max. 8 PCs
Main Console
KVM-210-08 Rear Panel
3. Physical Introduction
8/16-Port Combo KVM Switch
Front Panel
2
1
ON Select
4
3
ON Select
6
5
ON Select
8
7
ON Select
8-Port Combo KVM Series
Reset
2
1
ON Select
4
3
ON Select
6
5
ON Select
8
7
ON Select
10
9
ON Select
12
11
ON Select
14
13
ON Select
16
15
ON Select
Reset
16-Port Combo KVM Series
LED and button denitions
LED Color Function
On Line Red Lights to indicate that the PC is operating.
Select Green Press this button to select a PC port.
Button Function
Reset
This button is hidden in the pinhole. This button is
used to restore all the factory default settings. Please
hold the reset button for about 5 seconds to load
default.
Rear Panel
DC 9V
8 7 6 5 4 3 2 1
Console
16 15 14 13 12 11 10 9
DC 9V
8Console 7 6 5 4 3 2 1
Interface Description
Power Jack
The input power is 9V DC.
Note
Use the power adapter included
in the package; otherwise, it
may damage the unit and result
in danger.
USB Port Plug USB keyboard and mouse in this port.
Computer Port Install the KVM cable connected to a PC here.
Console Ports
z In the Master KVM, connect the monitor,
keyboard and mouse here.
z In the Slave KVM, connect the cable from
the Master computer port here.
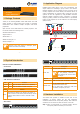
4. Hardware Installation
The Switch KVM provides a standard 19-inch rack for the
installation of devices. Please use the rack installation
accessories attached with the product package. First install the
accessories to the device and then the device to the rack.
Step 1. Place your KVM Switch on a hard at surface, with the
front panel positioned towards your front side.