
User's Manual
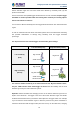
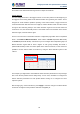


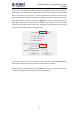


Table Of Contents
- Chapter 1. Product Introduction
- Chapter 2. Hardware Interface
- 2.1 Physical Descriptions
- 2.2 Hardware Installation
- 2.3 Initial Utility Installation
- 2.4 Using UPnP of Windows XP or 7
- 2.5 Setting Up ActiveX for the Camera
- Chapter 3. Web-based Management
- Appendix A. The Dimensional Diagram of the Stand
- Appendix B. The Dimensional Diagram of the Camera
- Appendix C. Ping IP Address
- Appendix D. Configuring Port Forwarding Manually
- Appendix E. Waterproofing the Cable Connections
- Appendix F. Joystick Compatibility
- Appendix G. Connecting Audio Devices
- Appendix H. Connecting Digital Input/ Digital Output Devices
- Appendix I. How to Replace the Fuse
- Appendix J. Troubleshooting & Frequently Asked Questions

2 Mega-pixel PoE Plus Speed Dome IP Camera
ICA-E6260
97
In such cases, the installer can “help” the camera to understand the true colors by placing a
white object (for example a piece of white paper) in front of the camera to cover the whole
field of view and wait a few seconds – the auto white balance system will adjust the colors
until the white paper will really look white on the display. At that moment, the user can freeze
these white balance settings by pressing the Hold button. After pressing that button, the
White Balance will switch from Auto mode to Manual mode, together with the color values
captured at the moment of Hold. The user can now remove the white object from the field of
view, and the colors will stay correct for given scene.
For advanced users, there is also an option to switch from Auto mode to Manual mode of
White Balance directly and input the R Gain and B Gain values manually.
After changing any of the items above, press Apply to save the changes. The Reset button
undoes the changes that had just been made but not Applied yet.