
User's Manual

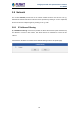
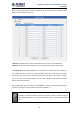
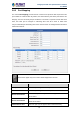
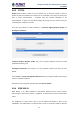

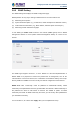

Table Of Contents
- Chapter 1. Product Introduction
- Chapter 2. Hardware Interface
- 2.1 Physical Descriptions
- 2.2 Hardware Installation
- 2.3 Initial Utility Installation
- 2.4 Using UPnP of Windows XP or 7
- 2.5 Setting Up ActiveX for the Camera
- Chapter 3. Web-based Management
- Appendix A. The Dimensional Diagram of the Stand
- Appendix B. The Dimensional Diagram of the Camera
- Appendix C. Ping IP Address
- Appendix D. Configuring Port Forwarding Manually
- Appendix E. Waterproofing the Cable Connections
- Appendix F. Joystick Compatibility
- Appendix G. Connecting Audio Devices
- Appendix H. Connecting Digital Input/ Digital Output Devices
- Appendix I. How to Replace the Fuse
- Appendix J. Troubleshooting & Frequently Asked Questions

2 Mega-pixel PoE Plus Speed Dome IP Camera
ICA-E6260
64
Below you can select either “Allowed” or “Blocked” list to add items there and Enable them
with the checkbox behind each row.
“Allowed” mode will refuse access to all IP addresses except the ones listed below.
“Blocked” mode will accept all incoming access except the IP addresses listed below.
Using Netmask (Subnet Mask) allows you to set filtering for a whole range of IP address at
once, without the need to enter all of them individually. If you are not sure about the function
of Netmask, then you should use 255.255.255.255, and it will affect only a single IP address
per line of entry, or use 255.255.255.0 to use the same setting for all IP addresses starting
with the same three numbers. .
After changing any of the items above, press Apply to save the changes. The Reset button
undoes the changes that had just been made but not Applied yet.
Do not accidentally block your own IP address that you are connecting from;
otherwise, you will not be able to access the camera any more to undo the changes.
If this happens by mistake, you can do the hardware reset – it will clear all the filtering
rules.