
User's Manual
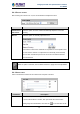
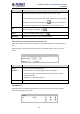
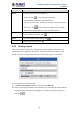
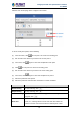
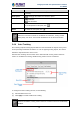
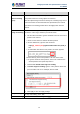

Table Of Contents
- Chapter 1. Product Introduction
- Chapter 2. Hardware Interface
- 2.1 Physical Descriptions
- 2.2 Hardware Installation
- 2.3 Initial Utility Installation
- 2.4 Using UPnP of Windows XP or 7
- 2.5 Setting Up ActiveX for the Camera
- Chapter 3. Web-based Management
- Appendix A. The Dimensional Diagram of the Stand
- Appendix B. The Dimensional Diagram of the Camera
- Appendix C. Ping IP Address
- Appendix D. Configuring Port Forwarding Manually
- Appendix E. Waterproofing the Cable Connections
- Appendix F. Joystick Compatibility
- Appendix G. Connecting Audio Devices
- Appendix H. Connecting Digital Input/ Digital Output Devices
- Appendix I. How to Replace the Fuse
- Appendix J. Troubleshooting & Frequently Asked Questions

2 Mega-pixel PoE Plus Speed Dome IP Camera
ICA-E6260
54
(3) On the Preset Points, the preset points added to the Tour are listed.
To change the sequence of preset points, click the (first/up/down/last) icons.
To directly go to the preset point, click .
To delete the preset point from the list, click .
(4) Repeat steps 2 and 3 to add more preset points to the tour.
(5) Once done, click the Save button on Select a Preset Point.
(6) On Touring Control, select the tour name to activate. Once activated, the camera will
start the tour.
Ensure Auto Tracking is disabled to use Touring Control.
3.4.3 Scan Control
The Scan Control page enables the camera to go from one predefined point to another by
scanning the view horizontally without losing focus. Unlike in preset tours, wherein the
camera goes to one preset point to another quickly and focusing only on the present point
area, scan function goes over point 1 to point 2 on a steady pace with the whole viewing
angle in complete focus. The scan speed can also be configured according to user
preference.