
User's Manual


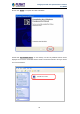


Table Of Contents
- Chapter 1. Product Introduction
- Chapter 2. Hardware Interface
- 2.1 Physical Descriptions
- 2.2 Hardware Installation
- 2.3 Initial Utility Installation
- 2.4 Using UPnP of Windows XP or 7
- 2.5 Setting Up ActiveX for the Camera
- Chapter 3. Web-based Management
- Appendix A. The Dimensional Diagram of the Stand
- Appendix B. The Dimensional Diagram of the Camera
- Appendix C. Ping IP Address
- Appendix D. Configuring Port Forwarding Manually
- Appendix E. Waterproofing the Cable Connections
- Appendix F. Joystick Compatibility
- Appendix G. Connecting Audio Devices
- Appendix H. Connecting Digital Input/ Digital Output Devices
- Appendix I. How to Replace the Fuse
- Appendix J. Troubleshooting & Frequently Asked Questions

2 Mega-pixel PoE Plus Speed Dome IP Camera
ICA-E6260
40
Chapter 3. Web-based Management
This chapter provides setup details of the camera’s Web-based Interface.
3.1 Introduction
The camera can be configured with your Web browser. Before configuring, please make sure
your PC is under the same IP segment as camera.
3.2 Connecting to the Camera
Use the following procedures to establish a connection from your PC to the camera. Once
the camera is connected, you can add the camera to your browser’s Favorites or
Bookmarks.
Start the web browser on the computer and type the IP address of the camera.
The default IP: “http://192.168.0.20“
The login window of the camera will appear.
Default login username and password are both admin.
If the User Name and Password have been changed, please enter the new User
Name and Password here.