
User's Manual
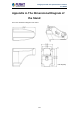
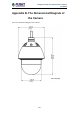

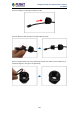
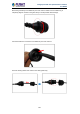
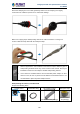
Table Of Contents
- Chapter 1. Product Introduction
- Chapter 2. Hardware Interface
- 2.1 Physical Descriptions
- 2.2 Hardware Installation
- 2.3 Initial Utility Installation
- 2.4 Using UPnP of Windows XP or 7
- 2.5 Setting Up ActiveX for the Camera
- Chapter 3. Web-based Management
- Appendix A. The Dimensional Diagram of the Stand
- Appendix B. The Dimensional Diagram of the Camera
- Appendix C. Ping IP Address
- Appendix D. Configuring Port Forwarding Manually
- Appendix E. Waterproofing the Cable Connections
- Appendix F. Joystick Compatibility
- Appendix G. Connecting Audio Devices
- Appendix H. Connecting Digital Input/ Digital Output Devices
- Appendix I. How to Replace the Fuse
- Appendix J. Troubleshooting & Frequently Asked Questions

2 Mega-pixel PoE Plus Speed Dome IP Camera
ICA-E6260
140
Attach the clamping nut to the cable gland body. Make sure the clamping nut is tightly
secured and the rubber is squeezed in to avoid water leakage.
Make sure to apply proper waterproofing methods to cable connections or arrange all
unused cables and wrap them with the waterproof tape.
1. Different applications and installation environments require different types of
waterproofing methods which may not be covered in this manual. Check your
installation environment and adapt a suitable waterproofing method.
2. If the camera is installed outdoors and the bundled power adapter or other
device is used, be sure to protect it from different environmental factors. It is
recommended to place the power adapter indoors.
Waterproofing the Cable by Conduit Gland
Prepare the following items:
Conduit Gland
Gland Rubber Ring
1/2” Flexible Conduit
Waterproof Tape
(not included in the package)
(not included in
the package)