
User's Manual
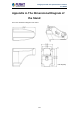
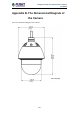
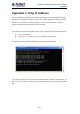
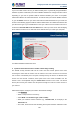
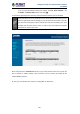

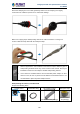
Table Of Contents
- Chapter 1. Product Introduction
- Chapter 2. Hardware Interface
- 2.1 Physical Descriptions
- 2.2 Hardware Installation
- 2.3 Initial Utility Installation
- 2.4 Using UPnP of Windows XP or 7
- 2.5 Setting Up ActiveX for the Camera
- Chapter 3. Web-based Management
- Appendix A. The Dimensional Diagram of the Stand
- Appendix B. The Dimensional Diagram of the Camera
- Appendix C. Ping IP Address
- Appendix D. Configuring Port Forwarding Manually
- Appendix E. Waterproofing the Cable Connections
- Appendix F. Joystick Compatibility
- Appendix G. Connecting Audio Devices
- Appendix H. Connecting Digital Input/ Digital Output Devices
- Appendix I. How to Replace the Fuse
- Appendix J. Troubleshooting & Frequently Asked Questions

2 Mega-pixel PoE Plus Speed Dome IP Camera
ICA-E6260
136
If you are using the default camera port settings, enter 80, 6001 and 6002 into
the Public and Private Port section and click Add.
A check mark appearing before the entry name will indicate that the ports are enabled.
Some ISPs block access to port 80. Be sure to check with your ISP so that you can
open the appropriate ports accordingly. If your ISP does not pass traffic on port 80,
you will need to change the port the camera uses from 80 to something else, such
as 8080. Not all routers are the same, so refer to your user manual for specific
instructions on how to open ports.
Enter valid ports in the Virtual Server section of your router. Please make sure to check the
box on this line to enable settings. Then the device can be accessed from WAN by the
router’s WAN IP address.
By now, you have finished your entire PC configuration for this device.