
User's Manual

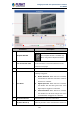
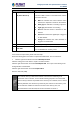


Table Of Contents
- Chapter 1. Product Introduction
- Chapter 2. Hardware Interface
- 2.1 Physical Descriptions
- 2.2 Hardware Installation
- 2.3 Initial Utility Installation
- 2.4 Using UPnP of Windows XP or 7
- 2.5 Setting Up ActiveX for the Camera
- Chapter 3. Web-based Management
- Appendix A. The Dimensional Diagram of the Stand
- Appendix B. The Dimensional Diagram of the Camera
- Appendix C. Ping IP Address
- Appendix D. Configuring Port Forwarding Manually
- Appendix E. Waterproofing the Cable Connections
- Appendix F. Joystick Compatibility
- Appendix G. Connecting Audio Devices
- Appendix H. Connecting Digital Input/ Digital Output Devices
- Appendix I. How to Replace the Fuse
- Appendix J. Troubleshooting & Frequently Asked Questions

2 Mega-pixel PoE Plus Speed Dome IP Camera
ICA-E6260
125
Parameters
Description
1
Snapshot Window
Displays the snapshot of the selected video timeslot.
The Snapshot window is available only
when using Internet Explorer browsers.
2
Time of Selected Video
Shows the time of the selected video timeslot. Click
the arrow buttons to scroll the timeline bar to the
previous or next page.
3
Start Time of Timeline Bar
The starting time (left side) of the timeline bar.
4
View Event
Check the box to view events recorded when the
following is triggered:
Motion Detection: When this box is checked,
the timeline bar will show red bars if motion is
detected on a timeslot.
Digital Input Port: When this box is checked,
the timeline bar will show green bars if the
digital input is triggered on a timeslot.
Sound Detection: When this box is checked,
the timeline bar will show orange bars if the
sound detection is triggered on a timeslot.
5
Go to Current Time
Click the button to go to the current time.
6
Timeline Bar:
S1 (Video Stream 1)
Allows users to browse and select the recorded
videos by timeslot. Video recorded from stream 1 is