
User's Manual

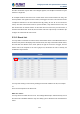
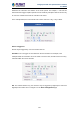
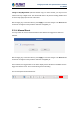
Table Of Contents
- Chapter 1. Product Introduction
- Chapter 2. Hardware Interface
- 2.1 Physical Descriptions
- 2.2 Hardware Installation
- 2.3 Initial Utility Installation
- 2.4 Using UPnP of Windows XP or 7
- 2.5 Setting Up ActiveX for the Camera
- Chapter 3. Web-based Management
- Appendix A. The Dimensional Diagram of the Stand
- Appendix B. The Dimensional Diagram of the Camera
- Appendix C. Ping IP Address
- Appendix D. Configuring Port Forwarding Manually
- Appendix E. Waterproofing the Cable Connections
- Appendix F. Joystick Compatibility
- Appendix G. Connecting Audio Devices
- Appendix H. Connecting Digital Input/ Digital Output Devices
- Appendix I. How to Replace the Fuse
- Appendix J. Troubleshooting & Frequently Asked Questions

2 Mega-pixel PoE Plus Speed Dome IP Camera
ICA-E6260
118
Change to Day/Night Mode (Selected models only): For some models, you may force the
Camera into Day or Night mode. The camera will return to its previous setting (whether auto
or forced day/ night) upon the end of the event.
After changing any of the items above, press Apply to save the changes. The Reset button
undoes the changes that had just been made but not Applied yet.
3.11.4 Manual Event
You may select one event in the Manual Event area below to be triggered via web user
interface.
After changing any of the items above, press Apply to save the changes. The Reset button
undoes the changes that had just been made but not Applied yet.
Once selected, the trigger button on the video display screen will show as clickable. Click to
trigger the selected event. This is useful during event rule testing.
The live view panel would look like this: