
Quick Guide

– 1 – – 2 –
– 3 – – 4 –
Verify The Contents Inside
The Package Box
The package should contain the items plus IP camera. If
any item is missing or damaged, please contact the seller
immediately.
Quick Installation Guide Cable Gland Screw Package
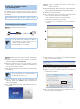
Connecting to the camera
Step 1: Connecting Network and PoE
PoE Ethernet Switch
Laptop
(192.168.0.X)
PoE
IP camera
Note
1. The IP camera also supports AC adapter.
Be reminded to power either from AC
adapter or 802.3af/at PoE switch.
2. The AC adapter is not included.
Step 2: Utility is installed and runs to locate the IP
camera (optional)
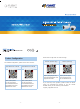
Please download the Utility from the link: http://www.planet.
com.tw/en/support/download.php?key=IP+Finder+II#list
Install the IP Finder II Utility.
After the camera utility is launched, all cameras found
in your local area network will be displayed.
1. The existing IP cameras in the local network
2. Search the IP camera in the network
3. To modify the IP parameters of the selected IP
camera
Step 3: Displayingthewebpageforfurther conguration
If there is no DHCP server in the network, the camera’s
default IP address is 192.168.0.20.
Enter the camera’s IP into your web browser or select
the IP camera you want to congure and double-click
on it by the IP Finder II Utility.
You will be connected to the IP camera via web browser
automatically.
Note
For full functionality, it is recommended to
use Microsoft IE browser 11.
The IP camera will prompt for logon username and
password. Please enter admin for both the default user
name and password.
It is recommended to change login password for secu-
rity reasons.
After logging on, you should see the following messages
at the top of Internet Explorer:
Clickonthe messageandclickRunAdd-on.
When you see this message, click Run to install the
required ActiveX control.
After the ActiveX control has been installed and run,
therstimage willbedisplayed.