Z-Wave Home Automation Control Gateway HAC-1000 -1-
Z-Wave Home Automation Control Gateway HAC-1000 Copyright Copyright © 2015 by PLANET Technology Corp. All rights reserved. No part of this publication may be reproduced, transmitted, transcribed, stored in a retrieval system, or translated into any language or computer language, in any form or by any means, electronic, mechanical, magnetic, optical, chemical, manual or otherwise, without the prior written permission of PLANET.
Z-Wave Home Automation Control Gateway HAC-1000 CE Mark Warning This is a Class B product. In a domestic environment, this product may cause radio interference, in which case the user may be required to take adequate measures.
Z-Wave Home Automation Control Gateway HAC-1000 Table of Contents Chapter 1. Product Introduction ......................................................................5 1.1 Package Contents...............................................................................5 1.2 Overview.............................................................................................5 1.3 Specifications......................................................................................8 Chapter 2.
Z-Wave Home Automation Control Gateway HAC-1000 Chapter 1. Product Introduction 1.1 Package Contents The package should contain the following: z Quick Installation Guide x 1 z Wall-mounted & DIN-rail Kit x 1 z Power Adapter x 1 z Magnet Kit x 1 If any of the above items are missing, please contact your seller immediately. 1.
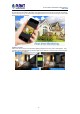
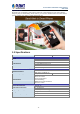
Z-Wave Home Automation Control Gateway HAC-1000 Real-time Monitoring IP cameras can be linked to PLANET HAC-1000 and Cloud Home app for remote monitoring. Users can keep an eye on their home on mobile phones over a secure connection to the Home Automation Control Gateway. Lighting Control Users can choose the most comfortable lighting brightness for the perfect atmosphere. They can also choose the right time to turn the light on for comfort, or to warn and prevent burglars from intruding the premises.
Z-Wave Home Automation Control Gateway HAC-1000 Personal Scene Mode In the "Scene" mode you can set everything you want in every room of your home for any activity or anything in-between from morning to night. An unlimited number of scenes can be created and customized to your personal preferences. Energy and Cost Saving on Every Room You can also check the current energy consumption in your home within the configuration interface of the HAC-1000.
Z-Wave Home Automation Control Gateway HAC-1000 Important Alerts Alerts like use of electricity, home alarms and more can be brought to your notice without delays by way of cloud hosting. From now on, you can have all these alerts no matter where you are, making your home a smart and secure one. 1.
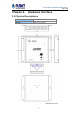
Z-Wave Home Automation Control Gateway HAC-1000 Chapter 2. Hardware Interface 2.
Z-Wave Home Automation Control Gateway HAC-1000 LED Color Description PWR Green Lights to indicate that the Switch has power. Lights to indicate the port is successfully established. LNK/ACT Green Interface Description Reset This button is hidden in the pinhole. This button is used to restore all the factory default settings. Please hold the reset button for about 10 seconds to load default. Blinks to indicate that the switch is actively sending or receiving data over that port. 2.
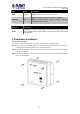
Z-Wave Home Automation Control Gateway HAC-1000 B. Magnet Installation To install the HAC-1000 on a magnetic surface, simply follow the following picture: C. Ethernet Connection There is a LAN port on the HAC-1000. Please connect to your router/switch. 2.3 Initial Utility Installation This chapter shows how to use utility to find the IP of your control gateway. The gateway is with the default settings.
Z-Wave Home Automation Control Gateway HAC-1000 Step 3: The window below will show the network information of control gateway. Before searching the IP, please make sure your PC is in the same IP segment as control gateway. Step 4: Modify the information in the red box and then click “Update Device”.
Z-Wave Home Automation Control Gateway HAC-1000 Step 5: Enter the password “admin”. After clicking “OK”, the information will change.
Z-Wave Home Automation Control Gateway HAC-1000 Chapter 3. Web-based Management Your control gateway is ready to put you in control of your home. Please take a few minutes to read through this guide to familiarize yourself with the steps required to set up your Z-Wave network and your control gateway. This chapter provides setup details of the control gateway web-based interface. 3.1 Introduction Control gateway can be configured with your web browser.
Z-Wave Home Automation Control Gateway HAC-1000 The current Network information of control gateway. 3.2.2 System Log This section provides the system log of recorded files. 3.3 System Configuration This chapter will cover the configuration of Administration, Time Synchronization, Firmware Update and Reboot. 3.3.1 System Here you can configure the basic aspects of your device like its time zone and language. 3.3.
Z-Wave Home Automation Control Gateway HAC-1000 3.3.3 Time Synchronization Synchronizing the system time. 3.3.4 Backup/Flash Firmware Parameters Backup Description To have a backup of all of the parameters, click this button. If necessary, it will then be possible to return to the previous settings if settings are changed and there is unexpected behavior. Click "Generate archive" to download a tar archive of the current configuration files.
Z-Wave Home Automation Control Gateway HAC-1000 3.4 Network Configuration Use this menu to configure the network to connect the device. There are three connection types: Static Address (Leased Line User) DHCP Client IP Address (Cable Modem User) PPPoE (ADSL Dial-up User) Step 1. Connect the Ethernet cable to your control gateway and to a network port on your internet router. Step 2. Connect your computer to the same internet router with control gateway. Step 3.
Z-Wave Home Automation Control Gateway HAC-1000 We suggest to use Static IP for HAC-1000 due to control pad need to set the IP of HAC-1000. If IP of HAC-1000 be changed, control pad can not connect with HAC-1000. 3.4.2 DHCP Client If you choose this connection type, please make sure your IP won’t be changed. When a DHCP server is installed on the network to issue IP address assignment. With this setting, the IP address is assigned automatically. 3.4.
Z-Wave Home Automation Control Gateway HAC-1000 Chapter 4. Z-Wave Setting Control gateway has three platforms available -- Web platform, iOS/Android platform and control pad platform. There is a menu of items like Room, Device, Camera, Scene, etc. where you can select to get the function you want done by clicking on the item. Parameters Description Logs of Z-Wave The Z-wave sensor information is shown here. The date and time are displayed at the top of the window.
Z-Wave Home Automation Control Gateway HAC-1000 4.2 Inclusion of Z-Wave Device The Devices tab enables you to manage devices included in the Home Automation System. Devices are plane system compatible sensors, IP cameras and door phone devices. To add a Z-Wave device, click Add. Once the system sets itself into learning mode, perform the tasks described in the manuals (see Appendix A and B).
Z-Wave Home Automation Control Gateway HAC-1000 Parameters Description ¾ Here different Z-Wave devices in a group can be connected. ¾ Z-Wave device without battery can use this button to check the status of devices. ¾ When Z-Wave device is dead, use this button to remove forcibly. 4.3 Inclusion of IP Camera To add a new IP camera, click Add. A new window will pop up, in which all camera configuration options will be available.
Z-Wave Home Automation Control Gateway HAC-1000 You can create and modify your camera list, based on the ICA-W7100 720p Wireless IR PT IP Camera to explain the application. 4.4 Scenes The Scenes tab lets the user create a scene by entering a scene name.
Z-Wave Home Automation Control Gateway HAC-1000 To open the new scene window, click Add. The new scene must be named and assigned to certain room for easier configuration after general parameters have been set. A Scene is a group of commands sent to user defined group of devices. You can set scenes to control your devices. Please refer to Appendix A or B to set the scene.
Z-Wave Home Automation Control Gateway HAC-1000 4.5 Trigger The Trigger tab lets the user create a trigger by entering its name, and then select a device, a mode and a scene. You can create a trigger when your device is selected, and set the mode and scene to “alarm” and “heater on”. Please refer to Appendix A or B to set the Trigger. 4.6 Schedule Using Schedule programs, you can easily program the devices’ schedule for the entire week. You can control your devices according to schedule.
Z-Wave Home Automation Control Gateway HAC-1000 4.7 Z-Wave You can view logs, topology and included/excluded devices. Z-Wave Logs Topology of Z-Wave devices This tab gives an overview of the network status and the availability of each device. Green block means connected. Gray block means disconnected. Z-Wave uses a source-routed mesh network topology and has one or more master controllers that control routing and security.
Z-Wave Home Automation Control Gateway HAC-1000 Removing a Device Already Connected Your Hub will enter exclude mode automatically when you remove a Z-Wave device from the Things page. This means you can delete the device from there as you normally would, just be sure to execute the required button press or exclusion process as outlined by the device's user guide. In order to exclude a Z-Wave device, you must have the physical device with you and be within range of the SmartThings Hub.
Z-Wave Home Automation Control Gateway HAC-1000 Appendix A: Configuring Z-Wave Device via Web Please refer to the following steps to add Z-Wave device via web. Step 1. Include a Z-Wave device via web. a) Go to "Z-Wave" and click "Device Configuration". b) Click” Include New Device” and the screen will appear with "Add Device: Waiting for a user action." c) Press the program switch button on the Z-Wave device to connect.
Z-Wave Home Automation Control Gateway HAC-1000 Step 2. Set up the location and room for Z-Wave device via web. a. Create rooms in your environment. b. Edit device. Step 3. Create a scene via web. a. Click “Create Scene” and name new scene. b. Select a device from this scene.
Z-Wave Home Automation Control Gateway HAC-1000 c. Select ON or OFF from this scene. d. You can click “RUN” to run this scene. Step 4. Create trigger via web. a. Click “Create a Trigger” and name new trigger. b. Select a Z-Wave device for this trigger. c. Select when it triggers, it will alarm or bypass. d. Select when it triggers, it will run which scene.
Z-Wave Home Automation Control Gateway HAC-1000 After entering the time selected for the scene to trigger, tick “Save and send alarm notification”. Tick “Active” to enable this trigger.
Z-Wave Home Automation Control Gateway HAC-1000 Appendix B: Configuring Z-Wave via Smart Phone The HAC-1100 can be used on iOS and Android operating system. Cloud Home can be downloaded at Google Play store or app store. Please refer to the following steps to install Cloud Home app and add Z-Wave device via smart phone. Before using Cloud Home app, please make sure your smart phone and your HAC-1000 are in the same subnet(connected to the same Wi-Fi router) so that you can find gateway. Step 1.
c. Make sure your smart phone and gateway are in the same LAN. e. Click the gateway to login. Z-Wave Home Automation Control Gateway HAC-1000 d. Find the gateway. f. - 32 - Setting.
Z-Wave Home Automation Control Gateway HAC-1000 g. Inclusion/Exclusion i. h. HZS-100: Use a paper clip or pin to press the program hole on the back of the HZS-100 for 3 times within 3 seconds to be included. - 33 - j. Click Inclusion to add device. HZS-200:Press the program button of the HZS-200 for 3 times within 3 seconds to be included.
k. HZS-300: Press the program button for 3 times within 3 seconds to be included. - 34 - Z-Wave Home Automation Control Gateway HAC-1000 l. HZS-530 Series: Press the program switch button 3 times within 3 seconds on the Z-Wave device to connect.
Z-Wave Home Automation Control Gateway HAC-1000 Step 2. Set up the location and room for Z-Wave device. b. Click “No Room” and will show the device. And place the new devices a. Create rooms in your environment. in a room. c. Select “Name” to name this device and select “Location” to place this device in the room that you created. - 35 - d. Select Picture for you Z-Wave device.
Z-Wave Home Automation Control Gateway HAC-1000 f. Done successfully. e. Click “Back” to save.
Z-Wave Home Automation Control Gateway HAC-1000 Step 3. Create a scene via smart phone. a. Click “Add” and name a new scene. b. Click “Add” to add a Z-Wave device. c. d. Click ON or OFF for the device you select. Select a Z-Wave device. f. e. Click “Back” to save. - 37 - Done successfully.
Z-Wave Home Automation Control Gateway HAC-1000 Step 4. Create Trigger via smart phone. b. Name this new Trigger. a. Click “Add”. c. Select the Z-Wave device and click next. d. Select a mode for a Z-Wave device. e. Select a scene. f. Select the time for the trigger and which scene to run. h. If you enable Save and send alarm notification, when it triggers, it will have a log. You can check this in Notification History. g. Done successfully.
Z-Wave Home Automation Control Gateway HAC-1000 Appendix C: Configuring the Schedule of Z-Wave Device A. Create schedule via web Step 1. Click “Create Schedule” and name a new schedule. Step 2. Select the day of a week and time of a day. Step 3. Select a scene when the time set is up. B. Create schedule via smart phone a. Click “Add”. b. Name this new Schedule. c. d. Select a scene and then click Save. Select a schedule.
Z-Wave Home Automation Control Gateway HAC-1000 Appendix D: Troubleshooting & Frequently Asked Questions Features Control gateway connects to router via wireless This difference between Z-Wave and ZigBee No, the antenna of control gateway is for Z-Wave device and cannot connect to router via wireless. z The frequency is different between Z-Wave and ZigBee. ZigBee is 2.4GHz and Z-Wave is about 900MHz. z The outdoor distance is different. ZigBee is 10~75 meters and Z-Wave is about 30 meters.
z Z-Wave device is dead Z-Wave Home Automation Control Gateway HAC-1000 Please install the control gateway at the center of Z-Wave devices. There is detection in control gateway. When Z-Wave device goes to sleep or gets disconnected with control gateway, you can press the button to awake the Z-Wave device.