G.
Copyright Copyright (C) 2003 PLANET Technology Corp. All rights reserved. The products and programs described in this User’s Manual are licensed products of PLANET Technology, This User’s Manual contains proprietary information protected by copyright, and this User’s Manual and all accompanying hardware, software, and documentation are copyrighted.
Table of Contents CHAPTER 1 OVERVIEW................................................................................ 1 SOFTWARE FEATURES...................................................................... 1 SOFTWARE SPECIFICATIONS........................................................... 1 ATM Protocol ........................................................................................ 1 PPP Support.........................................................................................
STU-R (CO) side ................................................................................ 16 STU-C (CPE) side .............................................................................. 17 Console Configuration ........................................................................ 17 3.3.5 Advanced Setup ............................................................................ 18 SHDSL ............................................................................................... 18 WAN .....
3.8.3 WAN.............................................................................................. 43 3.8.4 Bridge............................................................................................ 43 3.8.5 Route ............................................................................................ 44 3.8.6 LAN ............................................................................................... 44 3.8.7 IP share..................................................................
PLANET Technology Corp. GRT-101/401 User’s Manual Chapter 1 Overview Based on digital subscriber line (DSL) technology, PLANET’s G.SHDSL products, GRT-101/GRT-401 provide an affordable, flexible, efficient Internet access solution for SOHO customers while reducing deployment and operational costs from service providers.
PLANET Technology Corp.
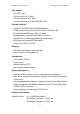
PLANET Technology Corp. Connector Cabling Requirement LEDs Speed Power Environmental Housing Dimension GRT-101/401 User’s Manual RJ-11 connector for WAN, RJ-45 connector for LAN G.SHDSL : AWG26 or higher 10 Base T: UTP/STP Category 3 or 5 SHDSL, Power Status, WAN Link and Action Status, LAN Link/Active (and 100M Status), Alram SHDSL: 192Kbps to 2.
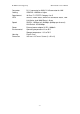
PLANET Technology Corp. GRT-101/401 User’s Manual Chapter 2 Installation 2.1 Front Panel LEDs The LEDs on the front panel indicate the operational status of GRT-101/GRT-401.
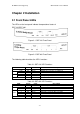
PLANET Technology Corp. GRT-101/401 User’s Manual 2.2 Rear Panel Ports The connectors on the rear panel provide Power, LAN, CONSOLE and LINE interfaces.
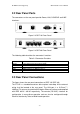
PLANET Technology Corp. GRT-101/401 User’s Manual NB PC RJ-45 cable DB-9 Cable Power Adapter Wall Jack Figure 2-2 Direct Connection with PC or NB Server File Server Workstation PC NB Mobile Device HUB/Switch RJ-45 cable Wireless LAN Power Wall Jack DB-9 Figure 2-4 Connection with Switch or HUB 2.4 Setting up the hardware environment Step 1: Connect the power adapter to the port labeled DC-IN on the rear panel of the product. Step 2: Connect the Ethernet cable.
PLANET Technology Corp. GRT-101/401 User’s Manual auto-MDI/MDI-X or not. If yes, both crossover and non-crossover Ethernet cable are suitable. If not, only non-crossover Ethernet cable could be used (refer to figure 2-4). Since GRT-401’s LAN port supports auto-MDI/MDI-X, both crossover and non-crossover Ethernet cable are suitable. Step 3: Connect the phone cable to the product. Connect the other side of phone cable to wall jack.
PLANET Technology Corp. GRT-101/401 User’s Manual Chapter 3 Configuration 3.1 Purpose This chapter provides information about configuring GRT-101/GRT-401. Note: After you have completed all necessary setting for GRT-101/GRT-401, make sure to write the new configuration to NVRAM by “write” command and reboot the system, or all of your changes will not take effect. 3.2 Logon Procedure There are three methods to logon to GRT-101/GRT-401: serial console, Telnet, and web interface.
PLANET Technology Corp. GRT-101/401 User’s Manual After you logon to GRT-101/GRT-401 and before proceeding any further, check the software version of GRT-101/GRT-401 by the command: admin> show system If firmware file is downloaded from our local distributor or FTP server, please refer to TFTP command in the section 3.18 Software Upgrade for more information on how to update GRT-101/GRT-401 firmware. 3.2.
PLANET Technology Corp. GRT-101/401 User’s Manual “root”. More security issues for remote management interfaces, please refer to section 3.15 Management Security. 3.3 Web operation and Quick Installation Guide 3.3.
PLANET Technology Corp. GRT-101/401 User’s Manual Web UI Configuration After connection via web browser, click Bridge to setup Bridging mode of the Router and then click Next for the next setting. Enter WAN1 VPI: 0 and VCI: 33. Select WAN1 AAL5 Encap: LLC Enter LAN IP: 192.168.0.1 Enter LAN Sub-net Mask: 255.255.255.0 Enter Gateway: 192.168.0.254 The Gateway is directly pointed to the BAS IP. Click Next Click OK to write the new configuration data to the flash memory of GRT-101/GRT-401.
PLANET Technology Corp. GRT-101/401 User’s Manual 3.3.2 Routing Mode for PPPoA and PPPoE with IP Sharing Web UI Configuration For Route Mode with Point-to-Point Protocol over ATM and Ethernet, follow the following setting. First select ROUTE and then click Next for setting others parameters. Enter VPI: 0 and VCI: 33 Select: LLC Select: PPP over ATM or PPPoE Click Next for ISP, LAN and DHCP server setting.
PLANET Technology Corp. GRT-101/401 User’s Manual Enter Default Gateway: 192.168.0.1 The Gateway is pointed to the LAN IP of GRT-101/GRT-401. Enter Subnet Mask: 255.255.255.0 Enter DHCP Client Start IP: 192.168.0.2 Enter DHCP Client End IP: 192.168.0.200 Enter Name Server: 192.168.0.1 The DNS server is embedded in GRT-101/GRT-401. Click Next to write the new setting. Click OK to write the new configuration data to the flash memory.
PLANET Technology Corp. GRT-101/401 User’s Manual 3.3.3 Routing Mode for IPoA or EoA Web UI Configuration For Route Mode with Classical IP over ATM and Ethernet over ATM, follow the following setting. First select ROUTE and then click Next for setting others parameters. Enter VPI: 0 and VCI: 33 Select: IP over ATM or Ethernet over ATM Click Next Enter WAN1 IP: 10.1.2.1 Enter WAN1 Subnet Mask: 255.255.255.0 Enter LAN IP: 192.168.0.1 Enter LAN Subnet Mask:255.255.255.0 Enter Default Route Gateway: 10.1.
PLANET Technology Corp. GRT-101/401 User’s Manual Note: You have to do that otherwise the new configuration parameters will not affect GRT-101/GRT-401. Click Restart to reboot GRT-101/GRT-401. GRT-101/GRT-401 will reboot with the new setting. Console Configuration Do the following settings: 1. User : admin É password: admin É 2. enable É supervisor password: root É 3. setup É mode É Route É 4. wan É Interface number (1~8) : 1 É protocol É IPoA or EoA É address É 10.1.2.1 É 255.255.255.
PLANET Technology Corp. GRT-101/401 User’s Manual 3.3.4 LAN-to-LAN Connection with Bridge Mode Web UI Configuration STU-R (CO) side Click setup to setup the bridge as CO. Follow the instruction. Click SHDSL in left side scroll bar to setup the SHDSL operation mode. Click CO SIDE for setting the bridge as CO. Click Finish for saving the setting. Setup the CO Router in bridge mode. The gateway of CO Router is pointed to LAN IP, 192.168.0.2, of CPE Router.
PLANET Technology Corp. GRT-101/401 User’s Manual STU-C (CPE) side Follow the above instruction. The only difference in this configuration is that users have to choose CPE SIDE instead of CO SIDE. Setup the CPE Router in bridge mode. The gateway of CPE Router is pointed to LAN IP, 192.168.0.1, of CO Router. Console Configuration Do the following steps in STU-R side: 1. User : admin É password: admin É 2. enable É supervisor password: root É 3. setup É mode É Bridge É shdsl É STU-R É 4.
PLANET Technology Corp. GRT-101/401 User’s Manual 3.3.5 Advanced Setup Advanced configuration contains SHDSL, WAN, Bridge, Route, NAT/DMZ and Virtual server parameters. SHDSL You can setup the Annex type, data rate and SNEXT margin for SHDSL parameters in SHDSL. Click SHDSL Annex Type: There are two Annex types, Annex A and Annex B, in SHDSL. Data Rate: you can setup the SHDSL data rate in the multiple of 64kbps. SHDSL SNEXT margin: the margin range is from –10 to 10.
PLANET Technology Corp. GRT-101/401 User’s Manual The WAN Number 1 will be the parameters setup in Basic Setup. If you want to setup another PVC, you can configure them in WAN 2 to WAN 8. Please enter the necessary parameters. After inserting the parameters, please press Finish to complete WAN configuration. . The screen will prompt the parameters that will be written in GRT-101/GRT-401. Please confirm these parameters before writing in machine.
PLANET Technology Corp. GRT-101/401 User’s Manual parameters or press continue to setup another parameter. Bridge The bridge mode can be setup the static bridge parameters. Click Bridge to start Bridge configuration. Press Add to add the static bridge information. The screen will prompt the parameters that will be written in GRT-101/GRT-401. Check the parameters before writing in machine. Press Restart to restart GRT-101/GRT-401 working with new parameters or press continue to setup another parameter.
PLANET Technology Corp. GRT-101/401 User’s Manual With Dynamic Routing, you can enable GRT-101/GRT-401 to automatically adjust to physical changes in the network’s layout. The Cable/DSL Firewall Router, using the RIP protocol, determines the network packets’ route based on the fewest number of hops between the source and the destination. The RIP protocol regularly broadcasts routing information to other routers on the network. Click Route to modify the routing information.
PLANET Technology Corp. GRT-101/401 User’s Manual RIP Mode: this parameter determines how the product handle RIP (Routing information protocol). RIP allows it to exchange routing information with other router. If set to Disable, the gateway does not participate in any RIP exchange with other router. If set Enable, GRT-101/GRT-401 broadcasts the routing table of GRT-101/GRT-401 on the LAN and incoporates RIP broadcast by other routers into it’s routing table.
PLANET Technology Corp. GRT-101/401 User’s Manual NAT/DMZ NAT (Network Address Translation) is the translation of an Internet Protocol address (IP address) used within one network to a different IP address known within another network. One network is designated the inside network and the other is the outside. Typically, a company maps its local inside network addresses to one or more global outside IP addresses and reverse the global IP addresses of incoming packets back into local IP addresses.
PLANET Technology Corp. GRT-101/401 User’s Manual addresses (eg: 192.168.0.10 ~ 192.168.0.50) collectively use two of the global IP addresses (eg: 69.210.1.9 and 69.210.1.10). The Multi-NAT table will be setup as; Virtual Start IP Address: 192.168.0.10 Count: 40 Global Start IP Address: 69.210.1.9 Count: 2 Press Finish to continue. The screen will prompt the parameters that will be written in GRT-101/GRT-401. Check the parameters before writing in GRT-101/GRT-401.
PLANET Technology Corp. GRT-101/401 User’s Manual 3.3.6 Administration This session introduces security and simple network management protocol (SNMP) and time synchronous. Security For system secutiry, suggest to change the default user name and password in the first setup otherwise unauthorized persons can access GRT-101/GRT-401 and change the parameters. There are three ways to configure GRT-101/GRT-401, Web browser, telnet and serial console. Press Security to setup the parameters.
PLANET Technology Corp. GRT-101/401 User’s Manual SNMP Simple Network Management Protocol (SNMP) is the protocol not only governing network management, but also the monitoring of network devices and their functions. GRT-101/GRT-401 can generate SNMP traps to indicate alarm conditions, and it relies on SNMP community strings to implement SNMP security. This gateway support MIB II. Click SNMP to configure the parameters. In the table of current community pool, you can setup the access authority.
PLANET Technology Corp. GRT-101/401 User’s Manual Community: it serves as password for access right. After configuring the community pool, press OK. Click Modify to modify the trap host pool. Version: select version for trap host. IP: type the trap host IP Community: type the community password. Press OK to finish the setup. The browser will prompt the configured parameters and check it before writing into GRT-101/GRT-401.
PLANET Technology Corp. GRT-101/401 User’s Manual the Internet. SNTP can be used when the ultimate performance of the full NTP implementation. For SNTP, select SNTP v4.0. SNTP service: Enable Time Server: All of the time server around the world can be used but suggest to use the time server nearby. Time Zone: you have to choose the right time zone. Press Finish to finish the setup. The browser will prompt the configured parameters and check it before writing into GRT-101/GRT-401.
PLANET Technology Corp. GRT-101/401 User’s Manual Upgrade You can upgrade the gateway using the upgrade function. Press Upgrade. Browse the file and press OK button to upgrade. The system will reboot automatically after finishing. Restart For restarting GRT-101/GRT-401, click the Restart in UTILITY menu. Press Restart to reboot GRT-101/GRT-401. 3.3.
PLANET Technology Corp. GRT-101/401 User’s Manual 3.4 Command Line Interface For serial console and Telnet management, GRT-101/GRT-401 implements two operational interfaces: command line interface (CLI) and menu driven interface. The CLI mode provides users a simple interface, which is better for working with script file. The menu driven interface is a user-friendly interface to general operations. The command syntax for CLI is the same as that of the menu driven interface.
PLANET Technology Corp. GRT-101/401 User’s Manual Note: GRT-101/GRT-401 invokes menu driven interface when first time logon with default user profile “admin”. Both interfaces have on-line help information. To get on-line help, type “?” for CLI mode or press CTRL+Q for menu driven interface. 3.4.1 Multi-level password protection When you login via serial console or Telnet, GRT-101/GRT-401 defaults to a program execution (read-only) privileges to you.
PLANET Technology Corp. GRT-101/401 User’s Manual The following command select CLI mode for user profile 1: admin# admin user modify 1 attrib command To save your changes enter: admin# write To enable your changes, reboot the system: admin# reboot For the menu interface, there is a method to enable CLI mode temporarily for script input. By pressing CTRL+U simultaneously, you can see the CLI system prompt in the command line window: Command Line Window...
PLANET Technology Corp. GRT-101/401 User’s Manual by supervisor password. On the other hand, unauthorized user cannot change any configurations but viewing the status and configuration of GRT-101/GRT-401 and using ping command to make sure machine network status.
PLANET Technology Corp.
PLANET Technology Corp.
PLANET Technology Corp.
PLANET Technology Corp. GRT-101/401 User’s Manual To start machine configuration, please move the cursor “ >>” to enable and press enter key. GRT-101/GRT-401 will prompt for password for enable mode, insert the supervisor password. (Default supervisor password is root.) . ---------------------------------------------------------------------Command: enable Message: Please input the following information.
PLANET Technology Corp. reboot ping admin utility exit GRT-101/401 User’s Manual Reset and boot system Packet internet groper command Setup management features TFTP upgrade utility Quit system 3.4.4 Status You can view running system status of SHDSL, WAN, route and interface via status command. Move cursor “ >> “ to status and press enter. >> shdsl wan route interface Show SHDSL status Show WAN interface status Show routing table Show interface statistics status 3.4.
PLANET Technology Corp. GRT-101/401 User’s Manual 3.4.7 Reboot To reboot GRT-101/GRT-401, use reboot command. Move cursor to “ >> “ to write and press enter. --------------------------------------------------------------------Command: reboot Message: Please input the following information. Do you want to reboot? (y/n): y --------------------------------------------------------------------- 3.4.8 Ping Ping command will be used to test the connection of router.
PLANET Technology Corp. GRT-101/401 User’s Manual telent in user profile table however users who have the supervisor password can change the configuration of GRT-101/GRT-401. Move the cursor “ >> “ to user and press enter key. >> clear modify list Clear user profile Modify the user profile List the user profile You can delete the user by number using clear command. If you do not make sure the number of user, you can use list command to check it.
PLANET Technology Corp. GRT-101/401 User’s Manual 3.5.5 SNTP Time synchronization is an essential element for any business that relies on an IT system. The reason for this is that these systems all have clocks that are the source of time for files or operations they handle. Without time synchronization, time on these systems varies with each other or with the correct time and this can cause- virtual server schedule processes to fail and system log exposures with wrong data.
PLANET Technology Corp. GRT-101/401 User’s Manual 3.8 Setup All of the setup parameters are located in the subdirectories of setup. Move the cursor “ >> “ to setup and press enter.
PLANET Technology Corp. GRT-101/401 User’s Manual configure n is 0, the product will perform as adaptive mode. There are two types of SHDSL Annex type, Annex-A and Annex-B. Clear command can clear CRC error count. Generally, you cannot need to change SNR margin, which range is from 0 to 10. 3.8.3 WAN GRT-101/GRT-401 supports up to 8 PVC, private virtual circuit, and so you can setup eight WAN, WAN1 to WAN8. Move the cursor “ >> “ to wan and press enter. To setup WAN1, type 1.
PLANET Technology Corp. GRT-101/401 User’s Manual the cursor “ >> “ to bridge and press enter. >> gateway static Default gateway Static bridging table You can setup default gateway IP via gateway command. You can setup 20 sets of static bridge in static command. 3.8.5 Route You can setup the routing parameters in route command. If the product is configured as a bridge, you do not want to setup the route parameters. Move the cursor “ >> “ to route and press enter.
PLANET Technology Corp. GRT-101/401 User’s Manual 3.8.9 DNS proxy You can setup three DNS servers in the product. The number 2 and 3 DNS servers are option. Move cursor “ >> “ to dns_proxy and press enter. ---------------------------------------------------------Command: setup dns_proxy [IP] [IP] Message: Please input the following information. DNS server 1 (ENTER for default) <168.95.1.1>: 10.0.10.1 DNS server 2: 10.10.10.1 DNS server 3: ---------------------------------------------------------- 3.
PLANET Technology Corp. GRT-101/401 User’s Manual 3.9 Connection Mode GRT-101/GRT-401 supports two connection modes: bridging and routing. Currently, it comes pre-configured with routing mode. Note that, routing mode and bridging mode cannot be used simultaneously.
PLANET Technology Corp. GRT-101/401 User’s Manual from Wide Area Network (WAN) interface. The following procedure shows how to set up GRT-101/GRT-401 for bridging management with IP = 192.168.0.1, subnet mask = 255.255.255.0, and gateway IP = 192.168.0.254: admin# setup lan 1 address 192.168.0.1 255.255.255.0 admin# setup bridge gateway 192.168.0.254 The IP address should be an IP address on the same network as that of the “far-end” station.
PLANET Technology Corp.
PLANET Technology Corp. GRT-101/401 User’s Manual 3.11.2 Static routing table In order to pass data through a network and onto the Internet or WAN, you might need to add the IP addresses of gateways to the static routing table. Follow the instructions below to build a static routing table manually by adding or deleting entries in the table. For example, to add a route to network address 140.182.1.0 with subnet mask of 255.255.255.0 via gateway at 140.182.2.254: admin# setup route static add 140.182.1.
PLANET Technology Corp. GRT-101/401 User’s Manual admin# write 3.11.3 NAT/PAT NAT can be used to share an Internet connection, to reduce the requirement for publicly assigned IP addresses, to expand an existing network without affecting existing IP based account schemes, and to hide an internal network schema from public networks. It is often used in the situation where only one IP address could be assigned for the network, such as a PPP connection to an local ISP, e.g.
PLANET Technology Corp. GRT-101/401 User’s Manual only possible when the number of hosts having concurrent requests to the external network is equal to or less than the number of external IP addresses on GRT-101/GRT-401. To setup GRT-101/GRT-401 working for the above situation where WAN 1 is used to connect to the corresponding ISP, use the below commands: admin# setup lan 1 attrib Virtual admin# setup ip_share nat global interface 3 1 admin# setup ip_share nat global range 3 69.210.1.
PLANET Technology Corp. GRT-101/401 User’s Manual To show the configuration, use the list command: admin# setup ip_share nat fixed list Note: The maximum number of entries in the NAT fixed IP address mapping pool is 128. To save your changes, enter: admin# write Another function provided by this GRT-101/GRT-401 NAT/PAT is the virtual server mapping. Specific ports on the WAN interface (e.g., WAN 1) are re-mapped to services inside the LAN. As only 69.210.1.8 (e.g.
PLANET Technology Corp. GRT-101/401 User’s Manual admin# write 3.11.4 DHCP server The DHCP server application automatically assigns IP addresses to DHCP clients. Follow the steps below to enable the DHCP applications. The example sets a DHCP server, which could service 50 DHCP clients. The available IP addresses for DHCP clients are located from 192.168.0.2 to 192.168.0.51. In this example, the LAN environment is configured with gateway of 192.168.0.1 and subnet mask of 255.255.255.0.
PLANET Technology Corp. GRT-101/401 User’s Manual addresses of real DNS servers: admin# setup dns_proxy 168.95.1.1 168.95.192.1 140.92.61.55 Note: For PPP connections, GRT-101/GRT-401 will get DNS server IPs from ISP and assign them into DNS proxy automatically if they have been pre-configured by the local ISP. The maximum number of DNS servers is limited to 3. To save your changes, enter: admin# write 3.
PLANET Technology Corp. GRT-101/401 User’s Manual Also, GRT-101/GRT-401 allows you to assign the connection rate directly by setting the N parameter of “n*64” command: admin# setup shdsl n*64 <0~36> where “0” indicates that the adaptive mode will be used to automatically train up to the ideal line speed. The other valid value of N parameter ranges between 3 and 36. Do not set the N value to 1 or 2.
PLANET Technology Corp. GRT-101/401 User’s Manual VC when communicating across your local ISP network. For bridging mode operation, you should select Ethernet over ATM (RFC 1483 bridged Ethernet) as the ATM protocol. For routing mode operation, GRT-101/GRT-401 supports Ethernet over ATM (RFC 1483 bridged Ethernet), IP over ATM (RFC 1483 routed IP/RFC 1577), PPP over ATM (RFC 2364), and PPP over Ethernet (RFC 2516).
PLANET Technology Corp. GRT-101/401 User’s Manual 3.12.3 ATM traffic shaping The objectives of ATM traffic management are to deliver quality-of-service (QoS) guarantees for the multimedia applications and provide overall optimization of network resources. Currently, GRT-101/GRT-401 supports two kinds of ATM QoS service: constant bit rate (CBR) and unspecified bit rate (UBR). The CBR connection involves a static amount of bandwidth allocated for those applications of video, voice, and circuit emulation.
PLANET Technology Corp. GRT-101/401 User’s Manual 3.12.4 WAN IP address Note: This sub-section is for routing mode operation with protocol of “Ethernet” and/or “IPoA” only. For PPP connections, it is unnecessary to set the WAN port IP address and subnet mask. To set the WAN 3 with IP address of 192.168.3.3 and subnet mask of 255.255.255.0, follow the following example: admin# setup wan 3 address 192.168.3.3 255.255.255.
PLANET Technology Corp. GRT-101/401 User’s Manual admin# setup wan 3 isp pppoa3@isp.com Fuyg47ds 10 To review the new configuration you have configured, type: admin# setup wan 3 list Int. ISP account username Idle time ---- --------------------------------- --------WAN 1 WAN 2 WAN 3 pppoa3@isp.com 10 WAN 4 WAN 5 WAN 6 WAN 7 WAN 8 Note: The ISP account information would not be shown if the corresponding WAN port is disabled. The account information is provided from your local ISP.
PLANET Technology Corp. GRT-101/401 User’s Manual list of applications and interfaces that provide status, enter: admin# status ? shdsl Show SHDSL status wan Show WAN interface status route Show routing table To display specific information, for example, for the SHDSL interface status and performance, enter: admin# status shdsl SHDSL mode :SHDSL CPE Side Bitrate :512kbps Tx Power :13.5dBm Current SNR Margin :10.8dB Attenuation :35.
PLANET Technology Corp. Flag Destination / GRT-101/401 User’s Manual Netmask / Gateway Interface Portname ---- ------------------------------------------ ------------ --------S 0.0.0.0/ 0.0.0.0/ 200.0.8.254 200.0.8.1 C 200.0.8.0/ 255.255.255.0/ directly 200.0.8.1 C 192.168.0.0/ 255.255.255.0/ directly 192.168.0.218 127.0.0.1/255.255.255.255/ directly C WAN1 WAN1 LAN 127.0.0.1 Loopback 3.
PLANET Technology Corp. GRT-101/401 User’s Manual Legal access user profile No User Name UI Mode ---- ------------------ ----------1 titan 2 test 3 (Empty) 4 (Empty) 5 (Empty) Command Menu To delete user profile 2, enter: admin# admin user clear 2 To save your changes, enter: admin# write 3.
PLANET Technology Corp. GRT-101/401 User’s Manual admin# write 3.15.2 Legal client IP You could assign the legal client IP addresses such that only Telnet clients and web browsers at the legal client IP addresses can access GRT-101/GRT-401. The following example specifies a legal IP address 192.168.0.6 in the pool. admin# admin security ip_pool modify 1 192.168.0.6 The maximum number in the legal IP pool is limited to 10.
PLANET Technology Corp. GRT-101/401 User’s Manual 3.16 SNMP Support In addition to managing GRT-101/GRT-401 by means of the command-line applications and web browsers, you can manage the unit by using a simple network management protocol (SNMP) management station. GRT-101/GRT-401 can generate SNMP traps to indicate alarm conditions, and it relies on SNMP community strings to implement SNMP security. Currently, SNMP (RFC 1157) and SNMPv2c (RFC 1901) agents are implemented.
PLANET Technology Corp. GRT-101/401 User’s Manual 3.16.2 SNMP trap GRT-101/GRT-401 can generate alarm conditions to SNMP manager via SNMP traps. The following example configures trap 1 with SNMPv2c encapsulation. The SNMP manager is located at 192.168.0.254 with community “private”. admin# admin snmp trap 1 edit 2 192.168.0.
PLANET Technology Corp. GRT-101/401 User’s Manual Showing System Configuration... setup mode Route setup shdsl mode STU-R setup shdsl n*64 0 setup shdsl type Annex_A setup shdsl margin 0 setup wan 1 protocol IPoA setup wan 1 address 192.168.1.1 255.255.255.0 setup wan 1 vpi_vci 0 32 setup wan 1 encap LLC setup wan 1 qos class UBR setup wan 1 qos pcr 2400 setup wan 1 isp test test 10 ... admin snmp trap 3 edit Disable 192.168.0.254 private admin snmp trap 4 edit Disable 192.168.0.
PLANET Technology Corp. GRT-101/401 User’s Manual them into the console CLI via your Telnet program or terminal access program. Watch the system messages to ensure every command was accepted by the system successfully. Note: The Telnet program is recommended during backup process. If only the serial port could be used, carefully add some delay by adjust the line and/or character delay for your terminal access program so that all command could be accepted by the system without error.
PLANET Technology Corp. GRT-101/401 User’s Manual Connecting... Download Byte Transferred : 624641 bytes Complete Transfer Complete, Replace Now? (y/n): y Writing flash....................... OK! Do you want to reboot? (y/n): y Be sure to write the new image to NVRAM and immediately reboot the device to activate it. When you log back onto GRT-101/GRT-401 after the reboot, then you can use the “show system” command to verify the version of the new firmware that is active, and restore your configuration.